HOME | DD
 Caerban — Labyrinth Map Tutorial

Published: 2011-12-08 16:51:56 +0000 UTC; Views: 2289; Favourites: 24; Downloads: 27
Redirect to original
Description
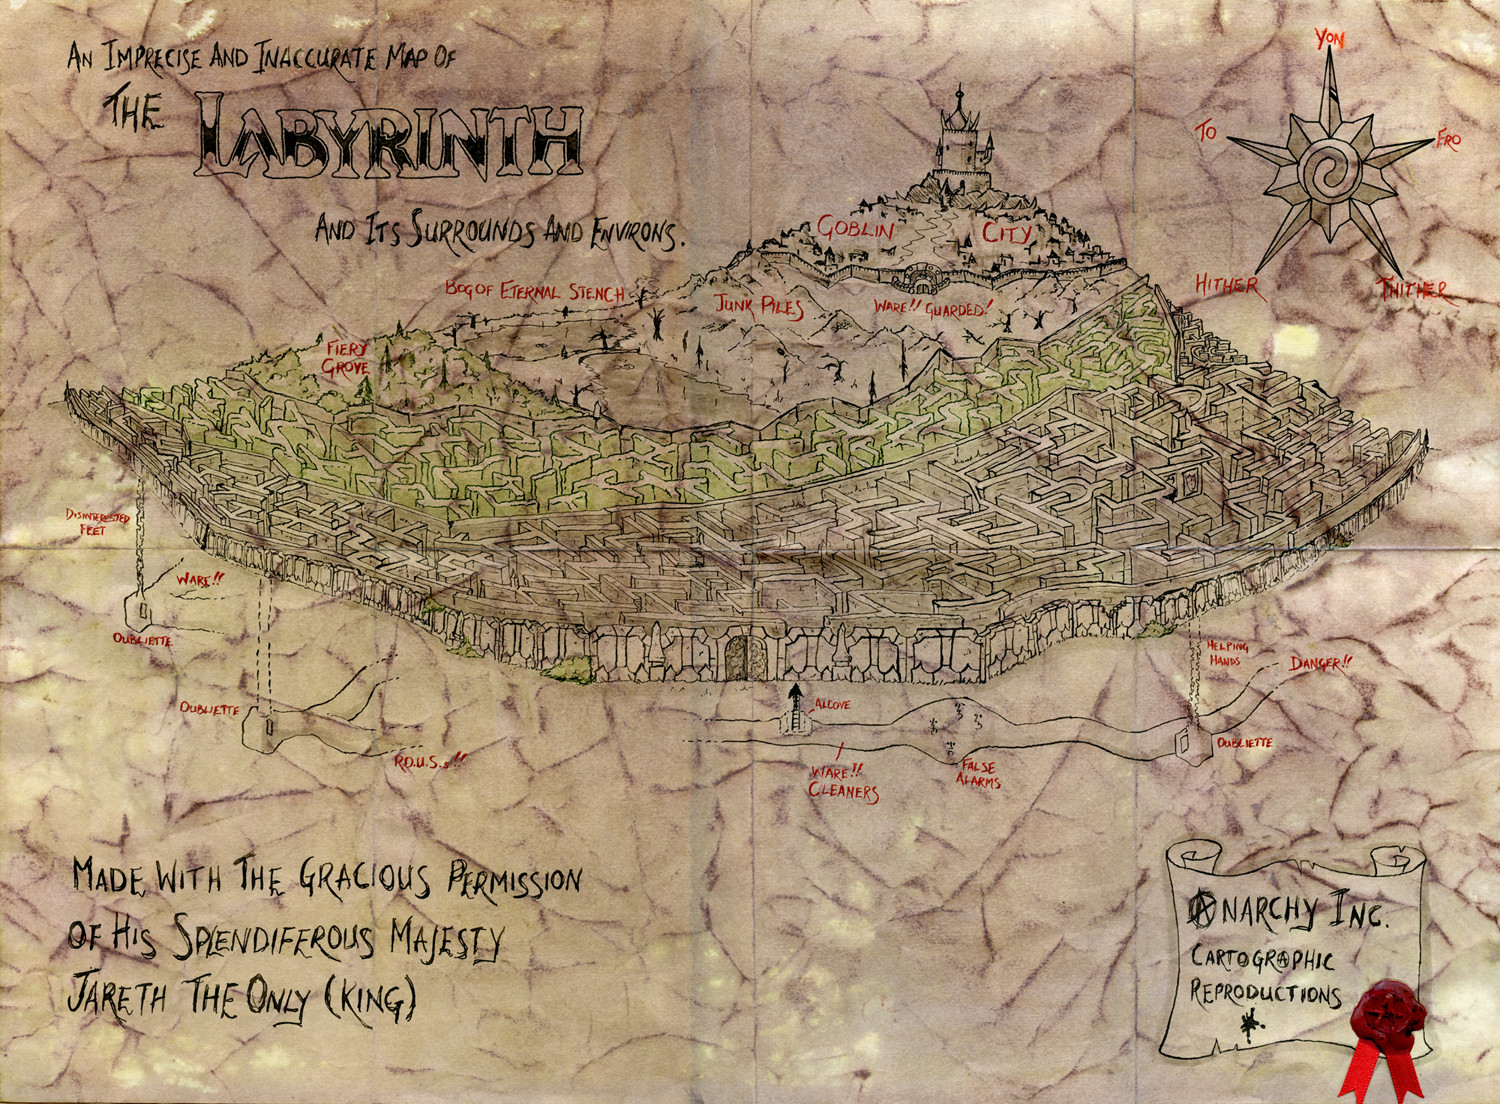
A while back someone asked me if I could do a sort of tutorial for the Labyrinth map and recent activity on the gallery reminded me. I happened to have kept a record of what I did so here's a sort of WIP/Tutorial/step-by-step.1) First I drew it out in pencil... no that's a lie... lets have a 0)
0) Research. It's really important most of the time but it was crucial for this. I watched the movie a ton of times with notebook in hand and made accurate thumbnails of the distinctive features of the different bits of the labyrinth and notes on the order of events from the story. Then I scoured the internet for all the artwork/stills I could from the film. This wasn't such a big task as I already have a mountain of Froud/Hensen books with that sort of stuff in.
1) THEN I drew it out in pencil, incorporating everything I could and trying to be aware of the order and therefore distance into the Labyrinth they occurred. I did it on a relatively cheap A3 sketch paper because it actually looked really... erm... "mappy" to begin with.
2) I started inking with a high quality waterproof black draughtsmans ink and crowquill dip pen. I started with the more geometric parts of the Labyrinth, the walls and hedges.
3) Then I added the warning lettering in a rusty red waterproof (these waterproofs are important
 (Smile)") ) acrylic ink.
) acrylic ink. 4) Next I finished the black inking of the more sketchy, artistic bits.
5) Colour was added to some bits using green and sepia waterproof inks.
6) And when it was dry I folded it neatly to get nice folded map lines (it fits into a leather map wallet I had). Then I did this, crumpling it up. Heartstopping moment. Why? There are no pics for this but let's call it...
6a) I opened it up and rubbed some brown Distress Inks all over it. It transferred very strongly to the fold and crumple lines. Then I squirted it with water liberally from a plant mister let the Distress Inks run a bit then laid it out to flatten and dry on a piece of plastic in the airing cupboard. You can see why drawing in waterproof ink was important now
7) Finishing touches. Once dry I ironed it flat with a cool iron then refolded the map folds to get them nice and sharp again. Then I waxed the surface with repeated rubbing of a candle to give it a nice feel and protect it. Finally I used some red sealing wax and ribbon to finish it off. The seal is an anarchy symbol I carved out of baked FIMO. Anarchy Ltd is the faux-company that produces all my hand-made gifts to people
I hope this is of some help. I can't imagine it's anything you don't already know but sometimes it's nice to see the process
")
Related content


Comments: 57

I dunno, you seem to be keeping up the arty levels.
👍: 0 ⏩: 1

Haven't found anyone else near me (Arkansas) on here. Right now I'm trying to convince my friends that we need to have an arts and crafts night once a week. LOL
👍: 0 ⏩: 1
Good luck! I've got some quite arty/crafty friends and now with the puppetry I'm getting lots of new friends who put my skills to shame.
👍: 0 ⏩: 0
Thanks and thanks for the fav. People asked me for a tuturial/step-by-step ages ago but in wasn't until someone favourited the original photo in the gallery today that I remembered

👍: 0 ⏩: 0

thats super nice dood. i gotta try that sometime since i just learned how draw level design. this work is fantastic
👍: 0 ⏩: 1
Thanks! If I can do it anyone can, you just need the inspiration
👍: 0 ⏩: 0
<= Prev |