HOME | DD
 Gorgonzola — Portrait step by step
Published: 2012-03-13 15:26:17 +0000 UTC; Views: 359; Favourites: 0; Downloads: 3
Redirect to original
Description
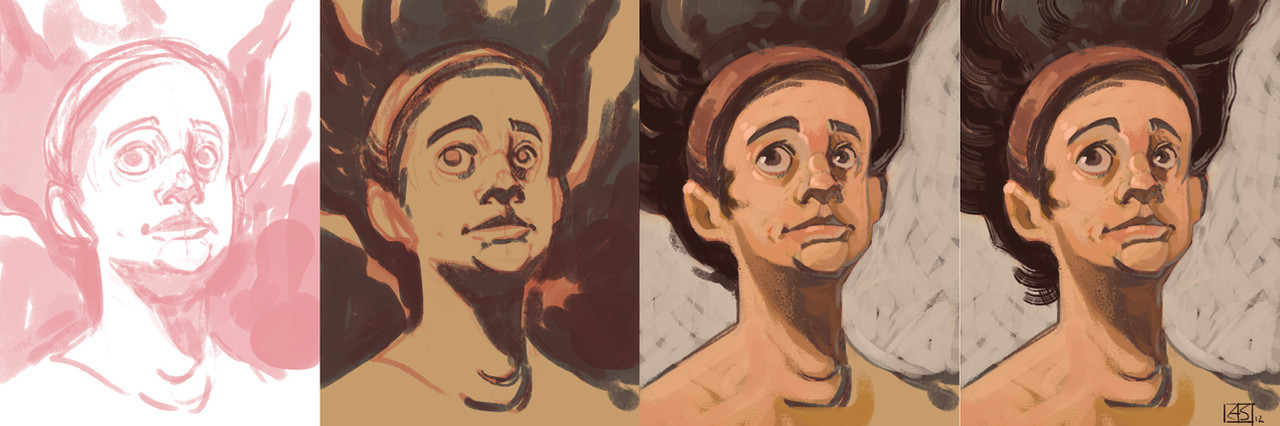
*Click on download image to get the full size version*Here's a step by step of one of the lunch portraits I've begun to do. A quick breakdown:
Sketch: I use a red and lay in a sketch of the portrait. This could be as tight or as loose as I want, but the main key I want in these is to mass shadows. It should already read pretty well as a face at this stage. Once it's ready for the next step I knock the opacity back to somewhere around 30-40%.
Value wash: Multiply layer, I put down a light base color, then paint dark shadow masses on top. I am not concerned with modeling at this point, instead I'm reinforcing shadow decisions to help with the next stage. For this one I chose browns, but for example in "portrait 2" I used blues. Really whatever floats your boat, but I try to be mindful of the colorcast I want the portrait.
Painting: This is the workhorse layer. Normal layer, a hard round brush with a texture applied (set to height,) and opacity turned on (though the minimum is set to 45, a CS5 feature. If I didn't have that, it'd probably be turned off and flow turned on instead.) I dabble some color here and there to establish my palette. I'm trying to keep my values pretty distinct, so in the light side any plane changes are done with color and not really so much with value...of course, this won't always be the case. There's a lot more to this than can be covered in quick blurb.
Finishing: I use a rake smudge brush to soften some of my edges. Hard edges everywhere doesn't help lead the eye, but all soft edges makes everything mushes. Be thoughtful about how you use the smudge tool! I prefer to err on the side of too little as opposed to too much. Once it's all done I put my signature on it and save it.