HOME | DD
 InsaneRoman — Create A Winter Icon!
Published: 2013-10-12 01:00:29 +0000 UTC; Views: 3471; Favourites: 107; Downloads: 242
Redirect to original
Description
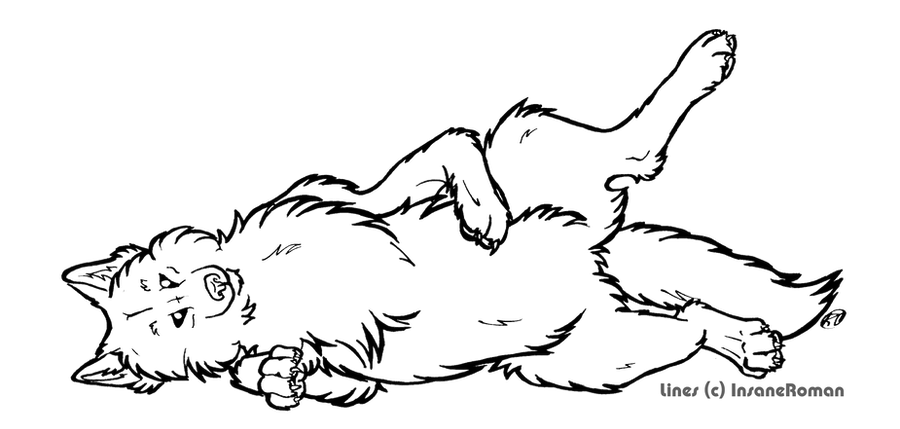
Hello, and welcome to Create A Winter Icon! 
Templates like these often get a lot of comments, so I encourage you to read this first. I'm going to explain everything step by step. If you still need personal help, comment below and I'll get back to you at my earliest convenience. 
RULES:


 (Smile)")
THE STEPS:
1) Download the .PSD file to your computer. Once it's saved, open it up. Everything is done for you but the coloring, including the animation. I wouldn't recommend moving layers around as it will mess it up when it comes time to save it as your animated icon. Please also note that the lines/snow layers cannot be edited to add hair or accessories. Sorry for any inconvenience there.

2) To get started, select the color layer and customize it as you please to suit your character, etc. If you want to add markings or complex color patterns, you can add more layers above the current color layer but below the shading layer. Don't forget the scarf!
3) Once you have the character colored, you can choose one of the provided backgrounds or make one of your own. Make sure only one of the background layers is selected as visible. If you want to create your own background, select the blue one and edit as you please, or if you want to have the background transparent, choose the transparent background layer and deselect all other backgrounds.
4) Everything all colored? Click Image > Image Resize > and choose the pixel size you want. For use on dA, you'll want 50x50.
5) Ready to animate. Wait -- I already did that for you! Just click File > Save for web and devices > The bottom of the right side is "Looping Options", choose "Forever" and Save!
6) All done!

Related content


Comments: 52

I think they have a version of photoshop for free on the adobe website?
👍: 0 ⏩: 0
<= Prev |