HOME | DD
 liiga — Eye tutorial

Published: 2004-08-23 22:51:02 +0000 UTC; Views: 140240; Favourites: 3016; Downloads: 35733
Redirect to original
Description
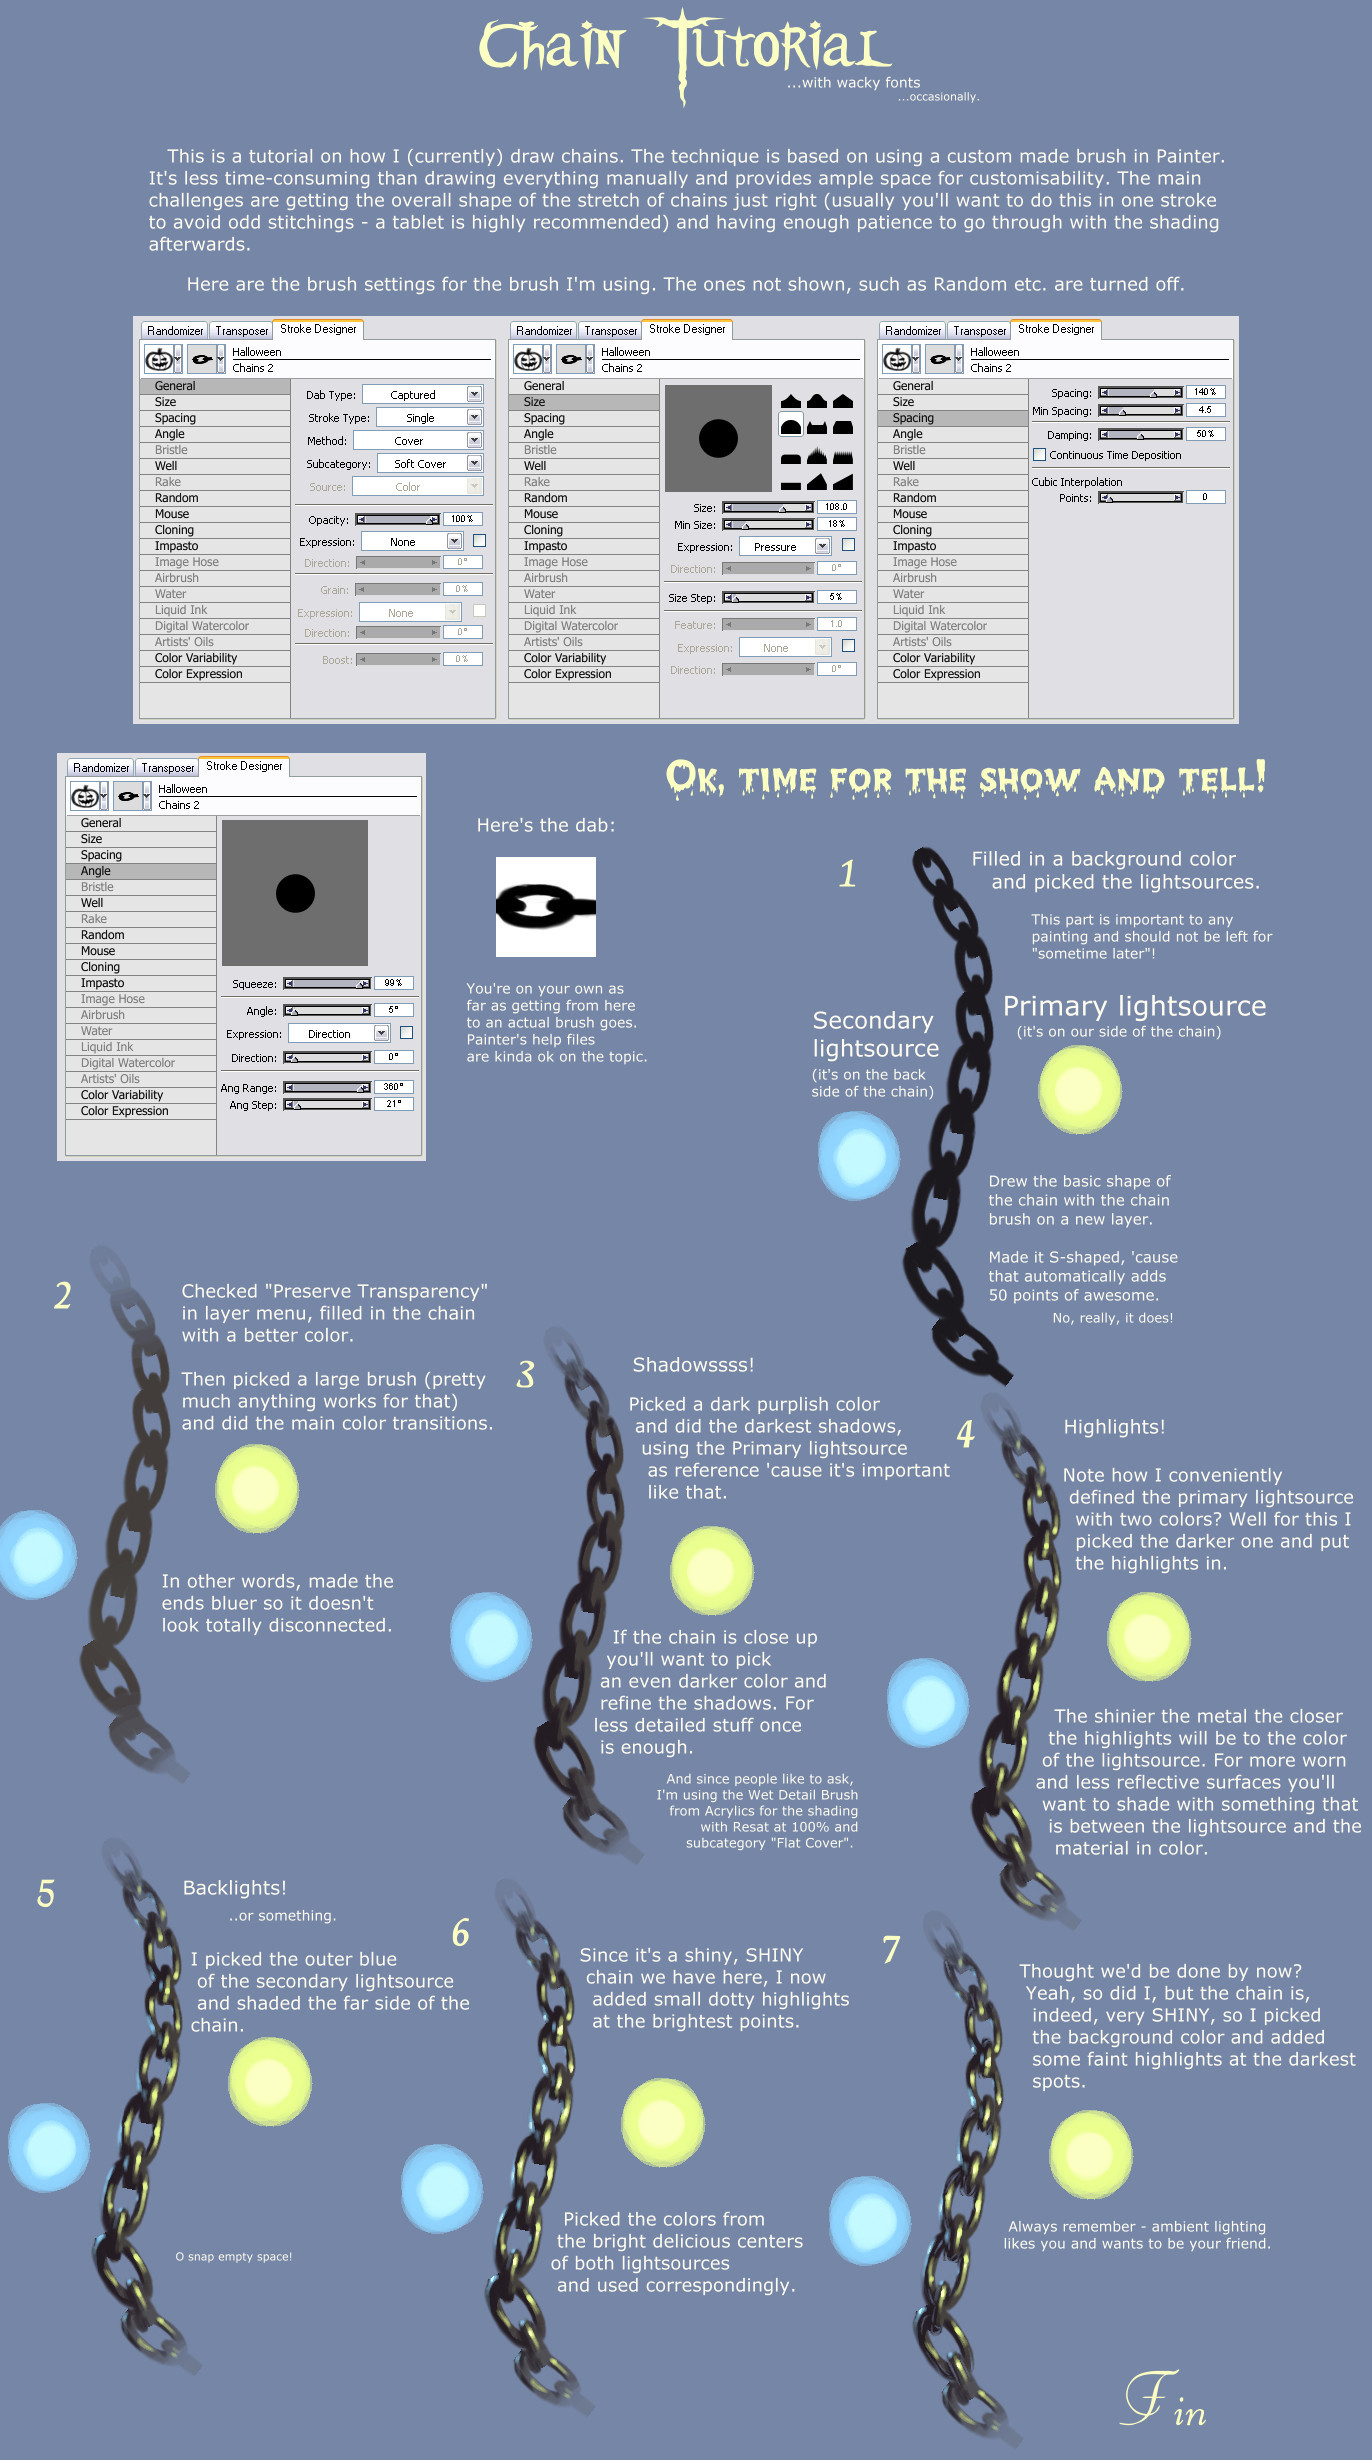
Alright, I've been asked a few times lately about how I draw eyes and why they're so 'spooky', so here's a short tutorial explaining the underlying ideas. Normally I'd refine the whole thing much further, but for a tutorial, this should work.Before we start: It really helps if you think about the 3d shape behind what you're drawing, and the structure. That's what references and anatomy books are great for. You can learn to repeat step-by-step tutorials of course, but they are mostly meant to illustrate application of various principles and techniques, not as ways cast in stone that you must follow. They're just a basic carcas for you to build your own ideas around.
 (Smile)")
Alright, with that out of the way, on to the tutorial.
1. Draw the basic shape of the eye. Note, how the inner corner (the one closer to the nose) is lower than the outer corner. Also keep the eye somewhat roundish, but not like a circle. Remember that the eye is a ball in the socket of the skull, and the eyelids are flexible tissues at the surface of this ball.
2. Deciding where the pupil will be. Sort of basic. Making some tiny adjustments to the outline, and marking where the eye ends at the inner corner. There's that red tissue at that place, we'll touch it up a bit later. Notice, how making this line at the inner corner curved helps to define the roundness of the eyeball.
3. Now it's getting more interesting. The arrow marks the direction of light (I picked a random one in this case). Now, note that the pupil part is like a water droplet on the eyeball - if you look at anatomy books or reference, or just look at someone sideways while they're staring at something, you'll see how it protrudes a bit from the eyeball's round surface.
So, we mark the big, famous speck of light that is reflection on the surface of the eye in the direction of light (counting from the black hole). Now, on the opposide side of the pupil, we mark a lighter region, that is hit by light that went through the transparent outer layer of the eye and didn't get lost in the black hole. Make sure to not pose that secondary reflection on a random place - put it where the light would actually go. (You find that place by drawing a line from the lightsource through the big white speck of light and through the black spot.)
4. Now we proceed to shade the eyeball itself. Shading the white part of the eye is often omitted, and causes flatness. When you shade, make sure that you figure out where those shadows are coming from, and don't just put them evenly all around. In this case, the upper eyelid is the main cause of shadow at the top and to the right, and the curved surface of the eyeball causes the less concentrated shadow at the bottom and to the left.
Important! Do NOT shade with gray, unless you're drawing the whole thing grayscale like I just did. The eyeball is a reflective surface and there's plenty of tiny tiny bloodvessels in it, so it will NEVER be gray (unless you're an alien in a gray gray world *cough*). Instead use desaturated beige or orange or red - depending on the colors of surroundings and the skin.
5. This is the final stage for this tutorial, although normally I'd be taking it further and refining it a whole lot. What happens here is mostly 'refinement', and shading of eyelids. Notice, how in 4. a small white speck appeared at the outer edge of the pupil. It is not a smudge, but a reflection. In 5., I've made this reflection brighter. I often put some at the edge of the pupil to show that the pupil shares the surface with the eyeball and they're both glistening with moisture. It makes the eye look rounder, more three-dimensional.
Notice that the eyelids got hit with some shadows and, importantly, highlights as well. The lower eyelid got a light highlight along its edge, because the light comes from above, and it has an edge that the light usually lands on. It got a shadow to the right to separate it from the eye a bit, creating the impression of eyeliner or eyelashes.
 (Wink)")
Note that at the inner corner, I put some shading and highlights at the little reddish tissue that is at the corner of the eye. It's where the tears come from. Usually it's wet, and tends to glisten. Great thing for adding detail and stressing the roundness of the eyeball.
I also hit the pupil with additional detail, because usually you see all those tiny tiny patterns going on in eyes that make them so much more interesting. I encourage you to develop them further if you're going for a detailed style or just want to give those eyes an extra punch - but remember, those patterns shouldn't be more important than the feeling of volume and depth, so make sure not to kill the shadows and highlights when drawing them.
---------------------------------------- ----------------------------------------
Note: This eye was drawn using a Trust tablet, and Corel Painter, the brush i used is Wet Detail brush 5 from Acrylics. It's not special in any way, I use it 'cause it's smooth and smudgy. Smudgyness can be adjusted or just carried out with airbrush or smudge tool. And since I've heard this one before too many times: it's not about the tablet.
Here's the same technique used with a mouse: [link]
Related content


Comments: 97

Thank-you - this is very helpful! This works for pencil sketching and digital painting, the eye looks great and I know it will help me improve!
👍: 0 ⏩: 0

wow thanks for the tutorial its will help me on drawing eyes thanks XD
👍: 0 ⏩: 0

I love eyes, but I can never get them right. Thank you.
👍: 0 ⏩: 0

wow...thanks for the tutorial...im practicing to draw realistic eyes much further ^^
👍: 0 ⏩: 0


wow i didn't even know i had to worry about some stuff you said X___x i usually have not much patience and wanna finish the faces quickly (specially the eyes and mouth). with this tutorial i totally got inspired to draw a lot of eyes <3 i wanna practice them to become as good as this for now. thank.you so much xx chuu
👍: 0 ⏩: 0


I love eyes, especially tinkering with how to draw them, but I never got them right. This would be so much help!
Though, I've a question: How do you draw a pair of eyes so that they remain, more or less, of equal size? Practice, or is there a trick somewhere?
-ddM
")
👍: 0 ⏩: 1

I'm glad to hear it's helpful. ^_^ As for the equal size, if it's a dead-on view, you can just take a ruler to them or something. If it's not, it's more or less a matter of practice and observation although you can always draw a few parallel lines to make sure at least vertically the eyes are of the same size, if that makes any sense.
👍: 0 ⏩: 0


Thanks for your tutorial, it really made me want to start drawing..Which I did
Here is a [link] for the eyes I made.
And thaaaaaaanks again xD
")

👍: 0 ⏩: 0


can TRUST tablet work on vista?
reply as possible please.
👍: 0 ⏩: 1
No idea. o_O Try Googling for it, or maybe there's something on their website about it.
👍: 0 ⏩: 0

This is good; This a really helpful tutorial, I appreciated what you done, Thank you!! ^^
👍: 0 ⏩: 0
this is good. this is a helpful really tutorial. I appreciated what you done. Thank you!! ^^
👍: 0 ⏩: 0

wow!..good lesson how to draw eyes!..thnx...;]*..
P.S. good idea!...^^
👍: 0 ⏩: 0

Oh, thank you! This is the first eye tutorial that I'm pleased with my final result (very pleased^^) and the only tutorial which didn't make me pull my hair.
thank you!
👍: 0 ⏩: 0

all of your tutorials seems so fantastic. Although a lot of them are in programs don't have when it comes to digital painting ie corel. The way you have stepped them out seems like I will be able to learn the steps in other programs eaily enough (not in 2 seconds but still easily enough). Thankyou so much for putting these tutorials up for people
👍: 0 ⏩: 0

thats very useful hopefully i'll do something as good as in there...
👍: 0 ⏩: 0


I like how you don't just tell people to do it a certain way because that's how you do it, you actually explain why you do things a certain way so it's more realistic and anatomically correct.
Very helpful!
👍: 0 ⏩: 0

Your tutorial was clearly worded and straight to the point,just how I like 'em.Well done.
👍: 0 ⏩: 0


Great tutorial. At first I didn't realize it was paint, because i was looking at the thumbnail...but it was still very useful for me, even though I use a different medium.
Great job!
👍: 0 ⏩: 0


wow, those eyes look really cool. I struggle a bit with eyes so I'll keep this for ruture reference.
👍: 0 ⏩: 1
Thanks! Glad you found this useful! ^^
👍: 0 ⏩: 0

Oooh!! Cool!
Thank you liiga, this will come in very handy!!
Jimzip
👍: 0 ⏩: 0

Thanks for such a great demonstration on the the effects of light through the iris as far as shading and highlight! I have had numerous discussions with felow artists on there placement...never could get them to understand the concept!! thanks also for basic eye construction!!
👍: 0 ⏩: 0


slshimerdla [2004-08-24 01:42:39 +0000 UTC]
Ahh, what a wonderful tutorial! You generally see people focusing on the starburst effect on the iris too much and the lighting effects on the eyeball too little. Awesome job - I definitely learned a few things.
👍: 0 ⏩: 1
Thanks! I'm happy you found this tut useful. ^_^
👍: 0 ⏩: 0

Lovely....you're great at painting eyes!
👍: 0 ⏩: 1