HOME | DD
 LionHeartCat — How to draw Cateyes with Colouredpencils
#cat #cats #eye #tutorial #coloredpenciltutorial #how_to_draw_cat_eyes #how_to_draw_a_cats_eye #tutorial_cat_eyes #tutorial_coloredpencils #cateyes #catseye #coloredpencil #coloredpencilart #coloredpencildrawing #coloredpencils #colouredpencils #how_to_draw #howtodraw #traditionalart #traditionaldrawing #tutorials #tutorialdrawing #tutorialhow #tutorialhowto
Published: 2022-09-02 18:07:35 +0000 UTC; Views: 4135; Favourites: 89; Downloads: 2
Redirect to original
Description
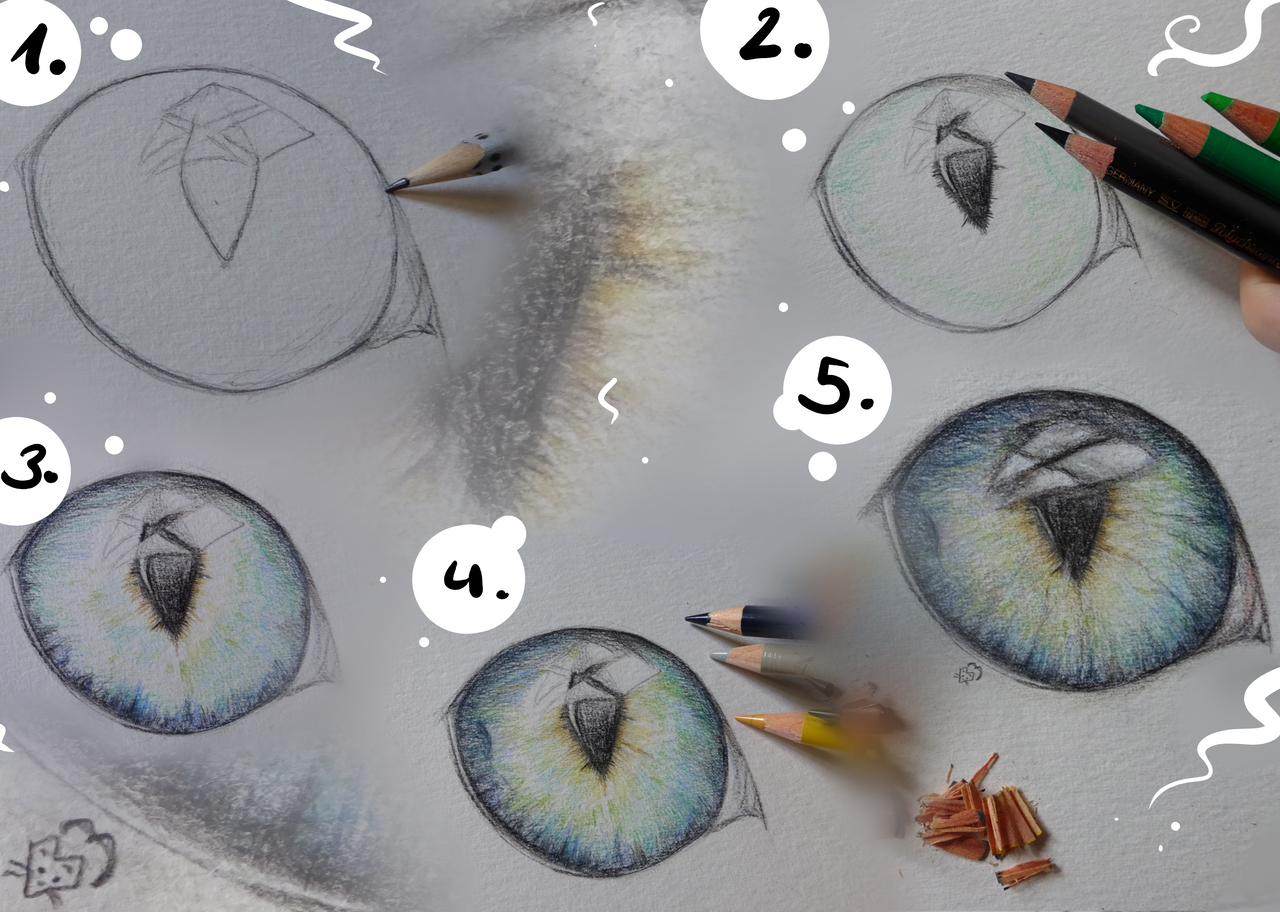
I have already made a more detailed tutorial on this topic. Here's the link: How to draw a Cat's Eye with Colored PencilsHey! I'm not really experienced in creating tutorials. So, I hope I'm doing everything right here xD I decided to make a tutorial about drawing cat eyes. With colored pencils. I think you can do a lot with colored pencils that I didn't know before. But enough written. I hope my tutorial is understandable and can help you. And I wish you a LOT of FUN drawing ^^ I would like to reiterate that any steps or sentences I have written are coincidence if they have ever existed. Because I thought up all the sentences myself :3 ************************************************************************************************************* Step 1Sketch a cat's eye with a pencil. If you need, then take a reference. There are many different eye shapes in cats. Depending on the incidence of light, the pupil is also narrower and smaller (with more light) and down and larger (with less light), but you know that for sure ^^Also draw the light in the eyes. For example, if the cat is indoors, the light will be window-like. So, you can see in the cat's eyes where the light shines through the windows. But a light reflection can also just be a point, depending on how the light comes. With cute cats, the light reflection is usually drawn larger :),Step 2With a black pen, outline all the lines you have sketched in pencil, except for the light reflection. I'll get to that later. But be careful when you draw with black: Black blurs very quickly and can destroy your picture right from the start! So be careful. If you have now also colored the pupil, draw small lines from the pupil with your black pen, which really needs to be sharpened very finely. So, now the colors come into play: Just press very lightly on the paper with your pencils and lightly hatch parts of the area. It can help if the pencil isn't fully sharpened (as you can see in the picture).Hatch with your colors especially on the edge where the shadows are. As you can see, the preparations alone for making an eye like this take quite a long time, so don't give up right away!!,Step 3You can see that I'm a bit further now: I used and combined a lot more colors. It's pretty dark at the edge. For this I used black, gray and very dark blue. With the gray I mixed the green tones a bit. You've probably already realized that I've always worked in lines towards the center. All strokes usually start at the edge and then end at the pupil. Around the pupil it is brown rather than blue. I can explain the colorfulness of the picture very simply: The reference I used was a small cat that was just changing its eye color from blue (as small cats usually have) to green (at least I suspect that their eyes were once turn green) :3 The strokes, which are a bit longer than the others, are also witig. And on the left is another "line" that doesn't fit into the pattern of the others. Well, you probably already know what I meant by that: Right - veins. They are also important because they make the eye look more alive. However, don't overdo it with veins (not like I used to do xD) Actually, I used a few more colors than those shown in the picture. But I think those are about the most important...,Step 4Over time, I pressed harder and harder on the paper while drawing and drew more and more lines. There are more shadows at the edge of the eye, so it's darker there too, while lighter colors were used in the middle. So, well, I'm actually done now. I didn't get the light so well and erased a lot. I also worked with white here and - I have to admit - also with a gel pen. Yes, I guess I still have to practice xD I also painted the pupil a bit with black and tried to make the eye look "wet" with light gray in some places. Well, I just painted over it and saw what happens And that's exactly what I would recommend to you: You are the artist! You can decide how your picture should look like in the end!!!,And yes, you're done now! It took me about 1 1/2 hours for this eye. But of course you can also sit longer on such an eye. First of all... well, I'm not a professional, I just drew randomly. Of course I get a lot of inspiration from friends and artists here on DeviantArt and on other platforms on the internet as well. I've also watched tutorials and I'm always amazed at how much you can draw, how realistic, etc... It's amazing what things I've seen!!! So yeah I hope this tutorial helped you :3 Thanks for reading about it or something... Here is the tutorial again at a glance. I ended up shooting a different version with the light, but like I said, I tinkered around a lot (because I can't do it myself xD),And now I finally got around to uploading the short version here ^^ I hope you can do something with it
 (Smile)")
Related content


Comments: 2

👍: 1 ⏩: 0

👍: 1 ⏩: 0