HOME | DD
 Lithographica — Muttaburrasaurus (2 of 3... WITH TUTORIAL NOTES!)
Published: 2014-05-29 11:28:22 +0000 UTC; Views: 1407; Favourites: 10; Downloads: 2
Redirect to original
Description
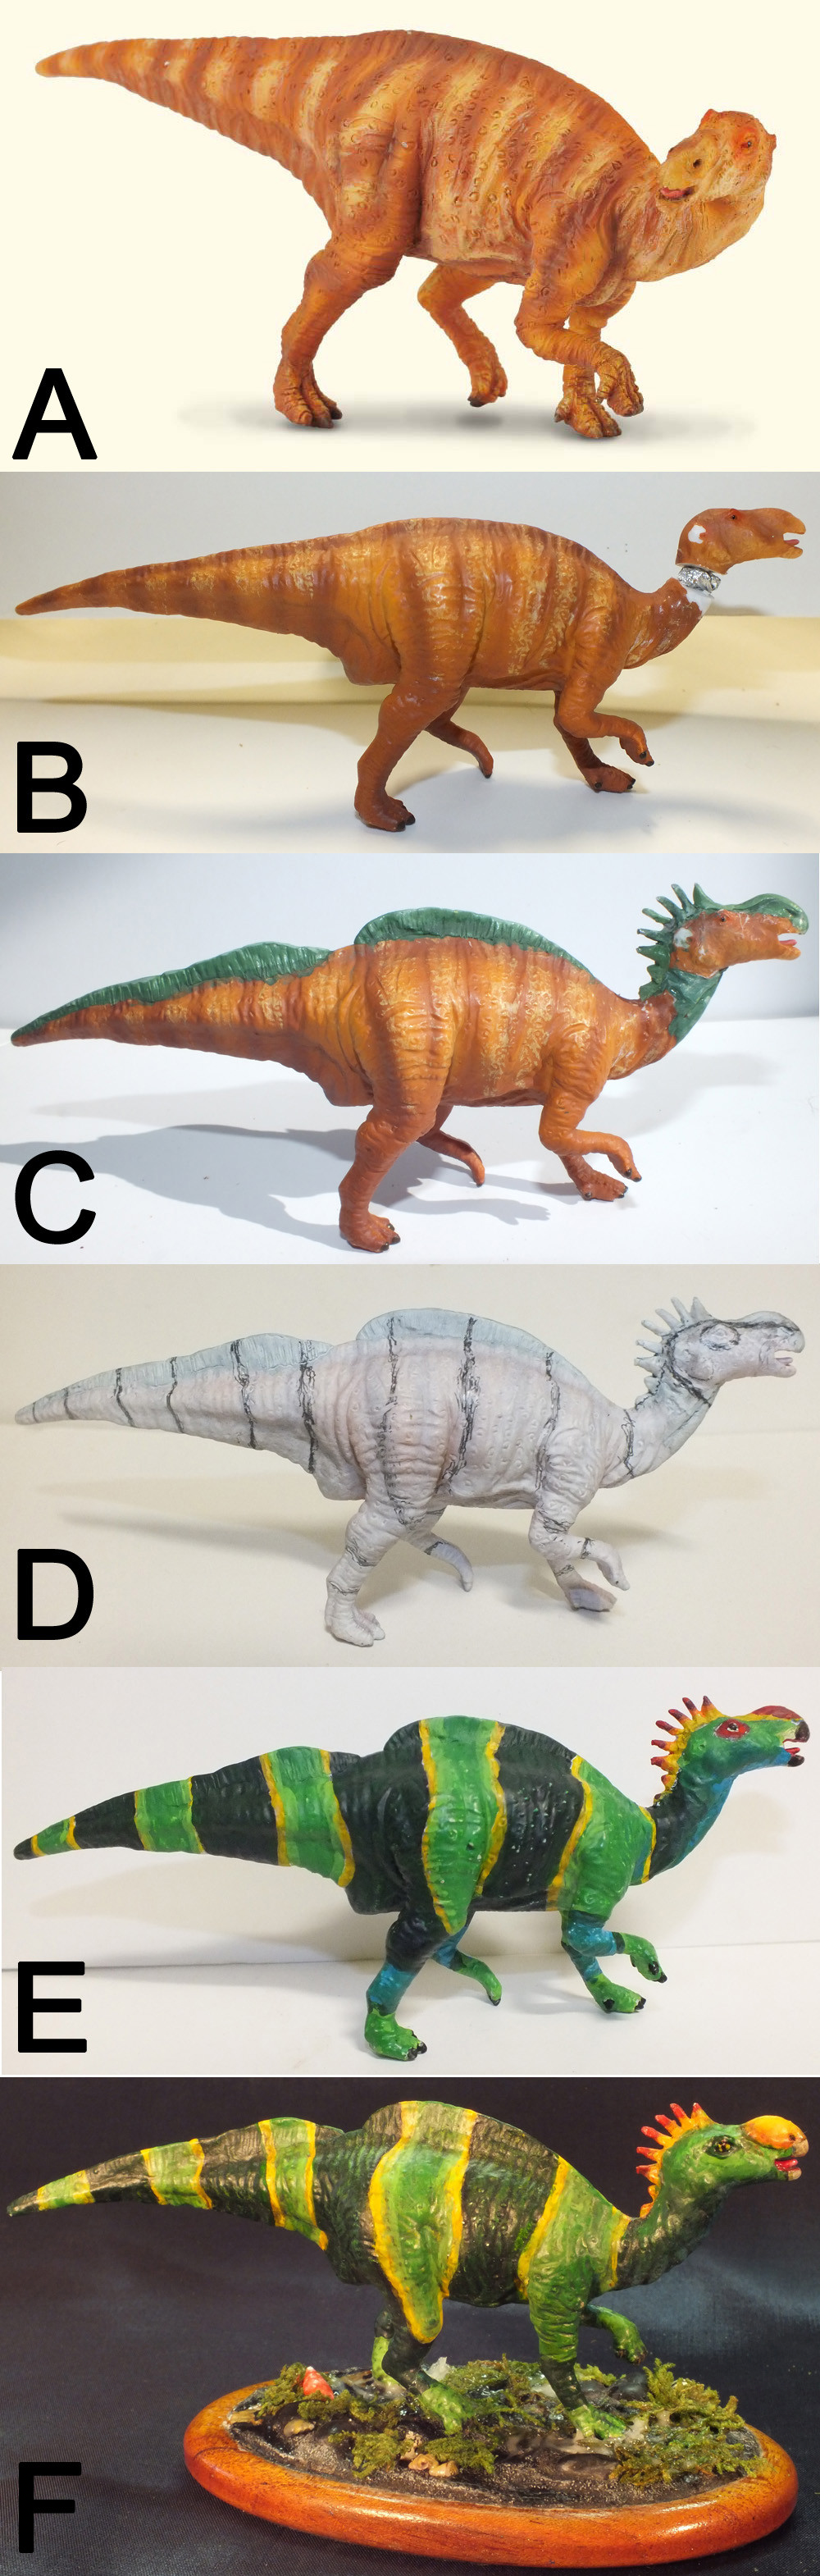
Here is a montage showing the conversion and repaint of my Muttaburrasaurus model by CollectA. If you are interested in trying your hand at converting and repainting toy figures but have no idea how to get started, then check it out!
A) This is the model as sold by CollectA (the image is from their web page). It's an OK model of an interesting dinosaur species. Note the rather plain brown colour scheme, and the head, which is turned sharply at ninety degrees. This means the figure displays well at some angles, but not others.
B) Here I have cut off the head, and repositioned it to make the neck straighter. The mechanical strength for the join comes from a short length of wire that was glued into receiving holes drilled into the neck and body. The wire was then packed around with crumpled aluminium foil to build up the basic contours of the neck again (using aluminium foil for this is cheaper and more lightweight than epoxy putty). By the way, note the white patch on the side of the head - believe it or not, the original model has what appears to be ear lobes! These are of course unrealistic for a reptile, and it was the work of a moment to whittle these back with a craft knife. By the way, BREIFLY immersing the model in near boiling water (straight from the kettle) makes it much easier (and safer!) to cut with a saw or craft knife.
C) Here I have used the two-part epoxy putty known to model-makers as "green stuff" to remodel the figure (the best and cheapest sources I have found for green stuff are on eBay). First, I applied a thin layer of green stuff over the tinfoil around the neck, and sculpted it to match the skin folds of the surrounding model. With care, and a few simple tools such as toothpicks and pencil-tips, sculpting epoxy putty like this is not as hard as you might think. Having repositioned the neck, I still thought the model looked a bit plain, so using more green stuff I added a (purely speculative) crest along the tail and back. I also exaggerated the "nose bump" that is the most distinguishing feature of Muttaburrasaurus, and added some (again, purely speculative) non-bony spikes on the back of neck. The spikes were made using green stuff over short lengths of wire - it's always best to reinforce green stuff in this way if you can, because otherwise it is very brittle and prone to snapping.
D) The conversion work has now been completed, and the model has been primed with a white undercoat. Specialist primers for models are available in spray cans, the advantage of these being a microscopically-thin paint thickness which won't obscure that precious surface detail that you need to preserve at all costs! In principle, you could do away with a primer and apply repaint colours straight over the original model, but I prefer to work over a white undercoat, because it brings out the full brightness and intensity of the repaint colours, and it also gives a better "tooth" to the surface which makes paint grip to it more readily off the brush. It's also rather easier to design a completely new colour scheme when starting from a blank white "canvass" as it were. Here you can see I'm roughing out the colour-scheme markings in pencil.
E) Here the model is "blocked out" in the new colour scheme. The idea at this initial stage of painting is to just to establish the correct outlines and cover up all that white undercoat with colour (this flat colour provides the base for the dry-brushing, blending and washing techniques that come later). The colours at this point are fairly flat and uniform, and not especially life-like. Incidentally, when you compare this picture with the finished model depicted below you can see how my colour choices changed slightly as the model progressed - for example, I did away with the red on the nose "bump"... because it was far too reminiscent of Rudolf the reindeer!
F) Here is the finished model. Once the main colours are blocked-in, the "special effects" used in painting models such as blending, dry-brushing and washing can be used to help bring out the surface detail and create more of an illusion of a large scale three-dimensional form. I won't go into detail about these painting effects here, but just Google the terms and you will find plenty of on-line tutorials. Even though they are very different techniques, the basic principle behind dry brushing, blending and washing is the same - to eliminate expanses of flat colour, and instead introduce gradations of tone that mimic the natural play of light across a large-scale three-dimensional form.
Also depicted in this picture is the diorama base that I made for the model. The base itself is varnished timber with the terrain surface built up in plaster of Paris and sand. I depicted the Muttaburrasaurus walking along a beach of volcanic black sand - complete with splashing puddles, washed up seaweed and prehistoric seashells. The seaweed is dried moss, made to look wet with varnish, and the huge prehistoric seashells (I was thinking of ammonites) are actually the tiniest shells I could find at the beach, painted up in bright colours to make them look "fresh". Scenic bases like this are always worth considering for your models. There is no end of "scenery" products available for model railroads that make them relatively easy to make, and a good diorama base will vastly enhance the visual impact of your work!
Well, if you are new to the hobby of converting and repainting toy figures I hope this little tutorial might encourage you to give it a go. It's really not as hard as you might think, and if you start out with a relatively cheap toy figure or model to begin with, you don't have much to lose anyway!  (Smile)")