HOME | DD
 mahgnitton — Colour separation TUT
Published: 2007-02-22 23:01:21 +0000 UTC; Views: 30730; Favourites: 381; Downloads: 0
Redirect to original
Description
Edit , since I uploaded this I have had quite a few s and only 1 comment, if you want to fav it ( which I am very gratefull for ) could you please comment a few words to say what you like about it, how you would use the tutorial and if you found it helpfull so I can see what people like and in turn make more tutorials techniques similar. Also any techniques you would like to know will get a respose aswell... Thanks.
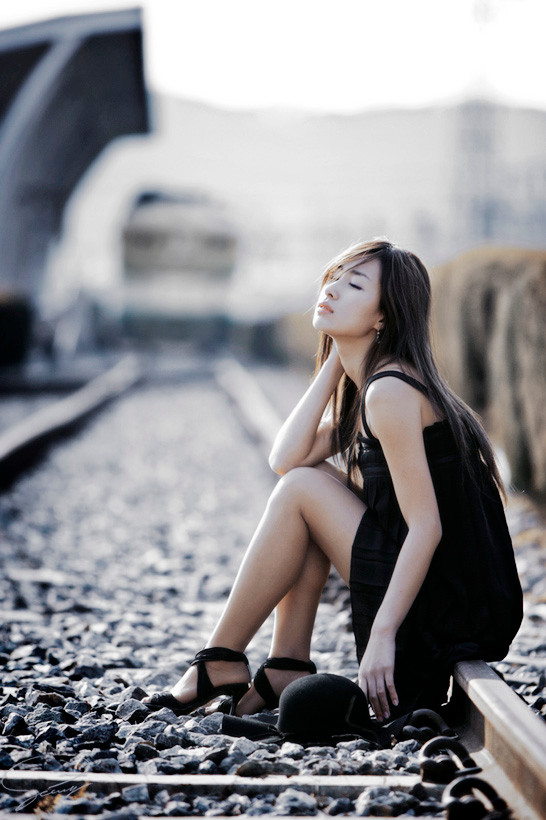
I wanted to create an image that separates the subject ( girl ) from the rest of the background without messy cut outs, with no portraits worth working on of my own I used this image here ~katayestyle
 (Smile)")
Limitations
This tutorial is best used on an image with mid to strong colour contrast between the subject and background to start off with, if you need to put a bit more contrast in the subject then use the sponge tool set to saturate at 20% , it is also done using Photoshop CS2, no plugins are used and the tools, adjustments can be translated to other apps.
1> Open the image to be edited and goto Image>adjustments>
 hoto filter.
2> Change the filter to Cooling filter (80) or (82) to give the entire image a colder look ( tanslation for other apps that don't have this feature you can use something like Color balance )
3> Goto Image>adjustments>selective color. and under the red channel move the yellow or red slider to add more warmth to the subject ( translation this can also be done with Color balance in other apps )
4> repeat steps 2 and 3 if required to vary the strength of the color contrast between blues and yellow/red ( depending on the original contrast )
5> Goto the layers pallet and click on Channels, hold the CTRL button down and left click on the blue channel to select the blues in the RGB image.
6> Goto select>Inverse to change the selection so it selects everything EXEPT the blue in the RGB image.
7> Edit>copy Edit>
aste to copy the selection into a new layer then duplicated that layer so you have 3 layers, original layer and the 2 selections.8> choose the middle layer and change it's blend mode to "Screen" then choose the top layer and change it's blend mode to "soft light"
9> select the original layer and Goto Image>adjustments>desaturate to make that layer B&W
If you have followed all the steps you will get an image that makes the subject look warm on a B&W background with a slight cold blue cast to it, once you get this you could do it again and add a lot more artistic effects to it.
Just remember that if you like the image then applause the Photographer here ~katayestyle and if you like the tutorial then comment bellow
Related content


Comments: 99

nice picture.
the tutorial was really helpful. thank you!
👍: 0 ⏩: 1

no problem I'm glad it helped, thanks for commenting and not just Faving
👍: 0 ⏩: 0


the tutorial works great. It has some great tips regarding tones which is great, and I'll definitely use it for future portraits/modelshots. Thank you for posting!
👍: 0 ⏩: 1
no problem and thanks for the comment to go with the
👍: 0 ⏩: 0

hope you find the tutorial helpfull
👍: 0 ⏩: 1
the tutorials in the description
👍: 0 ⏩: 0

I think although the picture has a great effect, there's something bout the background not conving, if you look at it more than once, it seems it doesn't look that natural after all, perhaps you should work on it a bit more
I like the message of the photo though, it's a beautiful scene
congrats
👍: 0 ⏩: 1
thanks for the comment +
👍: 0 ⏩: 0


all i hav to say is...
lovely
*favs n hugs ya*
.::timbermoonkiss::.
👍: 0 ⏩: 1


Wow, thank you so much for sharing this! 
👍: 0 ⏩: 1
No problem I'm glad you like it

👍: 0 ⏩: 1
")


Yes yes! easy to follow and I am happy with the results! Thanks a bunch.
👍: 0 ⏩: 1
not a problem I'm glad you found it helpfull
thanks for the

👍: 0 ⏩: 0
I am just looking for some helpful hints because I am getting bored and need some new techniques. I like the look of this photo and thought I would give it a shot. Thanks for the help and inspiration.
👍: 0 ⏩: 0

no probs and thanks for the
👍: 0 ⏩: 0
no probs and thanks for the
👍: 0 ⏩: 0


this is beautiful! i will use this soon!
👍: 0 ⏩: 2
thanks and also for the
👍: 0 ⏩: 0
thnaks and also for the
👍: 0 ⏩: 0

No problem Glad it's usefull for you
👍: 0 ⏩: 0

Really nice work! I am sure I will use this at some point
👍: 0 ⏩: 1
Thanks + for the
👍: 0 ⏩: 0


Thanks for posting this tutorial. I will give it a try when I get some decent picture!
👍: 0 ⏩: 1
No problem I hope it ends up being usefull
👍: 0 ⏩: 0


Thanks for sharing! I didn't use the whole thing in its entirety, but I've used a tip here and a tip there in some different works, and this was helpful for bringing forward some of the photoshop tweaks I never knew about. Awesome!
👍: 0 ⏩: 1
No problem
👍: 0 ⏩: 0

you're wow XD
that u taught me more than the tutorial ..
thanx
👍: 0 ⏩: 1


well, I'm not completely sure I know what your going for, but its seems to have turned out well
👍: 0 ⏩: 0
<= Prev |