HOME | DD
 Mastershizake — #DATutorialMermaid

#drawingtutorial #originalcharacter #tutorial #drawingguide #tutorialdrawing #stepbystepart #datutorialmermaids #datutorialmermaid2022 #mermaid #mermaidgirl #mermaidart #datutorialmermaid
Published: 2022-05-19 03:27:29 +0000 UTC; Views: 2138; Favourites: 18; Downloads: 0
Redirect to original
Description
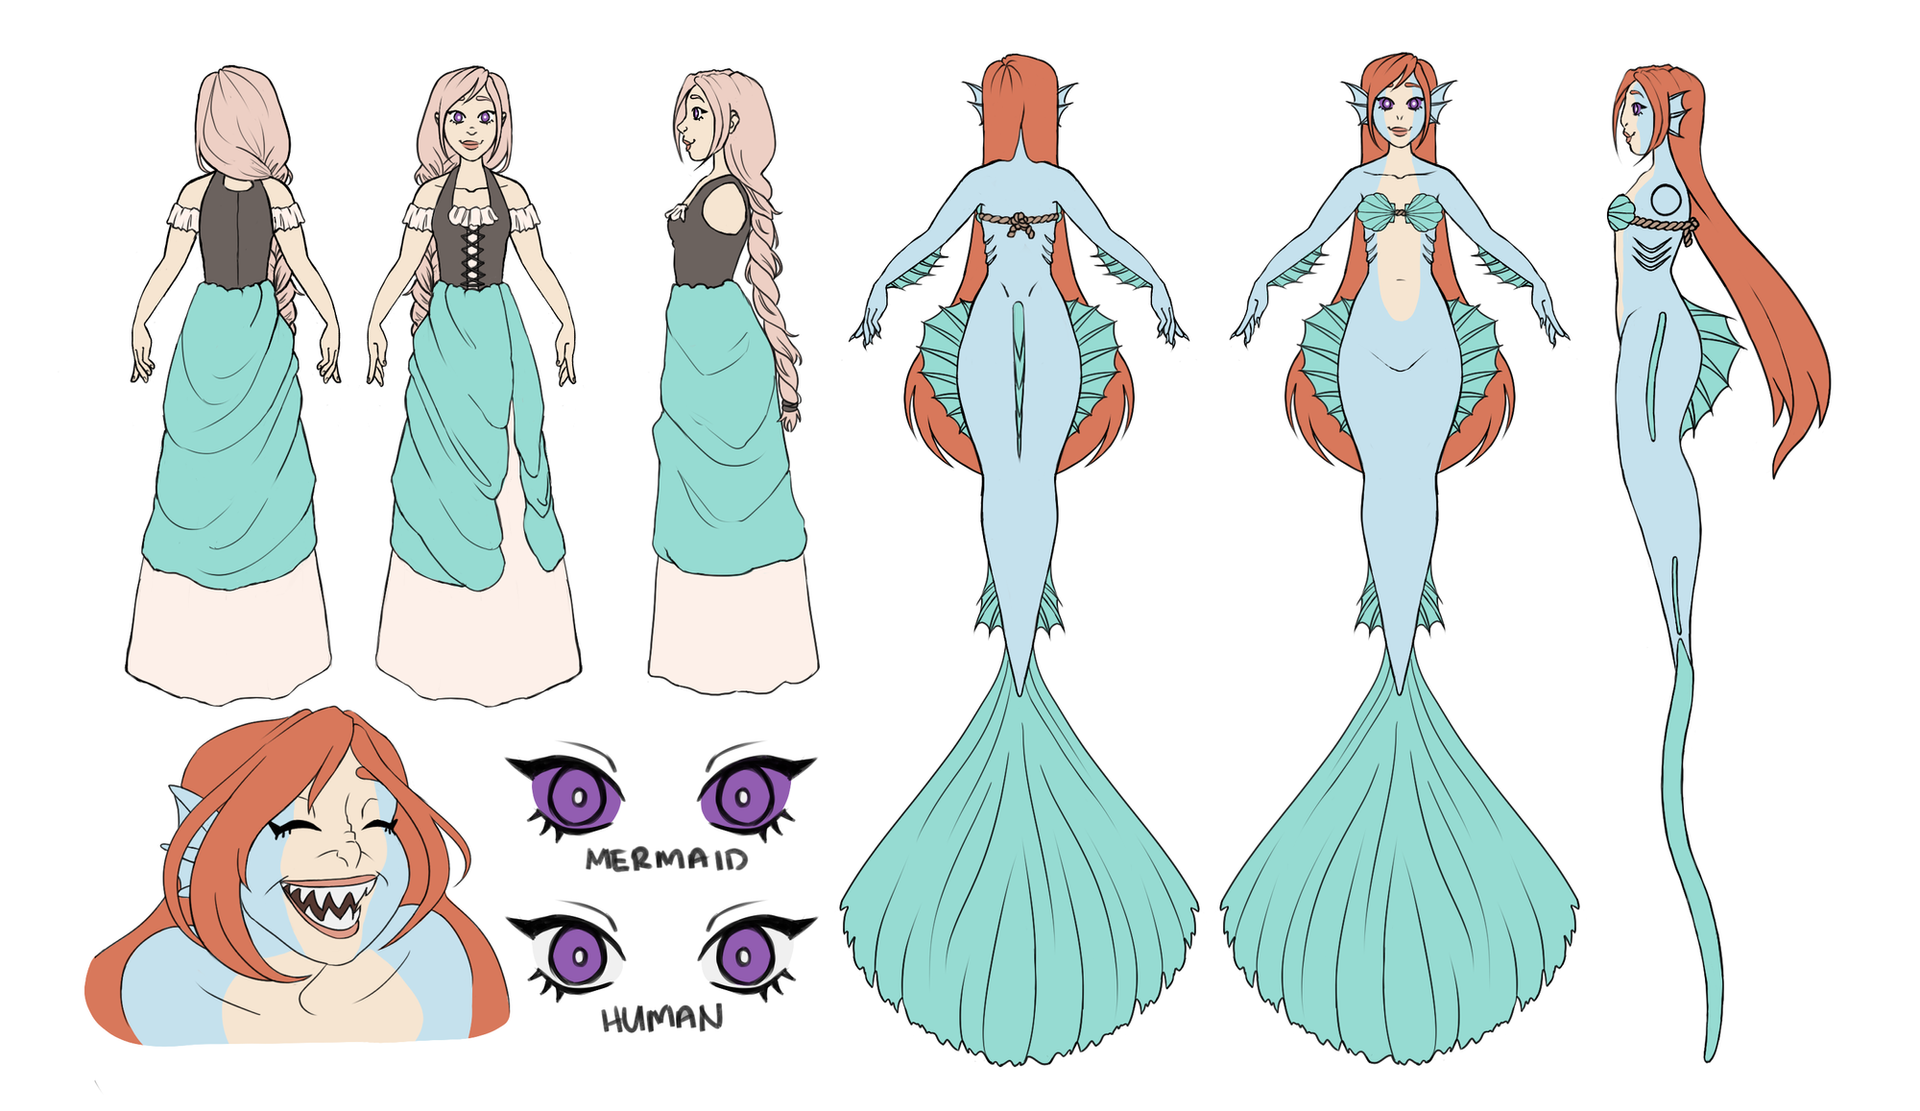
#DATutorialMermaidHere is another DATutorial that I have expanded upon. As usual I do these badge tutorials strictly digitally to learn and get some practice in. I wanted to do a 3/4 view profile since that was next after my last two tutorials. But this one lends itself better to female proportions. Mostly.
1. Shapes. As with my other tutorials here is where I lay down my shapes. The video shows oddly shaped triangles. But what size is right? What side lengths should be longer than the others? Due to the possibilities I went with what I usually do with a circle for the the head, oval for the chest, and since this is a side profile shot a circle for the hip area. So far with the shapes we can make this male or female. I added on the tail like the video shows.
2. Structure. My last tutorial had placement of body parts and then structure. Here I did them at the same time as this is what I usually do. I made some labels for what I feel is important at this step.
A. GOLD - Get your head the correct size. In comics a general rule is to measure the height of a character by their head size. Being that this is a mermaid that rule is kind of tough to apply. A female should be 8 heads in height while a male is 8 and a half heads. At the waist I like to measure 4 heads in height for a male and 3.5 for a female. In comics long legs take up the other half of a head. Remember, this is for an average human being. If we are drawing a dwarf, elf, or a super muscled giant we change the measurements.
B. GOLD - I see this messed up a lot in drawings: the length of the arms. Unlike legs which we get to extend for females to simulate high heels lengthening arms comes out looking cartoony. Try to get the wrist at the hip joint with the hand extending past. Now fold your arm up to have your hand tapping your shoulder of the same arm. If you can look in the mirror look at where your wrist is at. Most likely it is at the bottom of your deltoid. Your arms are almost perfectly 2 halves. Use this when drawing your humans.
C. ORANGE - Still on arms the elbow should line up at the bottom of the rib cage. Pay attention to where you have placed your shoulders. If the character is shrugging or puffing out the chest in a heroic pose the arms will be lifted. The reverse if the character is drooping or hunched over. When the arms are elevated for any reason simply visualize and arc from the elbow down to the torso and make sure they line up. If we are dealing with foreshortening then this rule of thumb doesn't work.
D. RED - "The line of action" This is in many books and many only videos. Because it makes or breaks an action pose. Looking at my mermaid above compared to the one done by the instructor of this tutorial we can see hers looks more "heroic" with her mermaid having her body more curved. Compare my red center lines to her curved line in her video. Mine is more flat making my mermaid plain and stiff. This is because I wanted to use it for measurements and wanted to line up the arms. But I lost the action I could have had with my mermaid.
3. Cleanup and finalizing the structure. Now I started to add in the details to the mermaid. More attention is needed to the little things. What type of hair? How muscular the body is? Young or old? All of these create variations in the details needed to be put into the drawing to convey these details to the viewer.
A. The bosom of a female moves and shifts all over depending on the stance or action of the character. In the case of the mermaid above she has no supportive apparel. So many times I see artists draw breasts up around a woman's clavicles right under her chin. If she is wearing a corset or a bra 2 sizes too small this is what it would look like it. However most of the time gravity overrides clothing and a woman's chest hangs down. Depending on her size the top of her rib cage should be exposed in a comic character. Also pay attention to where her shoulders are. If they are swept back then there should be no cleavage unless the costume forces it. If her arms are up then the breasts will move upwards as well.
B. Female hands. Do not give female giant man hands. I grimace at a lot of my old artwork because tried too hard to add detail to hands that were drawn too small with a pen that was too thick. If your female's hands can wrap around past her face they are too big. And don't go to the other extreme of having the hands too small. If they can cover her face they are good enough.
C. The posterior. This is another area like the bosom that can make or break the attractiveness of your female character. Since this is a mermaid the tail sort of doesn't help with my point on the rear end. However I wanted to point out at least to make sure the cheeks of her glutes do not sag. A rear shot would help explain this better. I good way to see what I am trying to explain is to go find some images of 1940s-1950s pinups such as Betty Grable and Marilyn Monroe. Note their posteriors would be considered droopy by today's standards. Whereas if you look at your latest online THOT you will see the tightness I am referring too.
4. Shading and rendering. I didn't do any shading with this one as I knew I was going to leave it to the coloring. And the only rendering was getting the line weights set.
5. Coloring. As with my other tutorials I just used Krita to apply base colors. Then made a shadow layer set to multiply for the shadows. Lastly I made a highlight layer set to screen.
Breast, shoulders, and glutes can shift and change all over the place and take a bit of time to remember what goes where depending on the situation. Sit down and draw armpits for a night and see how warped your mind will go. LOL. I hope if you took the time to read all of this it was helpful or at least made you question things.