HOME | DD
 mitoXD — mito's Wx Scripts (1-3)
by-nc-nd
mitoXD — mito's Wx Scripts (1-3)
by-nc-nd
#bash #linux #weather #shellscript #meteorology
Published: 2015-12-23 20:36:27 +0000 UTC; Views: 2137; Favourites: 1; Downloads: 4
Redirect to original
Description
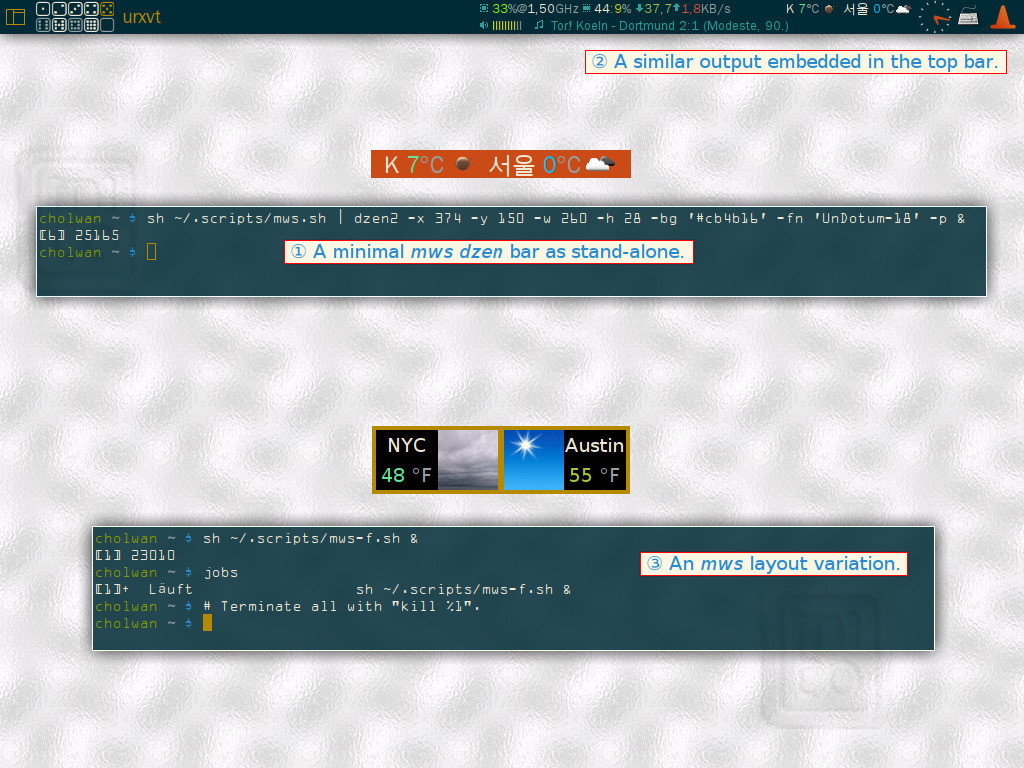
Screen #1 Example (1) depicts a decent mws dzen2 bar displaying basic weather info for two cities, and how it’s being invoked from an X terminal. Icons by OpenWeatherMap – A verified bar in (2) appearing as part of a desktop tray assemblage at the top, matching the visual style. It is being spawned from within another desktop startup script, every time an X session starts.
While at first sight (3) just looks like a new design, it is also different in other respects. First, the adaption to the Fahrenheit scale as well as data and icons originate from noaa.gov. Second, this is a combo of three particular dzen instances, for frame and weather modules. This alternative way requires to kill their old PIDs every time the bars are updated (what may cause them to flicker then); otherwise they would just overlay the others, while the old processes are still on. Though I consider this way running mws as deprecated, I provide the script mws-f.sh anyway.
Contents
screen #1 & .: 1. Specs · 2. What’s this all about … :.
screen #2 & 3. Troubleshooting
screen #3 & 4. Links and References
1. Specs
- type of applications: Unix shell scripts
- purpose: X window desktop widgets
- language: Bash
- dependencies: Bash, Dzen2, w3m and/or wget, bc, sed, (g)awk, ImageMagick
- helping programs: X terminal, optionally gotemps or units, and a graphics program e. g. Gimp or ImageMagick, another graphical webbrowser like Firefox, diverse fonts
[ ^ ] [ Contents ]
2. What’s this all about …
The purpose of mito’s wx scripts (mws) has been to enable a minimalist graphical weather display in my Linux desktop status bar. The combination of pure Bash with dzen2 formatting replaces the text-only tool xmobar, as a light alternative to conky or conky-cli.
Currently there are four individual scripts:
Finally it’s all about parsing and re-formatting including translation of textual information (localization, L10n) – with exemplary Korean, adaptable to any language! Scripting and minimalist pretty printing via Dzen has got both pros and cons. For a deeper understanding you’re encouraged to elaborate the source code comments anyway. Feel free to adapt the scripts, and match them your taste and your favorite places. Use on your own risk! Free for private use!
[ ^ ] [ Contents ]
2.1 Scripting tutorial – Location names
Referring to mws.sh, the output should result into a decent dzen2 bar as shown in the examples (1) or (2). It displays no more than two location names, along with their colored air temperatures and sky condition icons.
Viewing the source code, the first part is also the easiest: giving the location names. Usually these are cities, so I named the variables $city1 and $city2. These are arbitrary text strings of any writing system, as long there's an installed font for it and the filesystem supports it. Actually the examples are showing multi-language support (UTF-8).
The city names can be individually colored, for a better contrast or highlighting. Anyway as all the colors here are to be handed over to dzen2, just like the fonts, their annotation must follow the conventions of HTML coloring, which is an R(ed)G(reen)B(lue) hexadecimal key with a leading hash “#” (or a pre-defined color name) marked as foreground like this:
^fg(#RRGGBB).city1=NYC # Setting the name of New York City, ...
city1col="^fg(#eee8d5)" # ... drawing it Solarized white (base2).
Repeat this for any place in $city2.
[ ^ ] [ Contents ]
2.2 Temperature
Soon it's getting more interesting! We need an online weather service now, because this provides us with weather data like a certain location’s temperature given by a weather station within the area. While there’re countless weather services all over the world, not all are useful for our purpose however; for details see the references and the Troubleshooting section. – For a quick start just fire up your favorite webbrowser now and go to openweathermap.org (OWM).
Suppose you live souterrain or got a blind office desk in downtown Manhattan and want to stay tuned to the local weather, to decide whether it’s worth a stroll, type e. g. “NYC Central Park” into the panel. This will result in a link, leading you to “Manhattan, US” (if you want, check the coordinates). Copy and paste the URL into a new variable as follows:wservice1="http://openweathermap.org/city/5125771" # URL $city1 weather data
First we’re looking for the current temperature. And that’s only the value, the pure string, doesn’t matter how it appears in the browser. Hence there’s no use of JavaScript here, so simply block any scripts of the website now (possibly install a browser plug-in; as a consequence, there’s no Fahrenheit anymore). – The current temperature is easily scoured in the website’s source code, invoke it via
Assuming all literal strings are separated by white space, the temperature value is at the fourth position from the left of the line. It is extractable by the console webbrowser w3m and a trailing command sequence dealing with a portion of regex:traw1=$(w3m ${wservice1}|grep °C|tr '\n' ' '| awk '{print $4}') # refining $city1 weather temperature
[ ^ ] [ Contents ]
2.2.1 Command-line maths assistance
Defining this as another variable $traw1 will easily echo the desired temperature value at the prompt. However, using floating numbers (as given by OMW) in such a basic output looked ridiculous to me. Also the room for another bar on my small screen is quite limited. Further as I didn’t only want to chop the decimal places, I rather rounded the $temp numbers into integers, e. g. making 13.7 appear as 14. I figured out to do such kind of calculation with an extra program like bc:
gettemp1() { # *** Function for properly rounding floating temperature values
if (( $(bc <<< "${traw1}>=0") )) ; then # For values equal or higher than 0 ...
temp1=$(echo "(${traw1} + 0.5)/1"| bc ) # ... add .5 and divide by 1 (omit the decimal place) = round up if necessary.
elif (( $(bc <<< "${traw1}<0") )) ; then # For values lower than 0 ...
temp1=$(echo "(${traw1} - 0.5)/1"| bc ) # ... subtract .5 and devide by 1 (omit the decimal place) = round down i.n.
else # In the case there’s no temperature ...
temp1="n/a" # ... display a dummy text string.
fi # end of loop
}; gettemp1 # function call
For details on the syntax read bc’s manual. – This loop works also nicely without putting it into a function, but it helps to get the contents organized.
[ ^ ] [ Contents ]
2.2.2 Coloring
That’s the most fun part – creating a list of variables for different ad-lib temperature intervals, and assigning colors to them:
# temperature RGB color list
arctic="#6a5acd"
frosty="#00bfff"
cold="#add8e6"
chilly="#61e296"
moderate="#83d688"
lukewarm="#b5cd62"
warm="#ffd700"
hot="#ffa000"
tropic="#e93423"
meltinghot="#ff2222"
gettcol1() { # *** Function for relating (Celsius) temperatures to colors ...
if [[ "$temp1" -le -20 ]] ; then # ... due to the predefined list (back-tick notation).
temp1col="^fg($arctic)"
elif [[ "$temp1" -le 0 ]] ; then
temp1col="^fg($frosty)"
elif [[ "$temp1" -le 4 ]] ; then
temp1col="^fg($cold)"
elif [[ "$temp1" -le 10 ]] ; then
temp1col="^fg($chilly)"
elif [[ "$temp1" -le 16 ]] ; then
temp1col="^fg($moderate)"
elif [[ "$temp1" -le 23 ]] ; then
temp1col="^fg($lukewarm)"
elif [[ "$temp1" -le 29 ]] ; then
temp1col="^fg($warm)"
elif [[ "$temp1" -le 34 ]] ; then
temp1col="^fg($hot)"
elif [[ "$temp1" -le 45 ]] ; then
temp1col="^fg($tropic)"
elif [[ "$temp1" -gt 45 ]] ; then
temp1col="^fg($meltinghot)"
else
temp1col="^fg()" # If there’s no valid temperature, reset the color.
fi
}; gettcol1
Repeat this for the second temperature. They will be added before the $temp variables later; as there will be a trailing gray “°C”. Feel free to adjust the palette, the names, or the list to your liking. – Note I wrote a second script matching the Fahrenheit scale. See also the later Troubleshooting section.
[ ^ ] [ Contents ]
2.3 Weather condition
In this single line version, the condition is the third and final part of a place's weather representation. And this is really simplified, as actually that’s only the sky condition, and information other than sunshine or precipitation etc. has just been omitted. – Since we want it graphical, the task here is to get all necessary images organized, to correlate them appropriately with a condition, and of course to make them appear.
The easiest way is to use the same icon set names as the weather service; I call this “icon mirroring.” The only thing to do before is to download the icons and to convert it into XPM format (here they’re resized to my needs into 20×20 pixels), for that dzen can display them. Next is to fetch and to isolate the icon name from the website ($condition), and to just echo it to dzen into the local icon path ($sky).
With this preset of names, there’s no need to cope with any meteorology vocab, and to correlate it with icons (which would be necessary when using textual services). – Since the original converted fog icons looked odd, I created an extra monochrome set of three to choose from. The condition variable and the optional icon function now reads as follows:
condition1=$(w3m ${wservice1}|grep °C|tr -d '\n[]'|awk '{print $3}') # refining $city1 sky condition icon name
geticon1() { # *** Function for weather icon selection
if [[ -z "$condition1" ]] ; then # In case for whatever reason there’s no icon ...
sky1="^fg()n/a" # ... print this string in default color.
elif [[ "$condition1" =~ 50 ]] ; then # Otherwise track the OWM foggy icon marker ...
sky1="^i(/path/to/my/weather-icons/foggy-gray.xpm)" # ... and display the manually selected icon due to the bg-color.
else # In all other cases ...
sky1="^i(/path/to/my/weather-icons/${condition1}.xpm)" # ... automatically select one of the mirrored icons.
fi
}; geticon1
Repeat this for $sky2 accordingly; and you might want to change the icon path.
[ ^ ] [ Contents ]
2.4 Putting it all together
It’s nearly done! All predefined elements are to be arranged into $weather-variables now. Here the basic order of the three parts is city – temperature – sky condition. While the latter is just represented by the weather icon, the textual contents of each part are initiated by or including coloring commands, either as variable or direct arbitrary dzen ^fg() foreground color attributes; the background is being specified externally. And there must be two variables, representing each of both locations of course.
Finally the sleep command determines the interval, after which the script restarts and updates the data. That’s how the framework looks like:#!/bin/bash
while [ "true" ] # invoking the script
do
.
. # all particular variables and macros
. # *** Assembling the weather bar ...
weather1=$(echo "${city1col}${city1}${temp1col}${temp1}^fg(#93a1a1)°C${sky1}")
weather2=$(echo "${city2col}${city2}${temp2col}${temp2}^fg(#93a1a1)°C${sky2}")
echo "${weather1} ${weather2}"
sleep 1000 # refresh rate in seconds
done
[ ^ ] [ Contents ]
2.4.1 Ways of running and testing the script
Before embedding into another config, make the script executable and test it by entering at the prompt:$ cd /path/to/my/script-folder
~/my/script-folder $ chmod +x ./mws.sh
~/my/script-folder $ sh ./mws.sh
The result will be a printed long text string in the terminal with all variables expanded. The output updates itself as another lines within the refresh interval. Kill the script by pressing
A black bar will appear across the top of the screen, containing a centered message with a default font; this and the default colors can be set in ~/.Xresources. Anyway the -p option for “permanent” is mandatory, otherwise dzen terminates itself. And usually a dzen bar gets killed by right-clicking it.
Like any other scripts, this one can be easily bound to any hotkey, events, or embedded into other scripts. – I have it spawned in the config file of my favorite window manager XMonad, in proper Haskell syntax; see example (1) above. This way it’s autostarted every time I invoke an X desktop session, and completes the status bar:--- My ~/.xmonad/xmonad.hs
...
pipe <- spawnPipe myDzenWeather
myDzenWeather = "sh ${HOME}/.xmonad/mws.sh | dzen2 -x '764' -w '152' -h '16' -ta 'l' -bg '#002b36' -fn 'UnDotum-10'"
...
Executable Bash scripts run also in other shells, while testing particular parts of the code such as naming and echoing variables works only flawlessly at a Bash terminal.
[ ^ ] [ Contents ]
2.4.2 Alternative preparation tools and tipps
Linux offers a wide choice of free and open programs (here listed as dependencies) and methods for the same purpose to get this script to work; you might already have them installed. Just consult the programs’ documentations to be sure to edit the script’s internal macros with the right syntax and options. So a weather service’s website can be dumped by other text webbrowsers as well, such as elinks, or even without but simply via wget. And there shouldn’t be any problem doing so with curl. However for parsing websites there're caveats as well; see Troubleshooting below.
There’re numerous ways for turning a graphics format into another. So this is a basic task for Gimp for example. – When it comes to batch conversion, my first choice still is the pretty handy mogrify macro as part of ImageMagick though: Without hassle it puts a complete icon collection into a new folder in a snap, what makes it easy e.g. testing different sizes or complete icon sets.
And it is ImageMagick again, that provides the neat tool identify for font selection. – dzen2 supports TrueType fonts. So when you're looking for a special font but don't remember its full name, in case for a flavor of the free Noto font, enter a command like this at your prompt:$ identify -list font|grep -i noto|less
Then take any of the font family names as an argument for dzen's font option; see also the examples in the preview and the program’s documentation for further details. – Countless alternative font viewing and selection tools exist, from the classic xlsfonts, xfontsel, over gfontview up to complete office suites like LibreOffice.
When it comes to calculating metric and Imperial scales, look for units or gotemps. – Speaking of Bash, condition loops may look better legible when composed with case), rather than with if-elif statements; IMHO that’s a matter of taste. – Plus, the ~/.Xresources global or special settings e. g. for dzen2 could also spare a couple of command-line options.
[ ^ ] [ Contents ]
2.4.3 Extending the script
Similarly to the proceedings above, more data can be added easily: horizontally by more places, and vertically by considering the complexity of meteorological phenomena and skywatching. At least when you got connected to your own measuring station, you want to know more about wind speed and direction, wind chill, precipitation, atmospheric pressure etc. Also of interest could be forecasts of course, storm and flood warnings, or moon phases. Parse and display anything the weather service of your choice provides. Nonetheless you mustn’t get confused by imperial, metric, outdated or any other national systems.
So far we’ve put everything into a single line. However dzen2 also allows displaying lists! By default the top line “title” is shown. When this one gets hovered, the complete contents unfolds to given dimensions; see the wiki for details. Have also a look at screen # 3 where a button press even starts another Dzen instance! And it can invoke other programs as well.
[ ^ ] [ Contents ]
.: mws Screen # 3 :: UI Design :: Scripting :: mws Screen # 2 :.
Comments welcome!


