HOME | DD
 ParadoxSketch — Ant-Man Helmet Process
#ant #antman #man #antmancomic #cosplay #costume #process #cosplaycostume #antmanmarvel #antmanmovie
Published: 2015-08-18 00:56:03 +0000 UTC; Views: 1010; Favourites: 2; Downloads: 1
Redirect to original
Description
A quick rundown of the process I used to make the Ant-Man helmet for this videoThe finished product can be seen here and here .
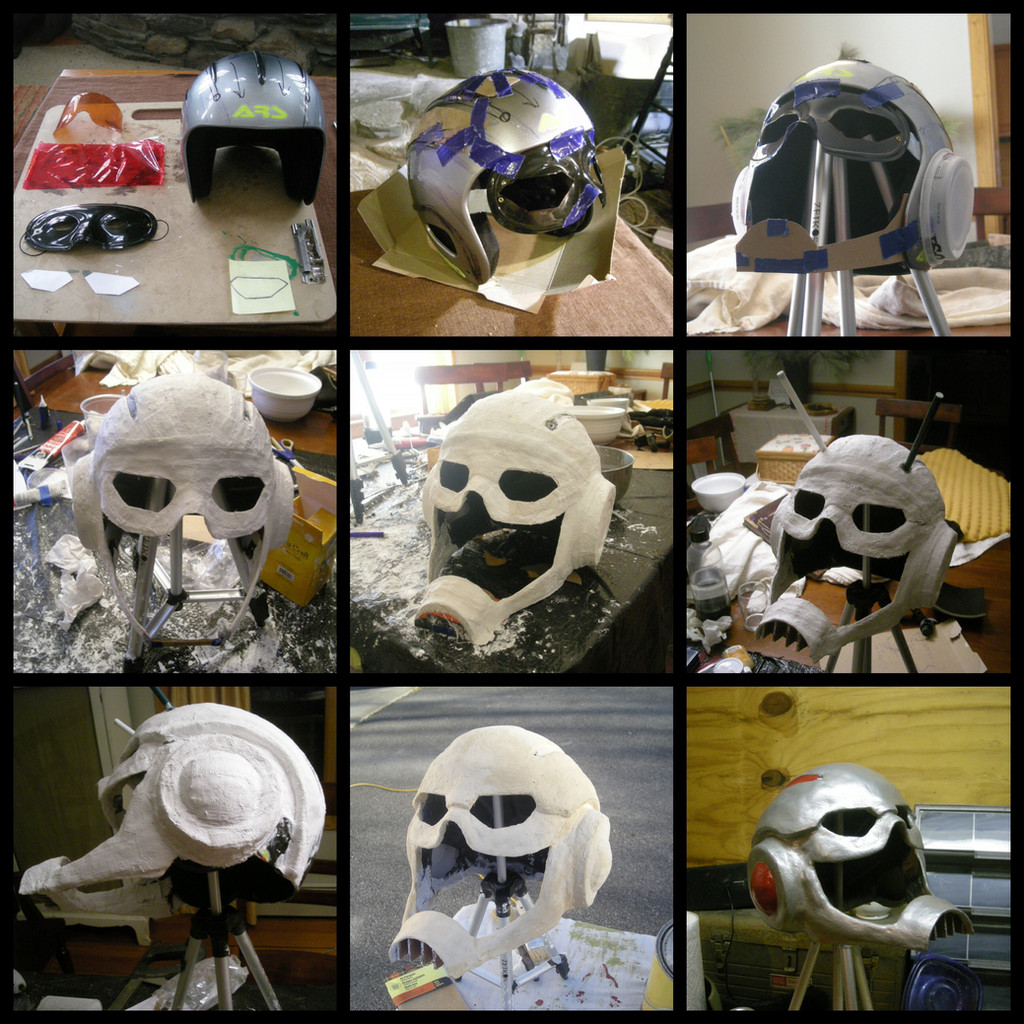
1. The basic elements I used to make the helmet, minus some things I added later. A ski helmet, plastic half mask, an old goggle lens, red cellophane, and a pattern for the shape of the eyes. I made the eye pattern by blowing up a picture of the helmet from the comic, and then tracing the general shape of the eyes. The thick structural foam, the soft comfort foam, and all the straps and bindings were removed from the helmet. You can see some of the markings I made on the helmet when I was laying out things. At this point, I've only spent something like 99 cents for the mask.
2. The mask has had the eye shapes cut out, and then was taped to the helmet. It is helpful to have someone else wear the helmet so you can get everything straight and lined up. I didn't, and things ended up a little lopsided, which I had to fix later. The nose was also cut on the mask, to fit the look of the comic helmet. Strips of thin cardboard were glued and taped to the helmet to smooth out the ridges, so less material would be needed for later steps.
3. The jaw and ear pieces were added here. The jaw piece was made of thin cardboard (from a cereal box), cut into two mirrored pieces for the jaw and one extended half circle for the mouth. These were taped together and then taped to the helmet. Low plastic containers (like the ones from a deli or used for hummus and the like) were used for the ear pieces. The containers I used were for some sort of yogurt stuff, as they were slightly thicker than anything else I had, but whatever will work. I added the top rim from another plastic container to give them a more gradual shape, but again, this was mostly to save materials later. I used hot glue to fix all this to the helmet base.
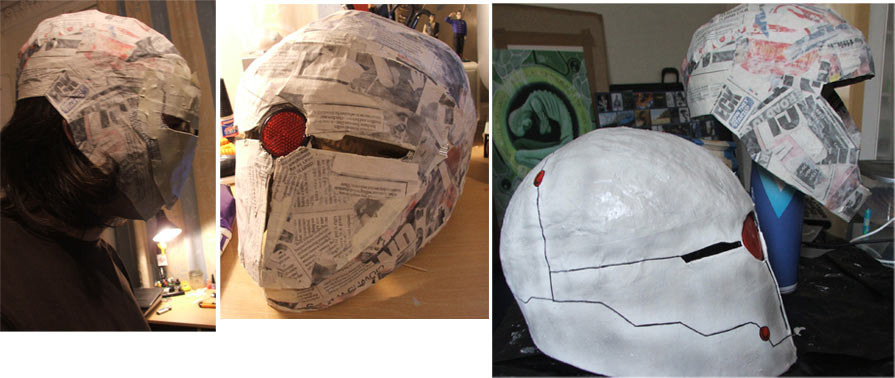
4. First round of plaster cloth. This stuff works like papier-mâché, and I love it for mask making. Covered all the gaps between the mask and the helmet, and generally just went around making it all smooth. The mouth piece was removed and replaced with a strip of the same length, as I was building the mouthpiece separately. You can find more detail on that here .
5. Mouthpiece attached, and another round of plaster cloth. A scaled down version of the original mouth piece was temporarily added to the front, and plaster cloth was draped between them. This allowed the plaster cloth to form a ridge once the piece was removed. The mouthpiece was mostly held on by the plaster cloth.
6. Here we have the first look at the antenna and the finished mouthpiece. As can be seen in this photo, the temporary piece has been removed, and the ragged edge formed during removal has been layered with more cloth. The antenna can be removed thanks to nuts that have been embedded in the helmet and screws in the antenna. More detail on their construction can be found here .
7. Second major layer of plaster cloth, and the final piece of the ears was added. Ridges were made using clay, and then covered with plaster cloth. This is where the majority of any fixing that needed doing was carried out, such as the lopsided nose and differing eye shapes. This was probably the longest step, as I did all the clay work first (along the side of the helmet, across the front to give it a brow, on the ear pieces to get their desired shape), then plastered it, and then did a round of fixing, plastered, fixing, etc. A foam ball was used to get the rounded parts on the ears. I cut about half inch pieces off the sides of the ball, glued them into place, fixed the seams with clay, and then covered them in plaster.
8. Smoothing. This was a tedious step. Plaster cloth is great to work with, and it's nice and strong, but if you don't lay it down smooth, that's it. You can really sand it due to the cloth part, and so you have to usually layer something else on it. I started with caulk and putty to get the really bad places, moved onto a wood filler/water mixture, and then finished with thick ceiling latex paint. I did a lot of sanding in between all these steps, and was pretty happy with the end result.
9. Painting step. I used whatever metal colored spray paint I had laying around, and then went out to buy some, and still ended up having to mix a bunch to get the color I wanted. I lightly dusted the finished color with a hammered nickel (or something similar) by spraying it at arms length to give it a more interesting texture. I hand painted the red lines and the ear pieces, using spray paint I sprayed into a container. I covered the whole thing with a clear gloss spray to protect it. Not pictured, but the final step was cutting the goggle lens into appropriate shapes, covering it in red shrinking cellophane, and then gluing them into the inside of the helmet.
All in all, I spent a little over $15 on the whole thing, from the plaster cloth, the mask, and the spray paint. This helmet turned out really strong, something I was striving for, and stood up to being knocked over and rolled down a gravel driveway for about 30 yards by the wind. The soft foam pads were added back into the helmet for comfort, and while it was a little bit of a tight fit, it was better than I thought it would be. I hope this was helpful, and please feel free to ask any questions. Also, check out my tumblr for more here
Helmet built by me, Paul Steadham
Ant-Man copyright Marvel