HOME | DD
 Pul53dr1v3r — Rainformer 3.1 HWiNFO Edition : Rainmeter
by-nc
Pul53dr1v3r — Rainformer 3.1 HWiNFO Edition : Rainmeter
by-nc
#amd #battery #clock #cpu #gadget #gadgets #gpu #harddisk #hdd #illustro #monitoring #moon #moonrise #network #nvidia #power #psu #rainmeter #ram #skins #ssd #sun #sunrise #sunset #temperature #weather #widget #widgets #windows #rainmeterskin
Published: 2019-03-14 22:08:07 +0000 UTC; Views: 615067; Favourites: 610; Downloads: 44353
Redirect to original
Description
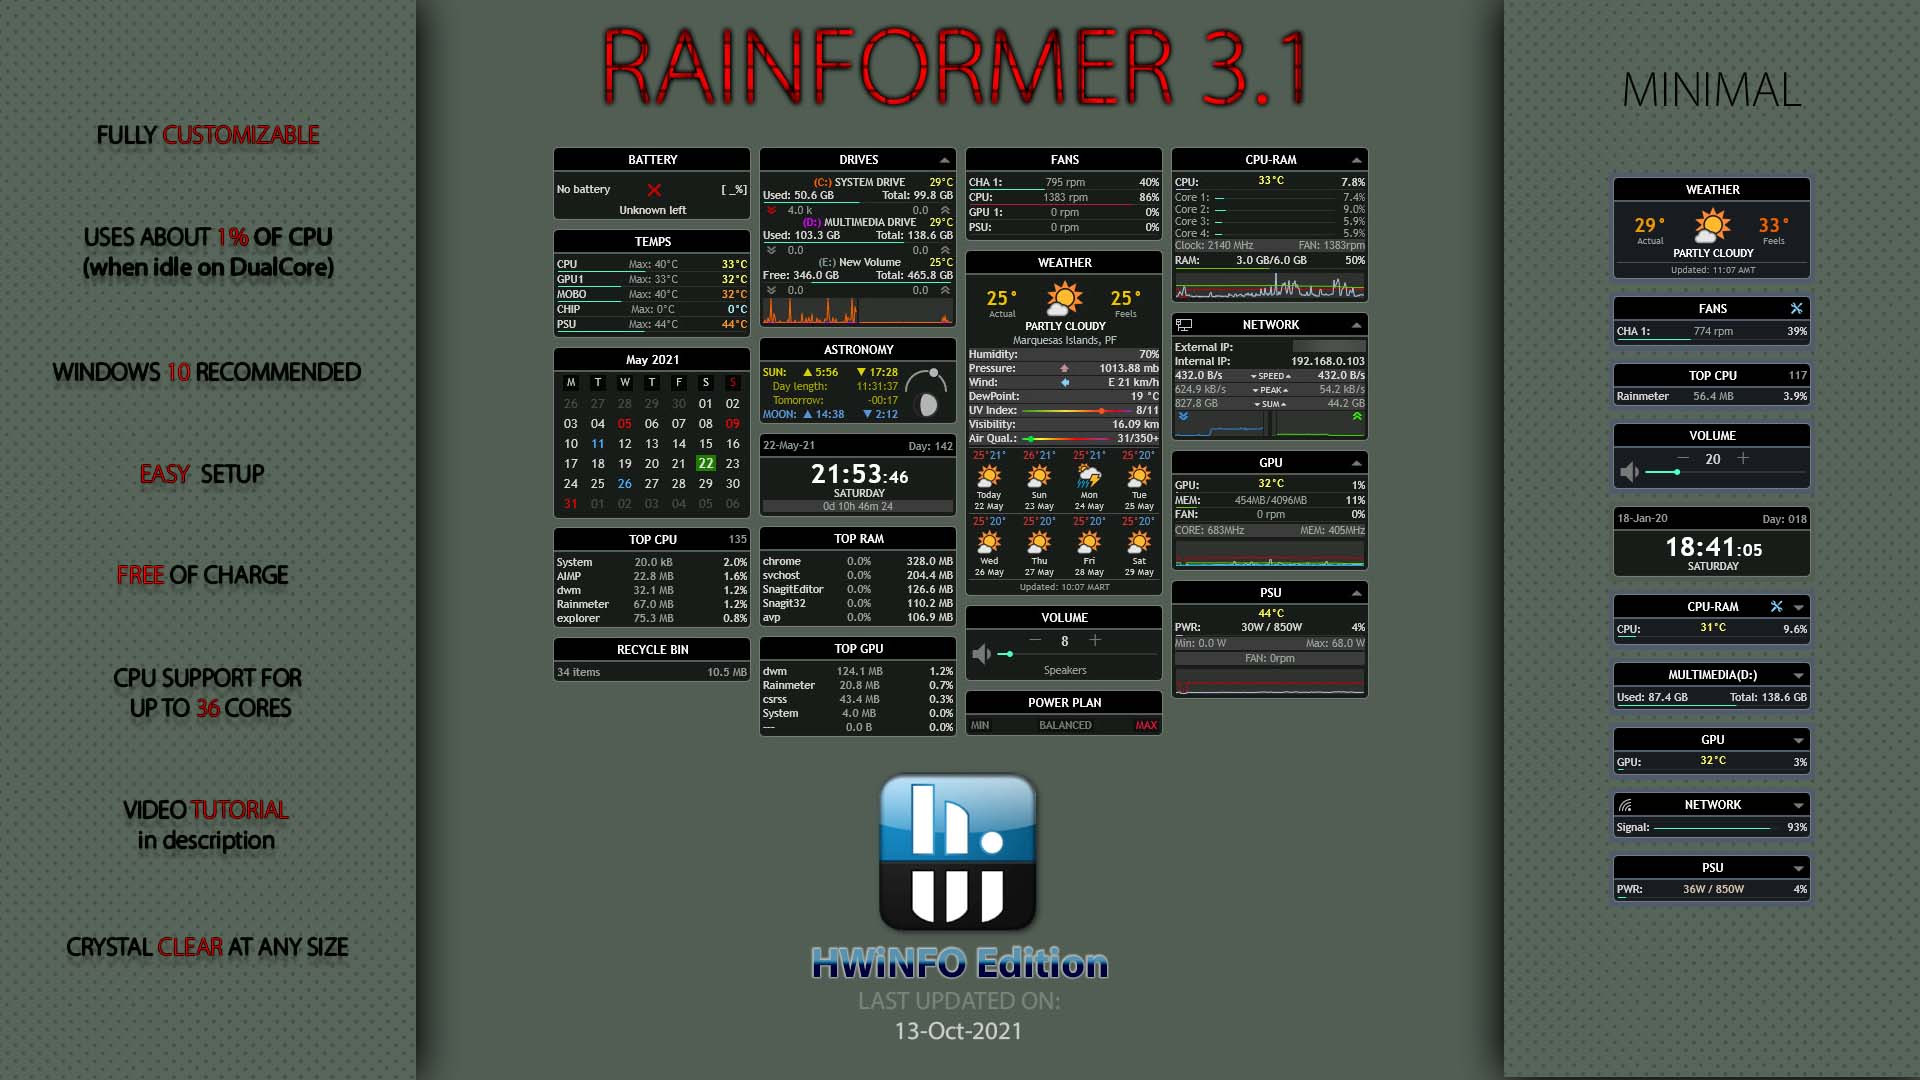
DOWNLOAD Rainformer AIDA64 Edition here⏺SKINS AND MAIN FEATURES⏺
✔ DISK DRIVE: (letters from C to Z, drive Label, Used-Free/Total space, activity indicators),
✔ NETWORK SKIN: (WLAN, Download/Upload speed, peak and total data transfer, External/Internal IP Address),
✔ GRAPHICS / VIDEO ADAPTER SKINS: (support for AMD and NVIDIA cards),
✔ RECYCLE BIN: (number/size of items, shortcuts to open and empty the Bin),
✔ CPU SKINS: (supports for up to 36 Cores, RAM usage, total and used...),
✔ UP TIME SKIN: (shows system up-time),
✔ CLOCK SKIN: (time, date, System uptime, current day...)
✔ CALENDAR: LuaCalendar (includes Julian and Gregorian calendar with some of the most important Events added),
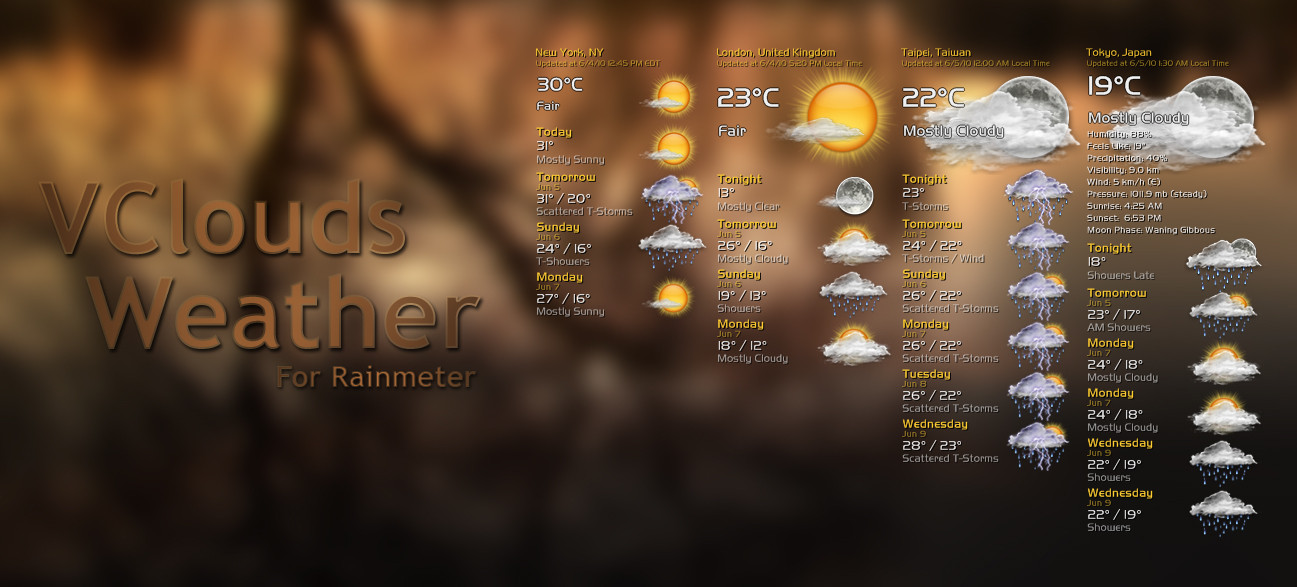
✔ WEATHER SKIN: (current weather condition, forecast for next 8 days including today, night forecast shows up on move hover),
Note for the WEATHER skin: Go to C:\Users\User\Documents\Rainmeter\Skins\RainformerHWi\ resources , find Variables.inc document, open it, search for "APIKey" variable and replace its value to 21d8a80b3d6b444998a80b3d6b1449d3 , save the changes then refresh the skin or Rainmeter.
✔ BATTERY SKIN: (charging level, time left... ),
✔ PSU SKIN: (Power usage, PSU temp., Fan speed...),
✔ VOLUME SKIN: (volume slider, mute/unmute sound, change device...),
✔ TOP CPU: (shows up 10 top CPU users + RAM usage for every of the processes),
✔ TOP GPU: (shows up 10 top GPU users + VRAM usage for every of the process),
✔ TOP RAM: (shows up 10 top RAM users + CPU usage for every of the process),
✔ POWER PLAN: (quickly switch between the Power plans and customize it),
✔ ASTRONOMY: originally made by balala (), (works offline, shows data such as sunrise, moonrise, sunset, moonset, day length and more on mouse hover action),
✔ FANS: (shows the main data for up to 13 Fans of a system),
✔ TEMPS: (shows up to 10 temperature sensors of a system. Fully customizable),
✔ SETTINGS: (includes options to customize colors, opacity, show/hide features of the skins, enter some customizable data etc.),
⏺CHANGELOG (click here to see) ⏺
⏺HOW TO USE:⏺
QUICK TUTORIAL
IN-DEPTH VIDEO TUTORIAL
REFRESH THE SKIN(S) AFTER YOU FINISH WITH UPDATING IDs in HWiNFO SMV. Click over a skin with "middle mouse button" for quick refreshing the skin.
WARNING! From HWiNFO v7.0 and upper, Shared Memeory Support feature turns off after every 12h of (continuous) use and it has to be re-enabled manually again: click for more details. If you restart your machine or HWiNFO once in 12h, it will reset the time.
Additional info:
What the CPU Temperature sensor to choose? click here to read
CPU Temperature accuracy read-outs useful info. click here to read
Thanks God for everything! Special thanks to jsmorley , balala , EclecticTech , raiguard and SilverAzide .
Related content


Comments: 600


👍: 0 ⏩: 0

👍: 0 ⏩: 0
👍: 0 ⏩: 1

👍: 0 ⏩: 0

👍: 0 ⏩: 0
👍: 0 ⏩: 1

👍: 0 ⏩: 0

👍: 0 ⏩: 1
👍: 0 ⏩: 0

👍: 0 ⏩: 1
👍: 0 ⏩: 1
👍: 0 ⏩: 0

👍: 0 ⏩: 0

👍: 0 ⏩: 1
👍: 0 ⏩: 1
👍: 0 ⏩: 1
👍: 0 ⏩: 0

👍: 0 ⏩: 0

👍: 2 ⏩: 1

👍: 1 ⏩: 0
Hi.
Run "Command Prompt" "As administrator", then type (copy-paste) next:
cd c:\windows\system32
lodctr /R
cd c:\windows\sysWOW64
lodctr /R
Run until you don't get errors.
👍: 2 ⏩: 1

👍: 1 ⏩: 0
Hi. Do this and read the comments next time pls as there might be a solution for many known problems:
link to solution
👍: 0 ⏩: 1

👍: 0 ⏩: 1
the missing include is the only thing you have to add in the code (as i missed to add it when i packed the suite). That's all. Then you update the sensor values simply in HWiNFO SMV. No need to input anything manually but you can if you wish to waste your time.
Did you watch the tutorials i posted in description, a picture and in-depth video tutorial?
👍: 0 ⏩: 0

👍: 1 ⏩: 0

👍: 0 ⏩: 3
Thanks for the suggestion. I'll consider it after i finish what i'm working on.
1. Just play around with the X values and font size of the next meters: [MeterCurrentTemperature], [LabelCurrentTemperature], [MeterCurrentFeelsLikeTemp] and [LabelCurrentFeelsLikeTemp]. Those are from line 1587-1634,
2. find Styles.inc file, open it and find [StyleBarCpuCore] and [StyleCoreBarSpacing] styles (line 215 and 237). To make the CPU bars thicker for 1, change "H" value of the first style for +1 (H=2) and "Y" value of the second style for 1 as well. Save and refresh Rainmeter to apply the changes. For the other bars find [StyleBar] (line 204) style in the code and cnahge the H values too.
3. no, the data has been obtained from weather.com, just truncated,
4. yes, i'll probably add the option instead of the skin name,
...and finally 5. The data has been obtained by an external web site (icanhazip.com/ ), not using a 3rd party software. Also, if you are using IPv6, place the mouse over the IP label to get a tooltip where the whole IP has been shown. It simply can't fit the skin's width so just a part of the ip be showed.
👍: 0 ⏩: 1
👍: 0 ⏩: 1
1a. Find [Core1UsageText] meter (line 1082) and replace the current "Y" with Y")
1b. find [RAMUsageLabel] (line 2112) and replace its "Y" with Y
2. search for [CPUBARWARNT], [CPUBARWARN1], [CPUBARWARN2] ... etc. (from line 633 on) and in theirs Substitute options you will see the 2 colors, one as a RGB form, and another as variable.
The first one is used as warning threshold and another one is normal bar color. Replace that one as you wish.
Example:
(original) Substitute="-1":"220,20,60,200","-2":"#colorBar #,#colorBarAlpha #"
(modified) Substitute="-1":"220,20,60,200","-2":"255,255,0,255"
Note: when you replace the #colorBar #,#colorBarAlpha # with a RGB color number, you won't be able to change the colors in the Settings panel anymore.
www.rapidtables.com/web/color/…
Because of the autoinserted emoticons, here is a raw backup of the reply: justpaste.it/3c4b5
👍: 0 ⏩: 0
👍: 0 ⏩: 0

5: I take it you mean show the External IP address?
Click the "Internal IP" and it will switch to "External IP"
www.dropbox.com/s/r7rpcyt3vtta…
👍: 0 ⏩: 1
👍: 0 ⏩: 0
Hi. Did you watch the video tutorial and are the other GPU skin sensors working?
👍: 0 ⏩: 2

👍: 0 ⏩: 0

I managed to get it working, thank you
👍: 1 ⏩: 0
If anyone is having issues with HWinfo64s sensor readout freezing after a awhile
Please do the following.
1: To do this type in "task" into the search bar and select task scheduler
2: Select "Create Task"
3: Under the General tab give it a name like HWInfo64 Kill and a description, set the privileges to "Highest Privileges "
4: Select the Set the Triggers tab and Click new and define when to start and how often to repeat.
I've set it to every 1hr and repeat each hour
5: Under the Actions tab click New
6: Select "Start a Program" and navigate to "C:\Windows\System32\" and select taskkill.exe
7: Add the following Arguments "/f /im HWInfo64.exe" and click OK
8: Click OK to create the task.
Now we need to make a task to start HWInfo64
1: To do this type in "task" into the search bar and select task scheduler
2: Select "Create Task"
3: Under the General tab give it a name like HWInfo64 Start and a description, set the privileges to "Highest Privileges "
4: Select the Set the Triggers tab and Click new and define when to start and how often to repeat, but make it so it triggers a few seconds after the Kill task.
I've set it to every 2seconds after the Kill task and repeat each hour
5: Under the Actions tab click New
6: Select "Start a Program" and navigate to ""C:\Program Files\HWiNFO64\" and select HWInfo64.exe
7: Click OK to create the task.
👍: 1 ⏩: 0

<= Prev | | Next =>