HOME | DD
 raindreams — glow flower tut part 1: star
Published: 2004-09-30 02:42:35 +0000 UTC; Views: 1546; Favourites: 15; Downloads: 157
Redirect to original
Description
As promised, here is the tutorial for 'glow flower.' This is only part 1 (to keep the image at a reasonable size so my fellow dialupians won't hate me), part 2 (the actual flower) will be out soon if not tonight.Create a new document with equal dimensions (It doesn’t matter too much what size it is, although you’ll need to know where the exact center is. I usually use 8x8 with 150 pixels/inch resolution, so that I can keep it as high-quality as I can, and so I can more easily do detail work if necessary).
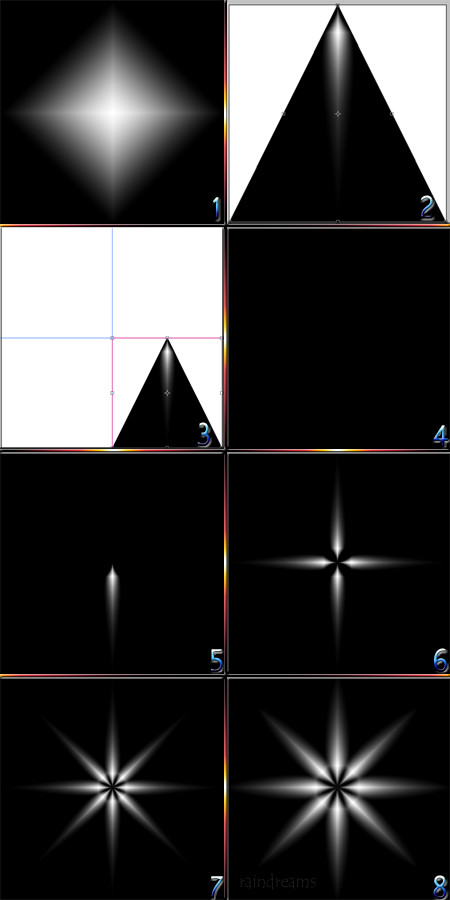
1. Create a new layer, and fill it with a black-and-white, diamond-shaped gradient fill, starting at the center and going straight down (hold down the shift key) right to the bottom edge. Make sure the diamond is white and the background is black.
2. From the menu, select edit/transform/perspective. Drag the top left corner towards the top center square, so that all 3 squares on the top row are completely overlapped, and hit the checkmark on the top right side of the menu.
It will help if we have guides, since the finished picture will look better if it is exactly symmetrical. Click the ruler on the far left side (if you don’t have a ruler, go to view/show rulers or press CTRL+R), and drag the guide to the exact center of the picture (if your picture is 4x4 inches, drag it to exactly 2). Repeat for the horizontal guide, from the ruler on the top. If you no longer want them later, just drag them back onto the rulers.
3. This is much larger than we want it, so go to edit/transform/scale. Make it 1/4 of its current size (hold down shift while you click and drag so the proportions will stay even), and drag it to the bottom center of the screen. If snap seems to be making the sides uneven, turn it off (view/snap, or CTRL+; ).
4. Create a new layer beneath layer 1 (you can drag a layer above or beneath other layers in the layer window). Fill it with black, using the paint bucket tool.
5. Merge the little triangle with the black layer (layer/merge down, or CTRL+E). This prevents annoying white outlines later.
6. Select the whole canvas. Copy it (edit/copy or CTRL+C), and paste. Rotate it 180 degrees (edit/transform/rotate 180 degrees). Because the first layer is now hidden, you need to change the blending mode (the box on the layer menu that currently says 'normal'). Change the blending mode to 'screen' instead. You should now see both white spots. Repeat this twice more, using 90 degrees CW and 90 degrees CCW. When you have all four spots, merge them together (by hiding the background (clicking on the eye beside it on the layer window) and selecting 'merge visible' (CTRL+SHIFT+E))
7. We need 8 points, not four, though. Select all (CTRL+A), copy, and paste. Change the blending mode to screen, just like before. Now go to edit/transform/rotate, hold down 'shift,' and rotate 3 'clicks,' or 45 degrees. Select all again in your newly rotated layer, and cut and paste. Then delete the old layer (this eliminates everything that got rotated offscreen but is still there and interfering with your picture). You may need to change the mode to 'screen' again. Then merge down.
8. Now that we have our basic form, the fun part starts (and you can and should save this 8-point star, as it is now, in case you want to change things later). There are a lot of things you can do to change your end result here, but for this tutorial I'll simply spherize it by going to filter/distort/spherize, and choosing 100%. (Another nice-looking one is obtained by using pinch once or twice and then enlarging the picture, this creates a smaller star with longer rays.)
Make a copy of the star (the easiest way is dragging the layer onto the 'new layer' button), name it 'star', and hide it. This way you have a backup to copy from, just in case. You should only have 3 layers now, the 8-point star you made, its now-hidden copy, 'star' (which you don't edit), and the background.
Related content


Comments: 3

Thank you so much for posting this! I'm going to go play with it right now...
👍: 0 ⏩: 0


x o My eye makes it blink for some reason.. anyways it's cool
👍: 0 ⏩: 0