HOME | DD
 raindreams — glow flower tut part 2: flower
Published: 2004-09-30 03:11:13 +0000 UTC; Views: 2410; Favourites: 16; Downloads: 258
Redirect to original
Description
Here's part 2, where we turn that star into a flower and give it some color. Step 8 text is included because this is the best place to individualize your results, especially through filters.(8). Now that we have our basic form, the fun part starts (and you can and should save this 8-point star, as it is now, in case you want to change things later). There are a lot of things you can do to change your end result here, but for this tutorial I'll simply spherize it by going to filter/distort/spherize, and choosing 100%. (Another nice-looking one is obtained by using pinch once or twice and then enlarging the picture, this creates a smaller star with longer rays.)
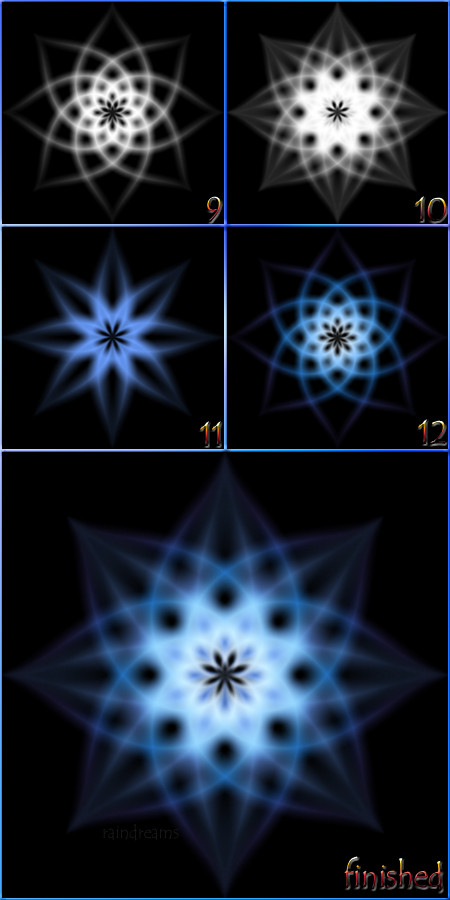
9. Now to make the actual flower. In the visible star layer, go to filter/distort/twirl, and choose 150 degrees. Copy this layer, and rotate the copy horizontally. Now change the blending mode of the flipped layer to 'screen', and merge it with the other twirled layer. Call the layer 'twirl 150' for reference.
10. For added effect, let's superimpose another one on top of this. Make another copy of the star and repeat step 9, this time twirling only 50 degrees, and calling the result, predictably enough, 'twirl 50'. (We'll change the blending mode later, I blended them here for reference).
11. Looks good, but somewhat chaotic and colorless. To add color, double-click on '50.' Color overlay is easy enough, change the blending mode (on the layer effects screen, not the layer window itself) to 'multipy' and pick your color (I chose 6B9FFF here). Drag '50' below '150' so we can see what we're doing in the next step.
12. Gradient overlays are pretty similar, again make sure you choose 'multiply' mode so that only the white parts are affected. Radial gradients tend to work better because they match the style of the flower. Here I used a radial gradient: FFFFFF(white) at 0%, 7DC0FF(light blue) at 25%, 2B8DFB(slightly darker blue) at 50%, and 7B71FF(light purple) at 75%.
13. Now we'll put them together (Photoshop sometimes does undesirable things when you try to use a 'multiply' layer effect on a screened layer).Create a new, empty layer just below 'twirl 50'. Then merge '50' into the blank layer (this just makes it a layer without any effects, even though it looks exactly the same). Now you can change the blending mode to 'screen' without messing up other layers.
14. You're done! Tweak or resize it if you need to, or try some other effects, and that's it!
**Incidentally, if you try out this tutorial, please link me to it- I would love to see it!
Related content


Comments: 6

I like the 11th frame even by itself. I love symmetry. Good job on this.
 (Smile)")
👍: 0 ⏩: 0

.... at lost for words..... all i can say is that is some beautiful shiznits.
👍: 0 ⏩: 0


Tried it out a few times, put up my two favorites. Thanks for the guide!
👍: 0 ⏩: 0

hey, that's nifty.
I'm going to try it out sometime.
👍: 0 ⏩: 0