HOME | DD
 Ryoko-demon — Jessie wig tutorial
Published: 2010-12-04 20:39:57 +0000 UTC; Views: 284624; Favourites: 4057; Downloads: 4247
Redirect to original
Description
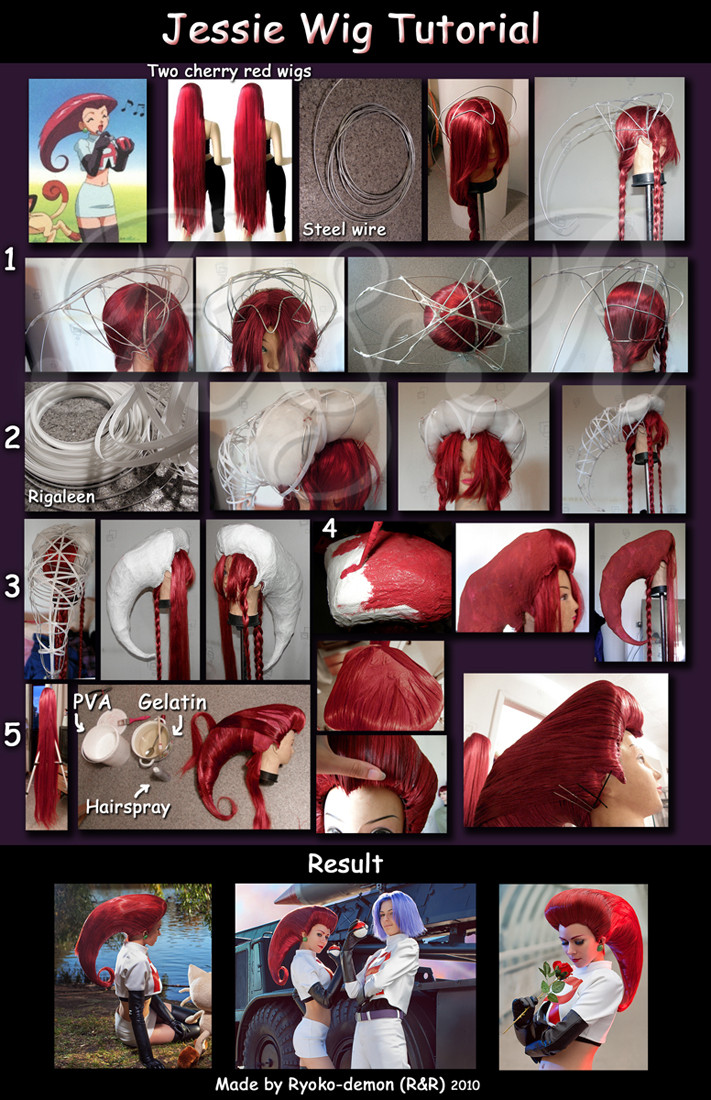
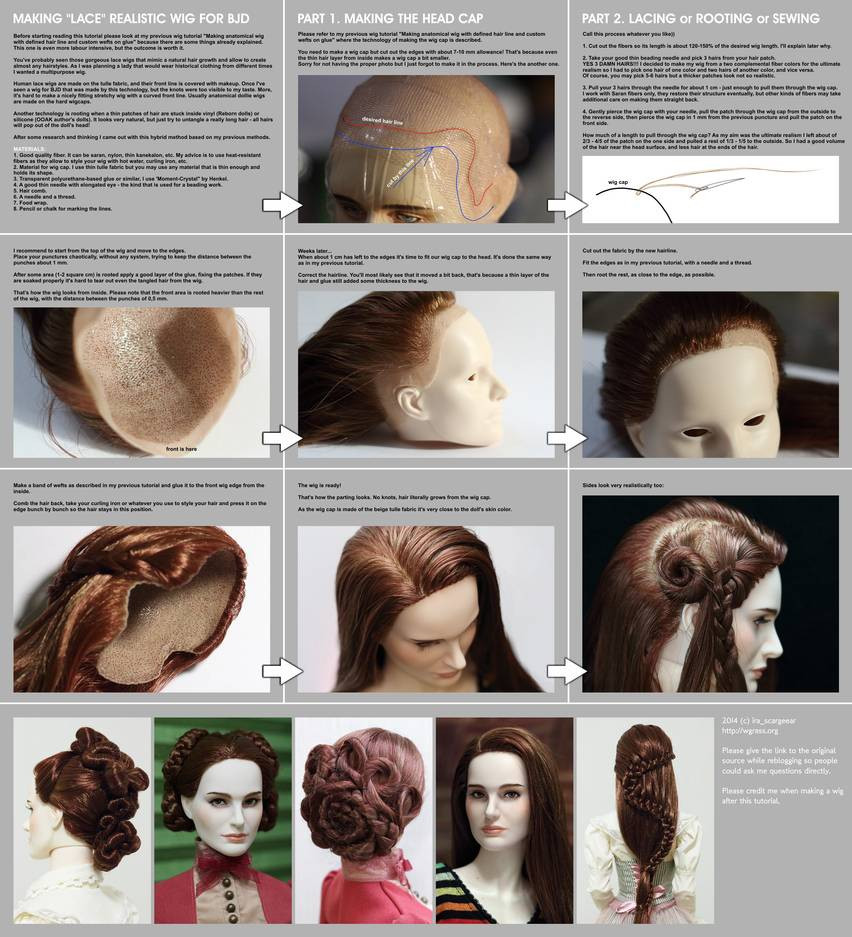
* R&R ArtGroup - Facebook page *1. Two cherry-red wigs (51’’); steel wire (better to use a lighter, for example, aluminum!). It is very important for mannequin head to be a little bit smaller than yours (it was my mistake, mine was 4 cm smaller around, it’s too small, as a result the wig pressed on my head awfully). The skeleton is made of wire and right over one of the wigs and fixed by sewing it to the wig net. It’s necessary to make a strong bearing on the back of the head, on the top and the triangle, covering half of the forehead. Also remember about the ears and temples, you should create the form you need while making the skeleton of wire. The crossing wire can be fixed with the sellotape.
2. Reel the plastic bonding (also used as bones in corsets) on the wire skeleton, bind crossing parts and fix them with sellotape. You need to make a roundish form with minimum of intervals. Put some padding polyester into the front part of the skeleton to make it puffy.
3. Fix the form with the help of papier-mache. I used paper napkins and PVA glue. Make several layers.
4.Paint it in the colour of the wig. I used acrylic, as I had nothing else at that time.
5. Glue the locks of the wig to papier-mache structure with PVA, by thin layers, removing the excess of the glue. First I glued the locks at the bottom across the structure, then upper and side locks. Sometimes for styling I used granulated gelatin (jelly) – glass of water for 1 tablespoon of gelatin, wait for 40-60 minutes, while it melting in the water and then warm but not boil. Cut the locks from the second wig and glue them to the bear intervals. Last of all glue the locks from the very top to the end of the structure. Cut the front locks so it makes an effect of real hair growth. If somewhere locks do not hold well, fix them with the hairpins, and wait till they are harden. At the top of the neck I left some wigs hair to hide my own hair. Do not forget to try the structure on during the process. For the safety of the ready wig cover it with the hairspray.
______________________________
My mistakes:
The top the wig came out too high, it can be avoided. Forms for the ears came out not deep enough, that’s why my ears were squeezed a little. As the skeleton of the wig structure became too small inside, my own hair could not be got into the ready wig, I had to cut them shortly and shave the temples to be sure they won’t bristle. It was not enough locks to cover the bottom of the wig along. While making the wire skeleton I did not underlay anything the wire. Cover it first with something soft to reduce pressure and pain. Because of the small space inside I could not even put the comb to hold the structure at my own hair. The wig holds on my head due to the pressure and the triangle part on my forehead.
I can wear this wig for only 4 hours, and then a bump appears on my forehead. It’s not too heavy, but during some time the neck feels tired. A time will come and I will burn this monster XD
That’s what remains from the second wig [link]
During a month I practiced to style wigs and one of them was Jessie’s wig, it was one of the first my really difficult works. It came out not perfectly enough, but this tutorial will help you to make it better and avoid my mistakes. Good luck with your creativity and creation of similar works
Thanks for the inspiration to the three of my favorite Jessies
[link]
[link]
[link]
Looking at their pictures I understood that it is possible to make such wig.
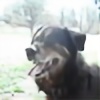
The wig and costume of Jessie made by me on July 2010
I tried to make a detailed description. I won’t answer additional questions as my English is bad.
Thanks for your attention.
Thanks Rei (Malro-doll) for the translation.
________________________________________________
1. Два вишнёво-красных парика (по 51 дюйм), металлическая проволока (лучше использовать более лёгкую, например, алюминиевую!). Важно учесть, чтобы голова, на которой вы будете делать каркас, была по размерам чуть меньше вашей (я с этим прогадала, у меня она была меньше в обхвате на 4 см, поэтому парик сильно давил в результате). Каркас из проволоки делаем прямо на парике и одновременно пришиваем. Важно сделать прочную опору на затылок, на макушку и треугольник, захватывающий половину лба. А так же помните об ушах и висках, уже на каркасе нужно создать необходимые формы. Пересекающуюся проволоку можно закреплять скотчем.
2. Наматываем регилин на проволочный каркас, пересечения сшиваем и скрепляем скотчем. Нужно, чтобы получилась округлая форма с минимальным пропусками. В переднюю часть для объёма кладём синтепон.
3. Закрепляем форму папье-маше. Я использовала простые бумажные салфетки и клей ПВА. Делаем несколько слоёв.
4. Красим каркас в цвет парика. Я красила акрилом, больше ничего не было под рукой.
5. Пряди к каркасу клеим на ПВА тонкими слоями, убирая остатки ПВА. Сначала я наклеила пряди снизу поперёк каркаса, потом верхние и боковые. Частично при укладке я использовала желатин (стакан воды на одну столовую ложку, дать раствориться в воде в течение 40-60 мин., разогреть, не доводя до кипения и немного остудить). От второго парика отрезаем пряди и так же наклеиваем их на открытые участки. Последними клеим пряди по самому верху до конца каркаса. Спереди кончики прядей обрезаем так, чтобы создавался эффект естественного роста волос. Если где-то пряди отклеиваются, фиксируем невидимками и ждём, когда пряди затвердеют. Сзади у шеи я оставила немного волос, чтобы они закрывали мои волосы. Не забывайте мерить каркас в процессе его создания. Для надёжности в конце обрызгайте парик лаком для волос.
______________________________
Мои ошибки:
Сверху каркас получился слишком высоким, этого можно избежать. Формы для ушей получились не достаточно глубокими, поэтому мои уши немного загибались под напором. Так как внутри каркас получился маловат, мои волосы под него не влезали, пришлось коротко постричься и обрить немного волос за ушами, чтобы не торчали. Мне не хватило прядей, чтобы обклеить низ ещё и вдоль парика. При создании каркаса, я ничего не подкладывала под проволоку. Обмотайте её сперва чем-то мягким, иначе будет очень больно носить. Из-за маленького пространства внутри я даже не смогла прикрепить гребень, который держал бы весь парик за мои волосы. Парик держался сам за счёт давления и треугольника на лбу.
Носить этот парик я могу не больше 4-х часов, потом на лбу остаётся шишка. Он не особо тяжёлый, но со временем шея устаёт. Настанет время и однажды я сожгу этого монстра XD
Вот, что осталось от второго парика [link]
В течение одного месяца я тренировалась укладывать парики и одним из них был парик Джесси, это была одна из первых моих настолько сложных работ. Получилось не идеально, но зато этот туториал поможет вам сделать лучше и не допустить моих ошибок.
Удачи в творчестве и создании подобных работ!
Спасибо за вдохновение моим трём любимым Джесси
[link]
[link]
[link]
Глядя на их фото, я поверила, что сделать такой парик возможно.
Парик и костюм Джесси сделаны мной в июле 2010.
Я постаралась сделать описание подробным. Поэтому надеюсь дополнительных вопросов не возникнет.
Спасибо за внимание.
My cosplay ^^
Related content


Comments: 336

this is really cool, i've been dappling in styling wigs for a year now so i understand how much work this must have been, but it definitely paid off!!
👍: 0 ⏩: 0

Oh wow, that's too perfect!
How does the wig stay on your head?
")
👍: 0 ⏩: 0

I cannot thankyou enough for posting this. My freind and I are about to follow your instructions to the ladder, I hope ours turns out as epic as yours did! I LOVE YOU THANKS
👍: 0 ⏩: 0


How long did it take you to make the wig, 'cause it is amazing!
👍: 0 ⏩: 0

Amazing!! *_* May I put this tutorial on my blog?
👍: 0 ⏩: 1


This is so amazing! I'm being Jessie for my group this fall and I was all "how???? T^T" This should definitely help out a lot! Once I get it done I'll credit you for it :3
👍: 0 ⏩: 0


this is very helpful if I chose to do a crazy wig like this  (Smile)")
👍: 0 ⏩: 0


Awesome! Thank's for taking the time to make a tutorial!
:3
I will probably be using this in the future.
xD
👍: 0 ⏩: 0

обожэ, респект тебе огромейнейший! Очень приятно видеть прямые руки и умелую работу С:
👍: 0 ⏩: 0

")

simply wonderfull!
This tutorial is great! tnx sooo much!
 (Wink)")
👍: 0 ⏩: 0

I know you said you wouldn't answer additional questions, but would it be possible to simply link to the type of "PVA" glue that you used? I'm trying to come up with the equivalent here in America, and having some difficulty. I want to make sure I get the right stuff. : )
👍: 0 ⏩: 1

Afaik, in the US they call PVA glue 'white glue', though I could be wrong.
👍: 0 ⏩: 1
Hmm. When I did a search for "PVA" glue, it came up as a clear-drying glue that is PH neutral and isn't affected by humidity; primarily used in paper crafting.
I don't know that our "white glue" would equate, since I don't think it's PH neutral.
👍: 0 ⏩: 1
"White glue (polyvinyl acetate, or PVA): PVA glue is a white liquid, usually sold in plastic bottles. It is recommended for use on porous materials -- wood, paper, cloth, porous pottery, and nonstructural wood-to-wood bonds. It is not water resistant. Clamping is required for 30 minutes to 1 hour to set the glue; curing time is 18 to 24 hours. School glue, a type of white glue, dries more slowly. Inexpensive and nonflammable, PVA glue dries clear." from [link]
Does that help?
👍: 0 ⏩: 1


hai, i am using your tutorial for making my jessie with this is my jessie wig [link]
thank you so much for your tutorial ^0^
👍: 0 ⏩: 1
wow.. nice tutorial.. can i use this tutorial for making my jessie wig??
👍: 0 ⏩: 0

This is great!! I'm currently working on a Jessie costume!! Thanks for the tutorial!! (it looks really bad when people "cosplay" as jessie with flat hair.)
👍: 0 ⏩: 0


You are featured on 2010-The Best of Cosplay News [link]
👍: 0 ⏩: 0


OH MY GOSH I LOVE YOU FOR THIS!!! THANKYOU!!
👍: 0 ⏩: 0

@_@ I can't even imagine trying to make something like this. It's soooo cool though. You rock!
👍: 0 ⏩: 0


I've never seen a more perfect, well detailed wig. I've never seen anything like it before.
👍: 0 ⏩: 0

OH MY¡¡¡¡¡¡ you'are awesome¡¡¡¡¡¡¡¡¡¡¡¡¡¡¡¡ ;DDDDD I love your wig¡¡¡¡
pikaaaa¡¡
👍: 0 ⏩: 0

I was just wondering, are there any substitutes for the gelatin? I don't use gelatin (or I try to avoid it as much as humanly possible) because it is made from animals. But if there isn't a substitute, that's fine. I was just wondering.
👍: 0 ⏩: 0


OH MY LORD.
Now I know WHO YOU ARE!!! And HOW YOU DID JESSE'S HAIR!!!
Seriously, I, and so many of my Cebuano cosplay friends are amazed by your Jesse cosplay!!!
Hehe~ just saying. ^___^;;;
Now I'll go lurk through your gallery!

👍: 0 ⏩: 1


<= Prev | | Next =>