HOME | DD
 Ryoko-demon — Thumbelina wig tutorial. Part III
#cosplay #pigtails #tutorial #wig #wigtutorial #thombelina
Published: 2015-03-03 17:03:48 +0000 UTC; Views: 23059; Favourites: 310; Downloads: 234
Redirect to original
Description
* R&R ArtGroup - Facebook page *Many, many thanks to Rei for the translation!

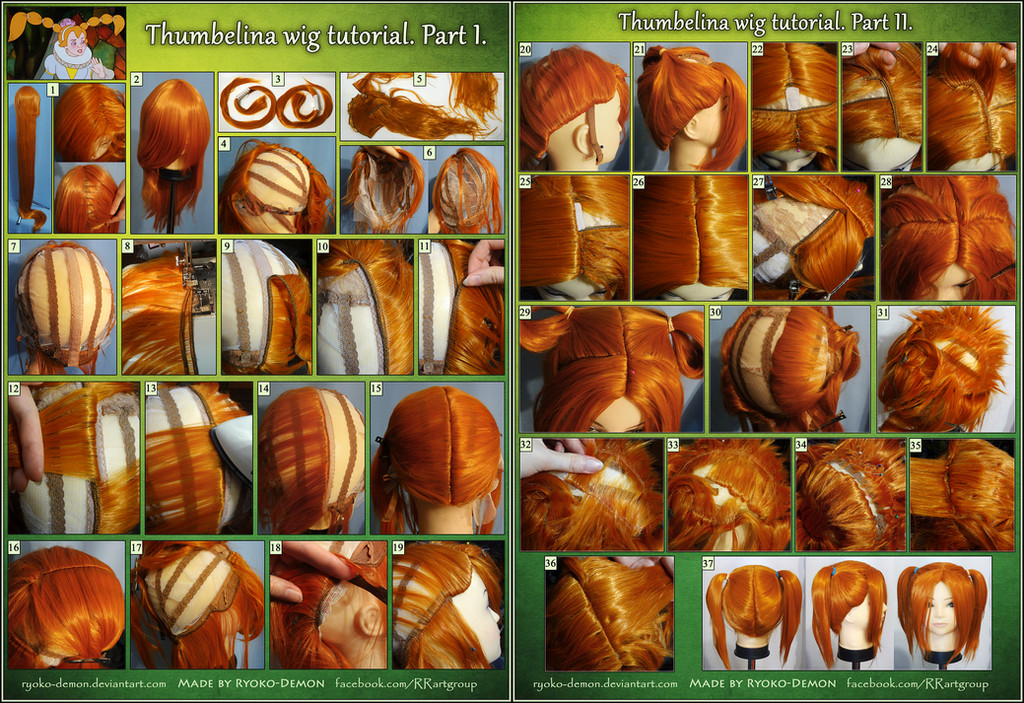
Part I and II- here:
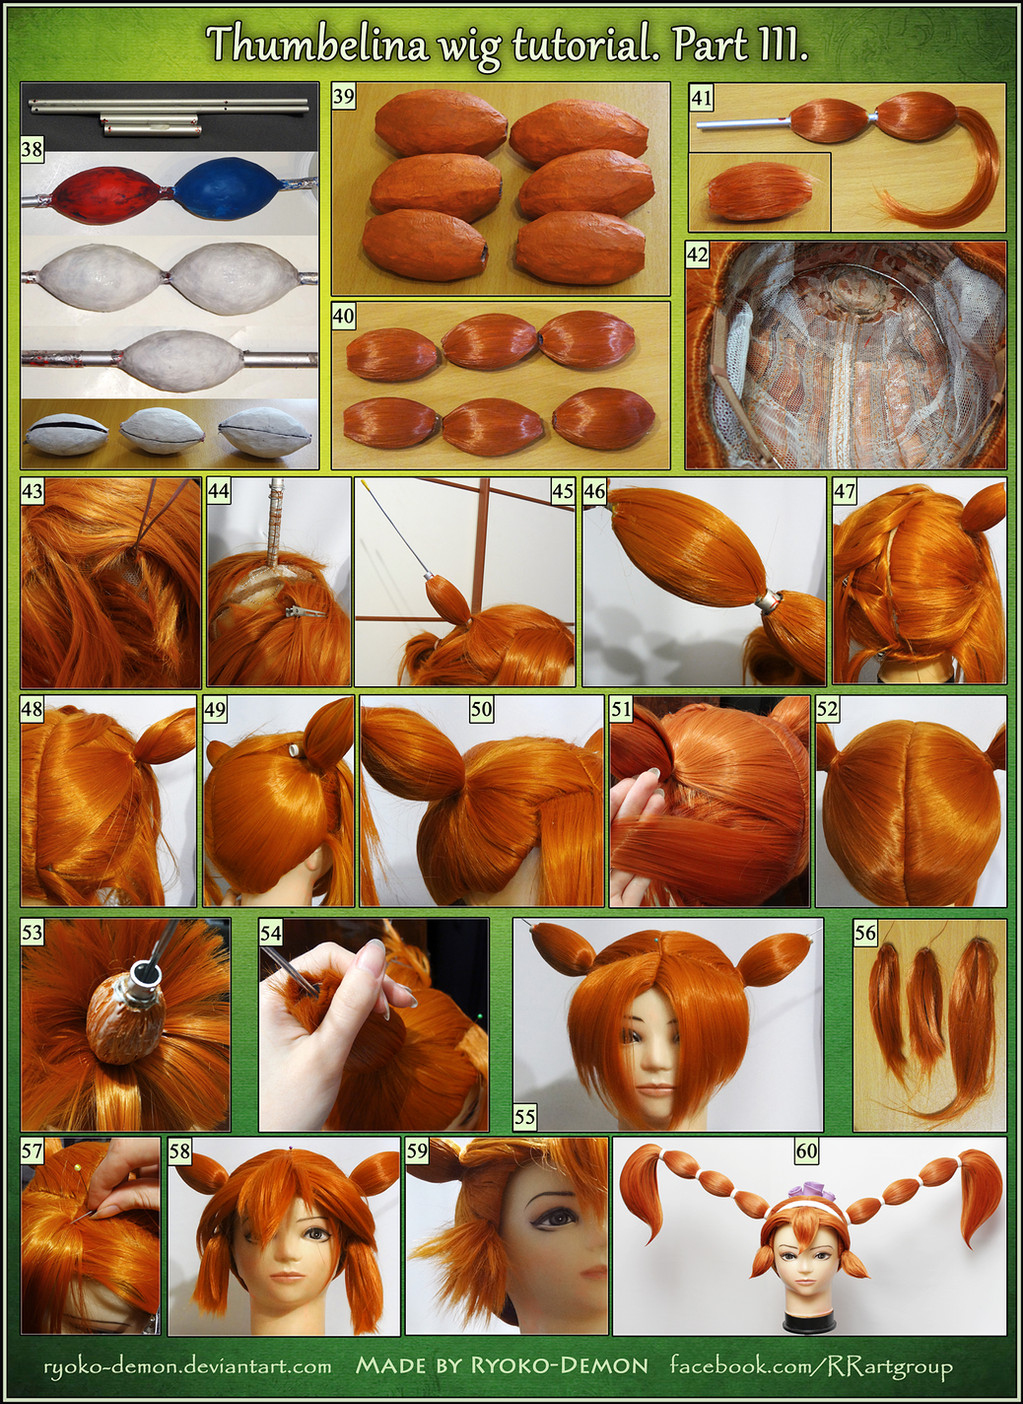
Part III.
Now we’ll make Thumbelina’s hairstyle.
38. I took 2 aluminum tubes (it’s better to use plastic ones, they’re lighter) and 2 more tubes of a bigger diameter so I can easily put one tube into another. Make pass-through holes on both sides close to the edges in the short wide tubes. And do the same with longer narrow tubes, but the bottom holes of longer tubes must be on the same place of the upper holes of the shorter tubes. This will allow to take your wig to pieces. The length of the longer tubes is equal to the length of the pigtails.
Cover tubes with foil, and make the form of the pigtails (let’s call them eggs) out of clay. Each egg is bigger than the previous one. Make smaller egg on the thick short tube and two more on the longer tube.
Cover eggs with papier-mache, don’t make too many layers. When form is ready and dry, cut it from one side and take off from the clay. Now you have 3 pistachio nuts
")
You can make such egg-forms with any other method you like, but they should be as light as possible.
39. Glue the cut and paint eggs with the colour of the wig.
40. Cover them with a thin layer of hair. I used PVA glue.
41. Fix two top eggs on the longer tube with glue and glue some hair on the top of the tube.
42. Now we need to make the frame of the construction. Mark points where you want to make your pigtails. This is where your frame will come out. I used hard metal wire. Make two arcs out of wire, attach them to the wig base from the inside. One arc is going between bangs and top of the head, shove its ends into the holes at the marked points (right where you’re going to make your pigtails). Second arc is going along the back of the head, shove its ends to the holes too. Sew wire to the base of the wig by hands. This construction won’t let your pigtails fall.
43. Here you can see the ends of the wire coming out from the inside, right on the place of the pigtails.
44. Join the ends with thread, cellotape or anything else. Put on the short tube, sew it to the wig and wire through the holes we made on the edges of the tube.
Now another important moment. We need to make one more frame to prevent pigtails from falling on the side. Make a loop out of wire, sew it to the wig from the inside and shove the end to the hole, right near the tube. Join them with threads and glue. So now we have one more footing from the side, the loop will lean on your head.
Now the construction is safe. If the wire hurt your head from the inside cover it with some soft material.
45. Fix the smallest egg on the tube. Consider that the upper holes on the tube need to stay uncovered, same thing with the bottom holes of the longer tubes. You can cut the extra wire or just bend it during the transporting of the wig.
46. Here you can see the coincident holes of the tubes, when I put one into another. It’s enough to put a thin wire through the holes of both tubes to make the longer nerrow tube stay safely into the short one.
Cover the upper eggs with more hair.
47-52. Smooth and fix with hairspray the inner layers of hair. Make the pigtails and fix with hairspray. You can also make an extra fixation with glue and threads at the bottom of the pigtails (I usually use edible gelatin for this)
53-54. Cover the bottom egg with the hair of the pigtails, cut if necessary and glue. Bottom layers of hair I glue with PVA glue, top layers I fix with hairsplay.
55. Cut bangs.
56. With the remains of the hair make flocks for bangs and temples.
57. Sew flocks to the wig.
58. Cut.
59. Tease, style and fix with hairspray. The very tips fix with glue.
60. The result.
In addition:
The ends of the pigtails. Unfortunately I don’t have photos of how I made them, so I’ll try to explain briefly. Glue or sew some hair to the ends of the tubes, tease the middle part of hair as much as possible and layer after layer cover it with upper hair, style and fix with hairspray. You can use the hairdryer to make hair more flexible, it’ll ease the process. Put some glue to the tips. You can use any glue you like, but it should be transparent and invisible after drying.
I made the flowers of a baking clay with a wire frame that I fasten into the wig. Painted with acrylic paints.
Bangs. Tease it, style and fix with hairspray. Hairband helps to keep it on place.
I glued white ribbons between the eggs. Unfortunately I have to remove one of them each time I undo the construction and then put it on again.
I hope this tutorial will be useful for you, now you can make your own constructive wigs
>>>>>> On the stage (video) <<<<<<
На русском.
Часть III.
Приступаем непосредственно к причёске Дюймовочки.
38. Я взяла две более узкие алюминиевые трубки (лучше использовать пластиковые, будут немного полегче), и две более широкие. Узкие легко входят в широкие. В широких сверлим отверстия насквозь сверху и снизу. В узких - сверху и с другой стороны ровно по высоте отверстий на широких. Это сделано для того, чтобы хвосты разбирались. А фиксироваться они будут именно на стыке отверстий. Длина узких трубок должна быть ровна длине хвостов в причёске.
Обматываем трубки фольгой, чтобы потом легко можно было снять с них форму. Из пластилина лепим деления хвостиков (назовём их – овалы). На широкой трубке делаем самый нижний овал. Он будет самым маленьким. Средний овал чуть побольше и верхний самый большой, их делаем на тонкой трубке.
Покрываем в несколько слоёв папье-маше. Первые пару слоёв я фиксировала на воду, чтобы легко можно было вытащить пластилин, а остальные на клей ПВА. Много слоёв делать не нужно. Использовать можно газету, бумагу, салфетки.
Когда форма полностью высохнет, делаем разрез канц. ножом с одной стороны и достаём пластилин. Получились фисташки =D
Не обязательно делать овалы из папье-маше. Можете использовать монтажную пену.
39. Заклеиваем наши овалы и красим в цвет парика.
40. Обклеиваем тонким слоем волос. Я использовала клей ПВА.
41. На верхний кончик узкой трубки наклеиваем пучок волос. Фиксируем верхние овалы на трубке клеем.
42. Теперь нам нужно создать опору всего каркаса. Намечаем, где у нас будут хвостики. В этих точках будет выходить опора. Я использовала жёсткую металлическую проволоку. Делаем из проволоки две дуги. Крепим их к сетке изнутри парика. Одна дуга будет проходить между чёлкой и макушкой, и её концы нужно просунуть в отверстия, где мы наметили хвостики. Вторая – по нижнезатылочной зоне и концы так же нужно просунуть в отверстия. Проволоку пришиваем к сетке вручную. Такая система не даст упасть хвостикам ни вперёд, ни назад.
43. Здесь как раз видно концы проволоки, которые выходят на месте хвостика.
44. Концы проволоки соединяем (нитками, скотчем, чем удобнее). Надеваем на них короткую трубку. Пришиваем за нижние отверстия к проволоке и сетке.
И теперь ещё один важный момент. Нужно сделать ещё одну опору, чтобы хвостики не упали вбок. Из проволоки мы делаем лапку/петлю. Пришиваем её изнутри к сетке сбоку от трубки. Её концы должны выйти чётко к трубке. Приматываем концы проволоки к трубке нитками и заливаем супер клеем (вы можете сделать это своим способом). Т.е. лапка будет опираться на голову, сбоку от хвоста.
Теперь каркас максимально устойчив. Если проволока изнутри будет давить на голову, подложите или подшейте что-то мягкое.
45. Фиксируем нижкий овал на трубке. Обратите внимание, что верхние отверстия широкой трубки должны остаться открытыми, как и нижние у узкой трубки.
Торчащую проволоку можно сделать покороче, но можно будет и просто загибать при транспортировке парика.
46. Здесь видно, как состыковались отверстия широкой и узкой трубки. Достаточно в них просунуть тонкую проволоку, чтобы узкая трубка не выпадала и не перекручивалась.
Верхние овалы покрываем ещё слоем волос.
47-52. Разглаживаем и фиксируем лаком внутренние слои волос. Собираем хвостики. Фиксируем лаком. У основания хвостики можно зафиксировать желатином и нитками (одну столовую ложку пищевого желатина разводим в стакане холодной воды, настаиваем 40 минут, ставим на плиту до полного растворения желатина, не доводя до кипения).
53-54. Собранными в хвосты волосами обклеиваем нижний овал, подрезаем. Нижние слои я клею на ПВА, верхние фиксирую лаком и где нужно, желатином.
55. Стрижём чёлку до нужной длины.
56. Из остатков волос сшиваем пучки для чёлки и висков.
57. Пришиваем пучки на нужные места.
58. Стрижём.
59. Начёсываем, укладываем, фиксируем лаком. Самые кончики можно зафиксировать желатином или клеем БФ-6 (для русских этот клей доступен, продаётся в аптеках, так что очень рекомендую).
60. Результат.
Дополнения:
Концы хвостов. У меня нет фотографий, так что опишу кратко. На концы подклеиваем нужное количество прядей (можно подшить, т.к. на концах узких трубок мы тоже делали отверстия), максимально начёсываем середину и слой за слоем укладываем, фиксируем лаком. С помощью фена вы можете подплавлять волосы, отчего они станут более податливыми и удобными для создания формы. Концы я фиксировала БФ-6, держит отлично. Можно попробовать ПВА или другим клеем. Главное, чтобы не осталось следов.
Украшение-цветы я слепила из запекаемой пластики сразу на проволочном каркасе, который вставила в парик и зафиксировала изнутри. Раскрасила акрилом вручную.
Чёлка. Начёсываем, укладываем, фиксируем лаком. Ободок её отлично держит.
Между овалами я просто приклеила полоски пенки. К сожалению, полоску между нижним и двумя верхними овалами приходится приклеивать после соединения частей хвостов, т.к. сначала нужно вставить проволоку в отверстия. Хотя как оказалось и без фиксации хвосты держатся хорошо, просто узкая трубка может перекручиваться.
Надеюсь этот туториал будет полезен и каркасные причёски теперь для вас не проблема  (Smile)")
Other tutorials:
Related content


Comments: 15

Спасибо большое за туториал, если бы не он-не решилась, пока в процессе, не так красиво как здесь выходит, но главное делать, а там уже в процессе будут решения приходить- очень очень полезнй туториал.
👍: 0 ⏩: 0

It's incredibly generous of you to share your knowledge with the rest of us! This is a wonderfully in-depth tutorial, it must have taken a lot of time and effort.
If I may ask one clarifying question - how did you make the "flocks" for the temples and the bangs? It doesn't look like you just sewed the ends, the point is so clean and neat. Did you glue the hair together?
👍: 0 ⏩: 0

You know, I was just gaping at this tutorial with my mouth open all the way going through it. This is nothing short of amazing, you really know your way with wigs!
I'm really impressed, definitely going to be watching you and maybe pick up a few tricks ^^

👍: 0 ⏩: 0

So Awesome!!! Awesome wig!!!
Congrats!! Best work ever <3
👍: 0 ⏩: 0

•-• that it the most hard ever see! Bravo!!!!!!
👍: 0 ⏩: 0


Holy crap that is amazing!! Your tutorials are so detailed! Thank you!
👍: 0 ⏩: 0

Your wig tutorials are the best thing ever. (and your finished wigs also, of course XD) Thank you very much for sharing your knowledge!
👍: 0 ⏩: 0

things like this.... wants me to beg for a VIDEO tutorial xD
but daaang! THIS IS AWESOME!
👍: 0 ⏩: 0


My word! The amount of time and work you put in! This is amazing!
👍: 0 ⏩: 0
