HOME | DD
 Wub-Bouncer — How to Limbs (Anthro)
#anthro #arms #bouncer #feet #gray #hands #legs #ligaments #tutorial #wub #how
Published: 2015-02-04 20:33:17 +0000 UTC; Views: 23899; Favourites: 245; Downloads: 62
Redirect to original
Description
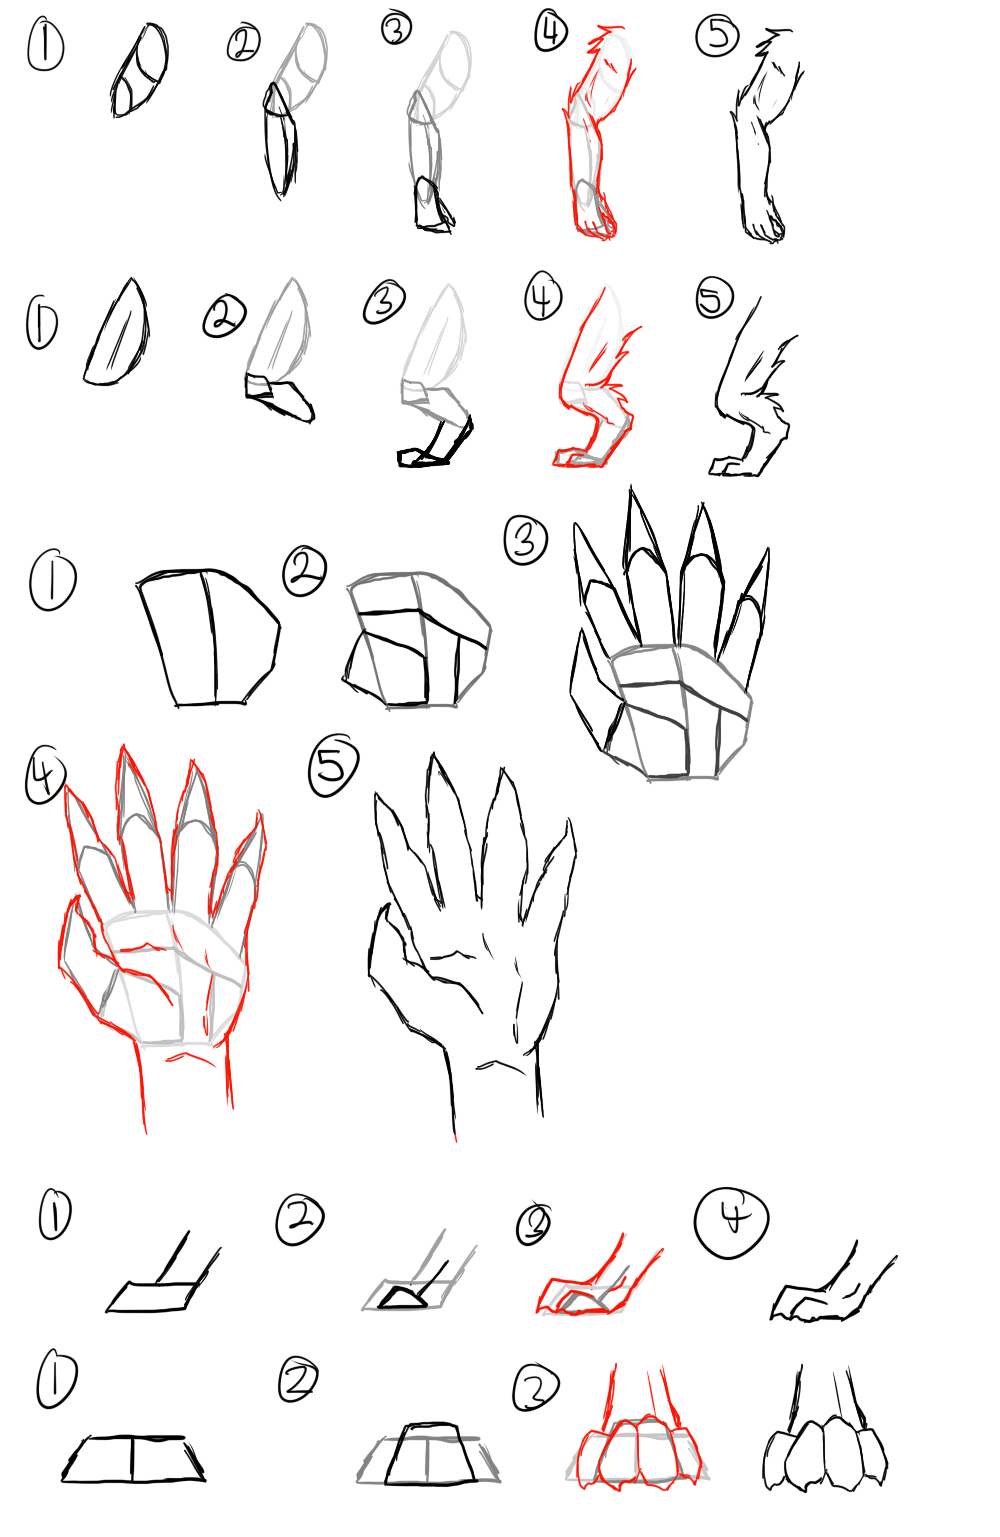
Now with this you can semi follow this for human limbs, with the exception of the legs and feet. But the arms and hands are similar its just more sharp and pointy in some areas.For the First Section we have the arms and ill go over some steps below:
1: Draw that shape! It dont know what else to call it other than a diagonal line with a circular bottom.
2: Draw that shape again! except this time its a bit thinner this time, and comes to almost a point t words the bottom.
3: Draw a box for the had, you can see the hand tutorial (frontal view) lower down the page.
4: Add some details! For more anthro furry creatures i recommend adding some fuzz to the shoulders and elbow, since it is where fur is more likely to stick out from. More feminine characters may seem less fuzzy in that regard.
5: a more clearer version of 4.. tada!
For the second section we have anthro like legs, these can also be used as drawing hind legs for animals as well, not all animal types but for a great variety of them:
1: Draw that shape! Again! its kind of like the arm shape but of course much more... meaty? This is the thigh we are talking about here.
2: this is a combination of two shapes one forming the kneecap and the second forming part of the upper calves. This should bend back into the thigh area a bit.
3: this is the lower calve and the foot, this is going to be straight lines but give it the look of curving back out from the upper calve.
4: Add some details, and connect the shapes with single lines. A side view and front view on foot tutorials are lower down the page.
5: More clear version of 4.... ta ta ta da
This is the front view hand tutorial, i thought it would be good to add this, if anyone requests it i can go into some other hand poses, but since hands are not my strong point i didn't add them onto this tutorial:
1: Draw that shape, i dont know what to call it.. maybe a rhombus? I forgot the names of shapes from geometry class apparently, but anways once youve drawn the basic outline your gonna wanna split it in half.
2: This is a shape that represents the first part of the thumb ligament and the mushy muscle next to it. i also added aditional lines that separate the center of the hand and the muscles that surround it.
3: draw some fingers, here is my own guide lines to drawing fingers, they have three sections, but i normally draw them in sections of 2 jsut like your thumb, cause the top part of your fingers do not move much unless its like your pinky. The thumb useually bends twords the other fingers, and the pinky stretches away from the middle three. The three fingers in the middle almsot always move together some way, and the pinky falls behind in a sense but thats for another tppic i suppose.
4: draw some details showing some of the muscle n what not (though i did a rough and poor job of doing so). For anthros some people like to draw a muscle art that sticks out liek a paw, which is fine, if i were to do that i would add it to finger tips and then have a marge muscle that follows the shape of the center of your hand dead center.
5: clear version of 4... all 5's are the same yes.
Next is the foot part, its pretty simple, i think many people can probably grasp this with ease, it was one of the first things i learned how to draw with any decency when i first started: First section is side view next will be front.
Section 1:
1: draw that its pretty much a box with a slanted end and two diagonal sticks coming out at the end.
2: this smaller box and line represents where the smaller toe is and ankle is.
3: add some details... the thing to remember about animalistic feet is that the two center toes are larger or rather taller than the two side ones. Not everyone draws them this way, and some draw them with all 4 the same size, if that's the case then just a lard box for each toe is needed.
Section 2:
1: Draw another box, but having two slants of equal length on each side. Separate it down the middle as well.
2: Add another box that is slightly taller than the one you drew previously, but this time no slants, you pretty much want the width lines to be the new middle separated for the already halved box.
3: in this i added some dteail ,and two lines to show it coming into the leg. The toes are pretty much just large square like circles with tiny thorns at the bottom.
Hope you enjoyed all the tutorials thus far, if you would like a tutorial on anything else, please let me know in the comments below or send me a note other wise.