HOME | DD
 Yuki87 — Mokona - with Pattern
Published: 2011-04-12 14:37:46 +0000 UTC; Views: 34562; Favourites: 219; Downloads: 753
Redirect to original
Description
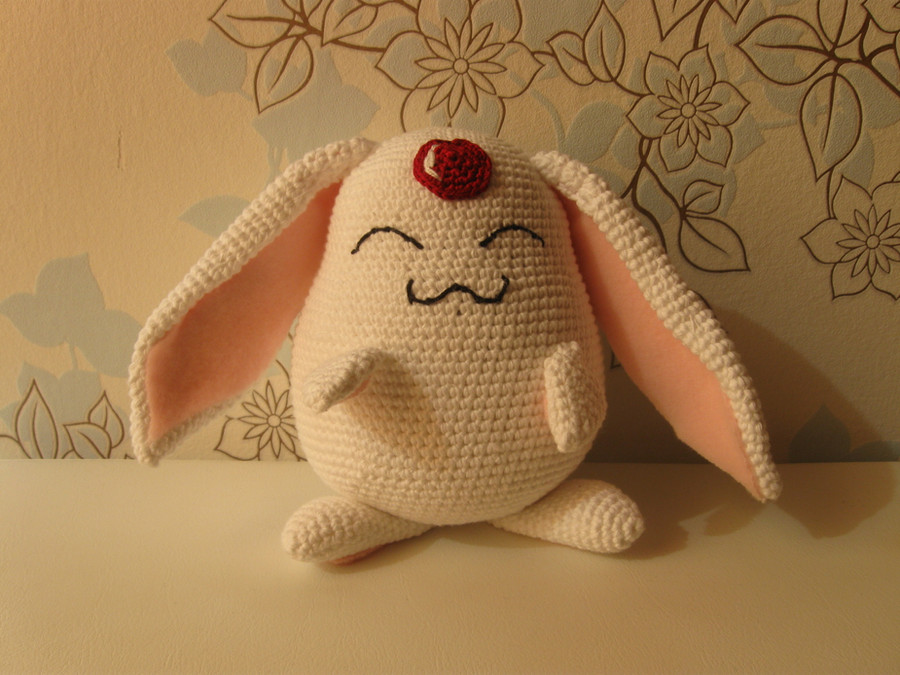
 little Mokona is done!
Ok, he is definitely not little, he is as big as my Totoro.
The reason therefore is, I used Totoros body pattern for Mokona too.
The original pattern can be found here [link]
This cutie was made out of thick cotton yarn and a much to small hook so my arm/hand hurts now. To the inside of his ears, hands and feet a piece of fleece was glued. I could have used felt, but this is much more...fluffy
---------------Pattern---------------------
Mokona Pattern, made out of the basic form of the “Blue Totoro Crochet Pattern” from Lucyravenscar ([link] )
I’ve changed the ear pattern and invented new hands and feets. So I try to write my pattern down and use the original pattern as a reference for the correct form. (I’m from germany, we have other systems and abbreviations for writing them down...and even these I can’t read ^^)
Materials:
White yarn, I’ve used “8-yarn” cotton whool
Small amount of black yarn/embroidery thread for the face
Tiny amount of red yarn for the stone
Stuffing
Embroidery needle
3mm hook (a thicker one would have been easier on my hand/arm)
A small amout of pink felt or fleece
Abbreviations:
ch = chain
tch = turning chain
st = stitch or stitches
sc = single crochet (US), double crochet (UK)
hdc = half double crochet (US), half treble (UK)
ss = slip stitch
inc = increase
inc 2 = increase by working 2 sc into one st
dec = decrease
dec 2 = decrease 2 st down to one
FO = finish off
Instructions:
Work in continuous rounds. Most rounds are written in the format:
Round number: [work a number of sc, increase or decrease by one st] x however many times (leaving however many st that round).
Leave long tails of yarn on each part in order to sew to body. Leave an extra long one on one arm to sew upside-down V marks on tummy.
Work the body until the hole is still big enough to fit your hand inside (rnd 48 or so) then fit the eyes.
The ears and hands need no stuffing, but the feet.
Body:
1: 6sc into magic ring
2: 2sc into each st (12st)
3: [1sc, inc 2] x 6 (18st)
4: [2sc, inc 2] x 6 (24st)
5: [3sc, inc 2] x 6 (30st)
6: [4sc, inc 2] x 6 (36st)
7: [5sc, inc 2] x 6 (42st)
8: [6sc, inc 2] x 6 (48st)
9: [7sc, inc 2] x 6 (54st)
10: [8sc, inc 2] x 6 (60st)
11-20: Work 60sc for 10 rounds
21: [5sc, inc 2] x 10 (70st)
22: [6sc, inc 2] x 10 (80st)
23-38: Work 80sc for 16 rounds
39: [18sc, dec 2] x 4 (76st)
40: [17sc, dec 2] x 4 (72st)
41: [16sc, dec 2] x 4 (68st)
42: [15sc, dec 2] x 4 (64st)
43: [14sc, dec 2] x 4 (60st)
44: [13sc, dec 2] x 4 (56st)
45: [12sc, dec 2] x 4 (52st)
46: [11sc, dec 2] x 4 (48st)
47: [6sc, dec 2] x 6 (42st)
48: [5sc, dec 2] x 6 (36st)
49: In back loop only [4sc, dec 2] x 6 (30st)
50: [1sc, dec 2] x 10 (20st)
51: [dec 2] x 10 (10st)
52: [dec 2] until hole is small enough to be sewn closed
Ears (make 2):
1: Ch 2, 4sc into 1st ch, link to 1st sc with slip st.
2: [1sc, inc 2] x 2 (6st)
3: [2sc, inc 2] x 2 (8st)
4: [3sc, inc 2] x 2 (10st)
5: [4sc, inc 2] x 2 (12st)
6: [5sc, inc 2] x 2 (14st)
7: [6sc, inc 2] x 2 (16st)
8: [7sc, inc 2] x 2 (18st)
9: [8sc, inc 2] x 2 (20st)
10: [9sc, inc 2] x 2 (22st)
11: [10sc, inc 2] x 2 (24st)
12: [11sc, inc 2] x 2 (26st)
13 - 20: Work 26sc for 8 rounds
21: [24sc, dec 2] x 1 (25st) <- means leave out the last stich
22 - 29: Work 25sc for 8 rounds
30: [23sc, dec 2] x 1 (24st) <- means leave out the last stich
Now crochet only the half row (12st) = first row of 12st
Add a turning chain and crochet 12st back = second row of 12st
Make four more rows of 12st with tch = at the end you’ll have 6 rows of 12st, FO, leave a long tail to sev the ears to the body.
Glue the felt/fleece to the inside of the ears.
Stone:
1: 6sc into magic ring
2: 2sc into each st (12st)
3: [1sc, inc 2] x 6 (18st)
4: [2sc, inc 2] x 6 (24st)
Leave a long tail to sew the stone to the body.
If you like, you can sew a bit of white yarn to one side of the stone to make it look like a light reflex.
Hands (make 2):
1: Ch 2, 4sc into 1st ch
2: [1sc, inc 2] x 2 (6st)
3: [2sc, inc 2] x 2 (8st)
4: [3sc, inc 2] x 2 (10st)
5: [4sc, inc 2] x 2 (12st)
6: [5sc, inc 2] x 2 (14st)
7 - 8: Work 14st for 2 rounds
9: [5sc, dec 2] x 2 (12st)
Leave a long tail to sew the arms to the body. No stuffing required.
Glue a round piece of felt/yarn to the inside of the hands.
Feets (make 2):
1: 6sc into magic ring
2: 2sc into the first four st, 1sc to the next two st (10st)
3: 2sc into fourth and sixth st (12st)
4: 2sc into fifth and ninth st (14st)
5: 2sc into fourth and eighth st (16st)
6 -18: Work 16sc for 13 rounds
19: [2sc, dec 2] x 4 (12st)
20: [1sc, dec 2] x 4 (9st)
21: [dec 2] until hole is small enough to be sewn closed, but stuff before!
Leave a long tail to sew the feet “under” the body.
Glue a piece of felt/fleece to the underside of the feet.
---> If you use this pattern, don't forget to add this or Lucyravenscars link!!!
Related content


Comments: 161

Of course 
I wish I could write (and read) pattern better or at all then I would write more down.
I would love to see that blog

👍: 0 ⏩: 1

That's really very nice of you. I'm also trying to write some of my patterns although I'm just starting out with this hobby. It may not be much but I hope people will appreciate it. ^^
I'll try to finish my blog soon. You'd be the first one to see.

👍: 0 ⏩: 0

Thanks....Hope you like the XXXHolic Mokona.
[link]
👍: 0 ⏩: 1
Thank you so much for the link and linking back to me
👍: 0 ⏩: 1
You're welcome....It wouldn't be right if I didn't
👍: 0 ⏩: 1
Think so too  (Smile)")
👍: 0 ⏩: 0
Looks good 
👍: 0 ⏩: 1

Thanks, my sis was looking for one but could not find one. will post pics after. =^.^=
👍: 0 ⏩: 1
I'm glad the instruction is helpful
Would you give me a link when your sisters Mokona is finished?
👍: 0 ⏩: 1

on the last row of the ears, you only work half way around all the way right?
👍: 0 ⏩: 1

I loved the show he was in, although he was kinda a wanker he was really cute as is the little doll you made of him
👍: 0 ⏩: 1
He's so cute! I can't wait to make him!
")
👍: 0 ⏩: 1
Hope you don't have any problems with the pattern
👍: 0 ⏩: 1

when you say "dec 2" Does it mean that i have to take 3 stitches to decrease to 1? O_o
Thank you!
👍: 0 ⏩: 2
In which row is it?
I'm HORRIBLE with pattern T_T I even have trouble reading those I wrote, btw. that's the only one I ever wrote.
👍: 0 ⏩: 1
Hi Hi ! Dont worry
👍: 0 ⏩: 1
i got it! you mean a simple decrease xD
it was so crazy trying to understand it! xD
👍: 0 ⏩: 0

I'm going to try making this, but I have a quick, silly question (I'm still learning how to read patterns correctly).
3: [1sc, inc 2] x 6 (18st)
That means:
1 sc in the next sc, 2 sc in the next sc (to make an increase), and then 1 sc in the next sc, 2 sc in the next sc (to make another increase) until I've done 18 st?
I just want to make sure I'm reading this right so I don't get half way done and realize I've been doing it wrong the entire time. >.<
Also, this Mokona is by far one of the best I've seen. :3 Thanks so much for the pattern!
👍: 0 ⏩: 1
Thank you
Not a silly question at all! I still can't read pattern correctly, I gave up on pattern after that one here.
But what you say is correct. You have 12 stitches from the second row. Now you crochet one sc in the first stitch, two in the second stitch and repeat that six times. Then you have 18.
To see what that means, have a look at that diagram for a kitty: [link]
If you have questions, feel free to ask me

👍: 0 ⏩: 1
Thanks for the answer. :3
I have another question about the third row on the feet, but I wasn't sure how to ask the question without a picture to show you what I mean... So here's a picture I just threw together: [link]
"3: 2sc into fourth and sixth st (12st)"
I'm assuming that you want me to do what I showed on the right (I would do the increase on my 4th sc and 7th sc). Otherwise, the two increases and right next to each other. But I wanted to make sure. >.<
👍: 0 ⏩: 1
No problem
I think you can translate the pattern this way: "3: 2sc into fourth and sixth st [of the last row!] (12st)"
That means the picture you showed me on the right side is correct, from what I can tell.
But even if you would but the two increases directly next to each other, it won't make a big difference because the yarn you use is very thick and one stitch further or sooner hasn't much weight in the overall project.
Btw. your yarn color is very nice!
👍: 0 ⏩: 0

Oooooooooh my god! That is adorable!!!
now...to figure out how to translate that pattern into knitting.....
👍: 0 ⏩: 1

SO CUTE!!!!!!!!!!!!!! [link] I'm in the process of making Mokona [link] and what line do you suggest i place the ears and the stone?
👍: 0 ⏩: 1
Thank you
The links are both to my frontpage, is that correct?
Anyway, I can't help you with the rows, because I don't count them to place the eyes etc. I add them when the plushie is stuffed and ready.
👍: 0 ⏩: 1
Oh K! and yes they are
👍: 0 ⏩: 0

I love, love, LOVE Mokona and this pattern is so great! I'm new to crochet, so I'm having a few issues with embroidering the face. Do you have any suggestions for how to correctly create the face (or a tutorial link somewhere else) so my Mokona doesn't look so strange ")
👍: 0 ⏩: 1
Yay! 
👍: 0 ⏩: 0


Beautiful!!! I love it!!
I'll try to do it, thank you very much for this lovely pattern ^_^
Bye!
👍: 0 ⏩: 1
I'm glad you like it!
The pattern are originally by someone else (who isn't on dA but on livejournal), I just have modified them a bit
Would you like to show me your Mokona when you're ready?

👍: 0 ⏩: 1
I have not seen the original model, but this is really beautiful!!!
Yes, i'll show you my Mokona with pleasure... i hope to be able to do it!!
👍: 0 ⏩: 1
The original one is the Totoro, which is also in my gallery
👍: 0 ⏩: 0

About how big is it in measurements?
👍: 0 ⏩: 1
Okay, thank you for the response. ^.^
👍: 0 ⏩: 0
| Next =>