HOME | DD
 ABrosis7AmnesiaX — Horse Line tutorial
by-nc-nd

Published: 2012-11-26 00:59:11 +0000 UTC; Views: 1961; Favourites: 37; Downloads: 11
Redirect to original
Description
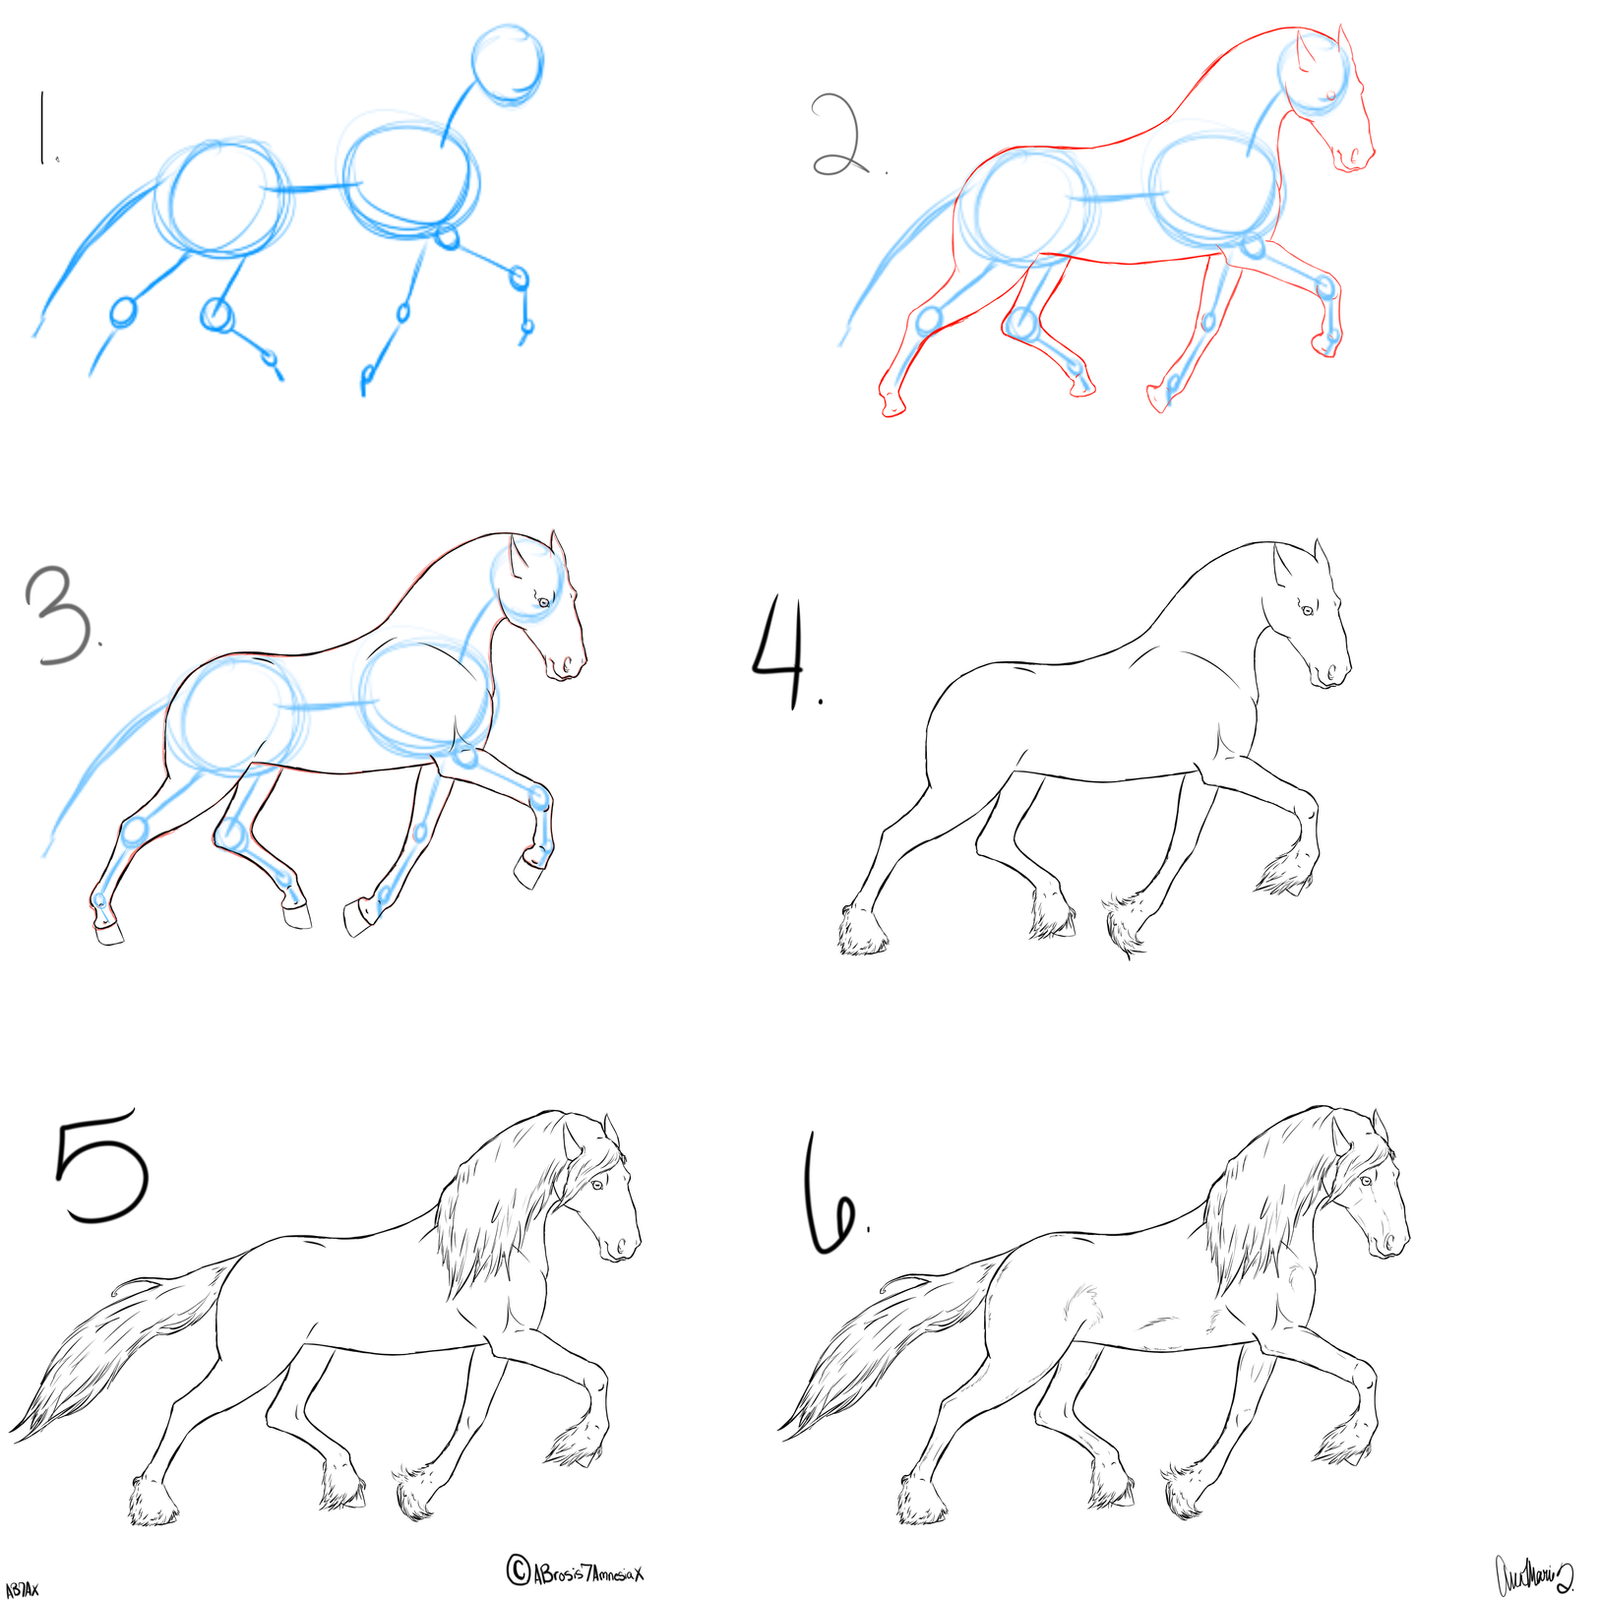
Digital tools used: Paint tool SAI size 5000x5000 canvas, size 9 ink pen. Colors used: Red, Black, and Blue1


 Color: Blue. Draw Blue circles for the major parts of the horse's body such as Joints, etc. A Circle for the head, A circle for the torso, the rear, circles for the ankles, and circles for the knees.
2


 Make another Layer. Change the pen color to red, keep the pen size at 9. Draw the outline of the horse. (I normally start with the head and work my way to the back and bottom of the horse.) This is just a simple outline of the horse's body (but make sure to draw a circle for the horse's visible eye, and make sure to draw a nostril's opening). You must take into account what a horse's face looks like, and how their bodies are built. Horses are muscular animals. (Another thing I've noticed, is that a horse's head is usually the length of their forearm or slightly longer.) Merge layer 2 and one, and make their opacity 60.
3


 Make another Layer. Change the pen color to black, keep the pen size at 9. Go over the outline you did in red, but this time, make sure you add in lines where the joints are (knees, ankles, shoulders, etc.). Draw the hooves. Also, be sure to add lines where the major muscles are- at the shoulders, at the hips, (wherever i have lines at on the horse in picture 3).
4


 Make another layer. Add feathering around and over the hooves (OPTIONAL), making sure to leave just a little bit of the hoof visible to the naked eye. This horse is in motion, to the feathering must be in motion as well. Go back to the black ink outline of the horse, and erase the lines under the feathering, still leaving the visible parts of the hoof. Now go back to the feathering layer and merge the feathering with the lines layer.
5


 Make another layer. Add the mane and tail, making sure that it is in motion just as the horse is. Since the horse is moving to the right of the screen, the mane and tail must be going to the left. Go back to the base line layer and erase the un-needed lines from under the mane and/or tail. Merge the base and mane layer. YOU COULD STOP HERE IF YOU LIKE
6


 Make a final layer. Here, you will add the small details, like at the hip where the fur turns backwards. You'll add small little fur lines at the nose, below the eye, around the nostril, at the legs, etc.
7--
YOU'RE FINISHED!!!
I Hope you all enjoyed the tutorial!! If you'd like, i'll make more in the future!!!
All art belongs to me, (c) ~ABrosis7AmnesiaX
Thanks guys!!


 <3
<3
Related content
Comments: 4

You use a tablet right? If so, what kind do you use and how long did it take you to get good with it?
I've had one for years but I just can't make myself use it, so I always just use the laptop mouse, but it's not easy to create detail with that lol.
👍: 0 ⏩: 1

I use a Genius 4.5. It took me like two weeks or more to get the hang of the hand-eye coordination crap, but i love it so much <3
👍: 0 ⏩: 1

Ahh, I see. (: I got mine out, and I'm trying to get the hang of it, but for right now I'm just using it for manes and tails lol. It's really shaky. O:
👍: 0 ⏩: 1

well if you use it for a while, you can use it for just about everything
I do my drawings like the tutorial says. I start out with circles and work my way from there.
It really helps me on my shaky days :3
👍: 0 ⏩: 0


