HOME | DD
 Abstormal — Fur Tutorial

Published: 2004-12-27 00:51:13 +0000 UTC; Views: 12544; Favourites: 78; Downloads: 649
Redirect to original
Description
This is a Tutorial on how to make fur in Adobe Photo ShopSome of these steps are how I like to do it, you might have you're own way to do these. The fur is basically step 4 and 5
Remember to use many layer sets, named properly, and layers named properly to more easily find you're way among the layers.
~~~
1. Sketch
2. Basic Color
3. Shading
4. Fur part 1
5. Fur part 2
6. Shadow
~~~
1. Sketch
Make the sketch. Personally I like to do it on a paper. (Notice, this sketch was tiny
") ) Can also be done on the computer
) Can also be done on the computer2. Basic Color
The cleanest way to color is with the pencil. With the fur technique the edges will be smudged anyway. (I usually use the brush to get fine smudgy edges when I don't make this kind of fur)
Color it with the basic color's, using the paint bucket.
3. Shading
First thing first: make a new empty layer. Use the paint bucket, don't use anti-aliased, use contiguous and all layers.
Fill in the outline and one area with the same color. Erase the line art that isn't in contact with the area. Have both in the same color.
If you do this with all areas, they will overlap a little (since you have the outline on them all) Remember to sort them after who overlaps who! (The overlapping one must be over the other one in the layer order)
Now, with all areas on a separate layer, the shading can start. This is the easy way: Lock layer transparency (found on top of the layer guide)
Now you can draw outside the area without painting there!
When I shade I use a huge brush, 17 on flow, airbrush. Then just play around with many shades, use white and black on the extremes, and many shades of the color.
Doing it like that I feel it's almost like the colors melt together.
4. Fur part 1
The shading is done, now comes the FUR!
To make the fur, go to Filter/Noise/Add Noise... I found 20%, Uniform and Monochromatic as a good setting
The layer will now be all pixely. Thats a part of the plan. Must be done on each layer separately.
(The eyes, mouth and nose aren't suppose to be pixely, I just did it the fast way on the tutorial)
5. Fur part 2
Now comes the real fur! To get the pixely area to look like fur, you must smudge it. The brush shown on the pic was very good to use. It's almost at the bottom of the standard brushes (It's further up on mine cause I have allot added to the list)
Now just follow the direction of the fur with the smudge tool. You should use a big smudge brush compared to the image. Don't forget to remove the layer transparency!!!
If you are afraid to mess it up, copy the layer first. That way, if you fail you'll still have the layer and can try again! I even have a copy of all the shaded layers, the basic color and basically every step
")
Try to get all the pixels to blend, but try not to go over the same area to many times or the fur effect will disappear.
If you want the edges to have fuzzy tips on the edges, use a smaller smudge brush with the mode set to lighten and drag some fluff out from the edges.
6. Shadow
This is just a little extra: Shadow!
To make a nice shadow, copy the layer sett with the fuzzy layers (You did put it in a set? Right? It's important to use many sets, named properly!)
Merge the copied layer set. Preserve transparency on the merged down layer, and paint it all black. To make it look like the shadow of you're char go to Edit/Transform (I think it was Perspective that was the easiest to get the best result)
Drag it to look like a shadow that falls behind the char, in the right direction from the light. Make the fill of the layer small (think I used 45%) The Fill is found on the layer guide
Put it behind the char. If the "shadow" shows in the front, erase those parts.
Now all thats missing is a BG, and you're all done!
How to make a BG? Eeerrr.... I just play around with a huge brush till I like it

The finished pic: [link]
This is my first ever Tutorial. Hope it's helpful =^_^=
Related content


Comments: 34

REALLY THANKS!! This is amazing!So much helpfull! You're a genius!
👍: 0 ⏩: 1

REALLY HELPFUL!
Look: [link]
👍: 0 ⏩: 1

I'm so glad it could be of help to you

👍: 0 ⏩: 1
And I'm glad you're happy for this xD
👍: 0 ⏩: 0

Ah, hm, I don't use the technique too often any more. But I would think fairly high. Probably around 80-90%
👍: 0 ⏩: 1

I never thought that the noise filter would turn out to be useful. (I mean.. Come on. Who in there right mind would actually want to ADD noise to a picture?) Great use for it though.
👍: 0 ⏩: 1
In art it's actually very useful. Both for techniques like here, and if you want to add a drawing to a real photo, the photo has more noise so adding it to the drawing will make it look more part of the photo =^_^=
👍: 0 ⏩: 1
Yea, I guess you're right. I'm kinda sad because the smudge tool doesn't work the same on gimp as it does on photoshop. Still a great technique though.
👍: 0 ⏩: 0

Brilliant idea adding noise, and then smudging it! Big time-saver!
👍: 0 ⏩: 1
It's a great beginner technique
👍: 0 ⏩: 0

Thats a neat way of doing it. I think I'll try it. Thank you. 8D
👍: 0 ⏩: 1
Hope it works out for you
👍: 0 ⏩: 0

Your tutorial has been useful to me, thank you very much.

👍: 0 ⏩: 0

Thank you for the tutorial. It was helpful and easy to learn
")
👍: 0 ⏩: 1
Glad it could be of help =^_^=
👍: 0 ⏩: 0

Absolutely amazing tutorial! It's so simple yet so effective which makes it stand out from other fur tutorials. I used it in this pic: [link] on the manectric (which I went a bit overboard on xD) and more subtley on rapidash and blaziken.
Thanks so much for making it!
👍: 0 ⏩: 1
I'm glad people find it useful =^_^=
👍: 0 ⏩: 0

i used ur tutorial here! i liked it, its very simple!
[link]
👍: 0 ⏩: 1
Looks rely cool!
I'm glad people still find my tutorial useful =^_^=
I need to make a new version of it thou
👍: 0 ⏩: 1
lol, i like it 
👍: 0 ⏩: 0

Thats cause it is
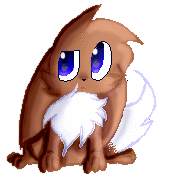
It's a fan art I made of Eevee way back when =^_^=
Thou it's fan art it's not referenced  (Smile)")
 (Wink)")
👍: 0 ⏩: 0

Neatos! ^w^
I shade mostly the same. The fur part was really helpful, I'd of never thought to do it like that, but it works great.
👍: 0 ⏩: 0

Ohh cool... ^_^
I shall try that next time I make something like that.
👍: 0 ⏩: 0

Neat tut! i just tried it on my Yeti... lol dont ask, but it works!
👍: 0 ⏩: 0

wow!! this is very interesting and very helpful, ill be sure to try that out!! i think its very clever the way that you use that brush with the smudge tool, very clever 

👍: 0 ⏩: 1
I used to shade with burn and dodge
But I think I have a better control on the shading when I do it this way
Thanks for the comment =^_^=
👍: 0 ⏩: 2

At the very beginning, I also shaded with Burn and Dodge! ^^ I agree with Sylphcat. It's probably just a phase. ^^
👍: 0 ⏩: 0
yeah i can see why you stopped, ill probably stop usung burn and dodge tools soon, im sure its just a phase. your welcome
👍: 0 ⏩: 0

XD Denne her va nyttige... *skummel plan*
👍: 0 ⏩: 0
