HOME | DD
 AnndreaLeeann — Splicer mask tutorial from Bioshock

Published: 2011-04-11 05:21:06 +0000 UTC; Views: 19671; Favourites: 144; Downloads: 318
Redirect to original
Description
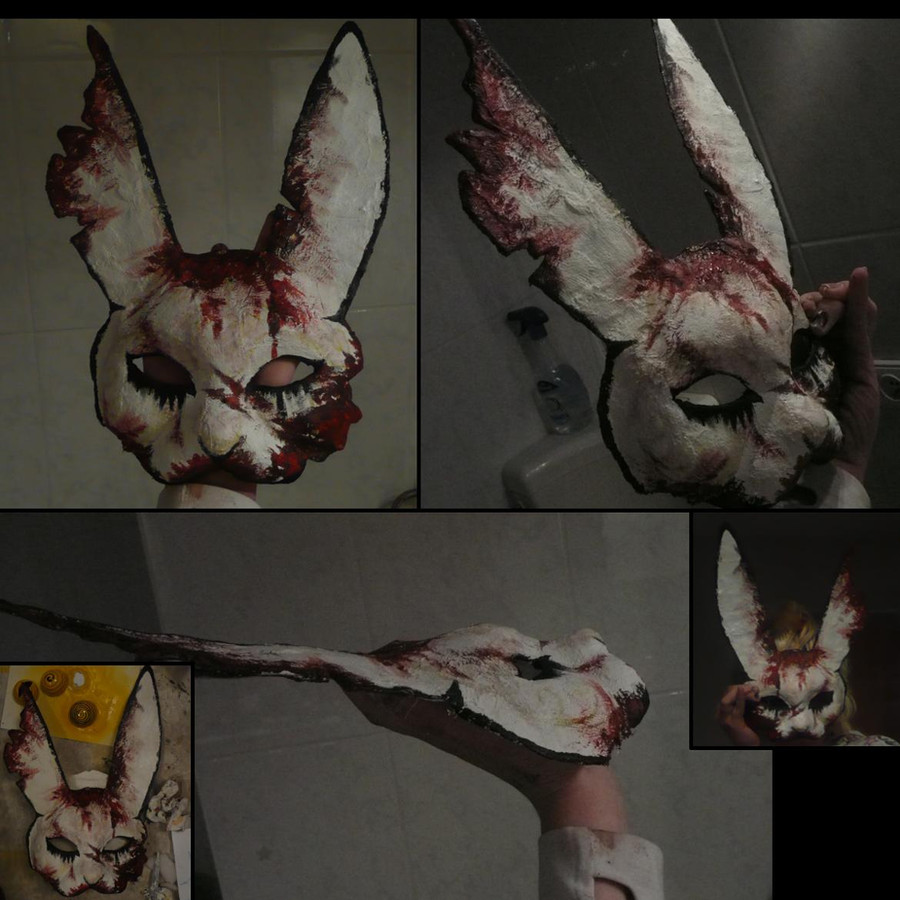
I completely updated this! I am really embarrassed at my first tutorial, so now..there is this one :] Just in time for halloween!FYI: You will need an entire roll of plastercloth, and if you don't use an entire roll, you really should lol. Just to make it sturdy. Its a solid mask, but isn't indestructible.
You can attach it to your face by hotglueing ribbon or elastic, but the heavier the mask, the more youll need to make sure it sticks to your face. (I once used long strips of velcro. That worked)
Related content


Comments: 27

COMPLETELY In love with this tut! But I have a question, is the clay too heavy to spirit to my face?? I was planning on using spirit gum to hold it to my face.
👍: 0 ⏩: 1

Ohh i would say so :/ you can always opt out of the clay art
👍: 0 ⏩: 0

any other tips and tricks? trying to make the BEST splicer mask for Comikaze, and your tutorial's perfect, by far~
👍: 0 ⏩: 1
Good luck! My biggest advice is the more plaster cloth, the better. Do not skimp out. Don't just layer it on the front, but also behind too, to secure the whole thing. *but not so much that it doesn't form to your face*
Be sure to give yourself breathing holes (i didn't my first mask, and couldn't eat with it lol)
If you are going the oven baked clay rout, make sure its sturdy enough before hand that it wont bend, because the clay will/might/WILL break off it if it moves. For a cracked splicer mask that's a-okay but for a regular mask (not broken), idk..
Also, there is a puffy air dry "clay" out there, that's like whipped playdough, i havn't tried it but i want to, it should be more flexable than oven bake and probably cheaper and easier to use.. ill let ya know, of if you go that way, let Me know! ")
👍: 0 ⏩: 1
sure, ill spread the word!
my friends and i are doing a group Bioshock cosplay, and there's, like, 13 of us, so we'll make reeally good use of your tut!
thanks again!
👍: 0 ⏩: 1
Show me some pictures when you are done!!
👍: 0 ⏩: 1
okay! yeah, i was trying to decide if i should make an EVE hypo or something, a plasmid jar sounds groovy too...
👍: 0 ⏩: 1
Covet that thang like MINE! lolol
👍: 0 ⏩: 1
*update*
okay, so...
XD it broke
i don't think i layered enough, so when I cut that chunk out of the side, the lower half broke off...gonna redo the face later
i finished the ears, gotta attach them- how'd you get the hot glue to work? mine isn't sticking
and i think i need more clay to put on the back of the ears....
did you put like a ribbon to hold it to your face? how'd you attach it to the mask?
but other than that- so far, so good!
👍: 0 ⏩: 1
Oh no!!! ")
👍: 0 ⏩: 1
oohhhhh..
plastercloth, right XD
👍: 0 ⏩: 0

Does heating the exactoknife make it easier to cut hard plastic? I bought a full faced mask to cut but the plastic is really hard and I wanted to know if your trick worked on that.
👍: 0 ⏩: 1
Yes, it does. Also will eliminate the change of the hard mask snapping. :]
👍: 0 ⏩: 1
Thanks so much for the tip!
👍: 0 ⏩: 1
I meant chance ")
👍: 0 ⏩: 1
It didn't work as well as scissors did, but it's turning out really great!
👍: 0 ⏩: 1
Well poo, sorry about that!
👍: 0 ⏩: 1
It's fine, it turned out pretty good in the end.
👍: 0 ⏩: 0

Hi there! I'm in the process of making this for Halloween  (Smile)")
👍: 0 ⏩: 1
I actually made a completely better mask with a different technique, you are free to use either if you'd like, but I'm going to explain as easily as I can how I did the others, and really, it's so much better lol :3
Instead of using a plastic mask as a base, I made the base by using plastercloth right on my face. This way it's shaped to your face and I have found that the overall shape was more game-like. (I'll attach a link to the final product, and you can pick which one you like more) [link]
First, cut a bunch (a bunch!!) of dry plaster cloth into stripes, some into squares, some thicker than others etc.
Use some vaseline on your eyebrows, hairline (secure your hair in a pony) anywhere where if you remove the plaster if will pull out hairs...
Get the plaster pieces wet, one at a time, and layer and smear them on your face in the general shape of a bunny mask. (Over your forehead, all the way down to a to a gradual slope over your upper lip up to your ears. Picture like a rounded circle. Don't breathe out your nose as it will be covered too! The thicker, the better. ) You will edit the shape later, but it's better to remove later than to add.
Let that dry for at least 20 min. Remove by scrunching up your face and wiggling to remove the dried plastercloth mask. The rest of the mask is pretty much the same as on the tutorial I do believe, but I'll explain it anyway lol.
For the ears, I'd use wire. Bendable but sort of stiff wire, bent in the shape of the ears, and filled in with plaster cloth like on the tutorial. To answer your question, plaster the ears to the mask in the front and the back yet, after you hotglue the wire if you so choose. You can then claycrete to shape from there, and use plaster cloth over that as well so the whole mask is plastered. It will be rough shaped right now, so after all is dried, you can sand down the shape til you are content.
This is just a lot easier than my tutorial, and I've been meaning to update it.. but either way, you should end up with a nice mask.
Id love to see how it looks when you are done!
Any questions, let me know! *Don't forget to drill some holes into your nose or else you can't breathe thru your nose,, or you can cut out your nose on the inside to it's a little cave if that makes sense ;]
👍: 0 ⏩: 1
Thank you! Even your first tutorial helped me tremendously. The only thing I changed was using newspaper instead of construction paper since it was all I had. Also, for the ears I started by cutting the pieces using cardboard, gluing the pipe cleaners to it leaving a few inches hanging off, and then plaster clothing over the whole ear. I also couldn't find claycrete anywhere so I just used the plaster cloth to shape below the nose. Right now I'm just waiting for it to dry and cannot wait until I get to paint it! I think I'm going to use primer and then spray paint white to add a more solid layer before using the acrylic paint for the designs. Here's what I got so far: [link]
I had a lot of fun making this and am thinking about making more in the future. I'll try your new tutorial next time. Thanks again!
👍: 0 ⏩: 1
Sounds like a perfect idea! And hot damn that looks amazing!!! Excellent job!
👍: 0 ⏩: 1
Thanks! :] I'm glad you like.
👍: 0 ⏩: 0

bravo! thanks for sharing! and i definitely want to see pictures of that party

👍: 0 ⏩: 1
