HOME | DD
 archaicart — Creating A Mood - Part One
Published: 2007-12-14 19:29:05 +0000 UTC; Views: 4118; Favourites: 36; Downloads: 141
Redirect to original
Description
Credits (Stock Images )Background - breiweistock
Model - auroradreams
Credits ( Brushes )
Tree - falln-brushes
**To download this tut complete with part two, click on download **
Archaicart Tutorials
© Tammy Kindred 2007
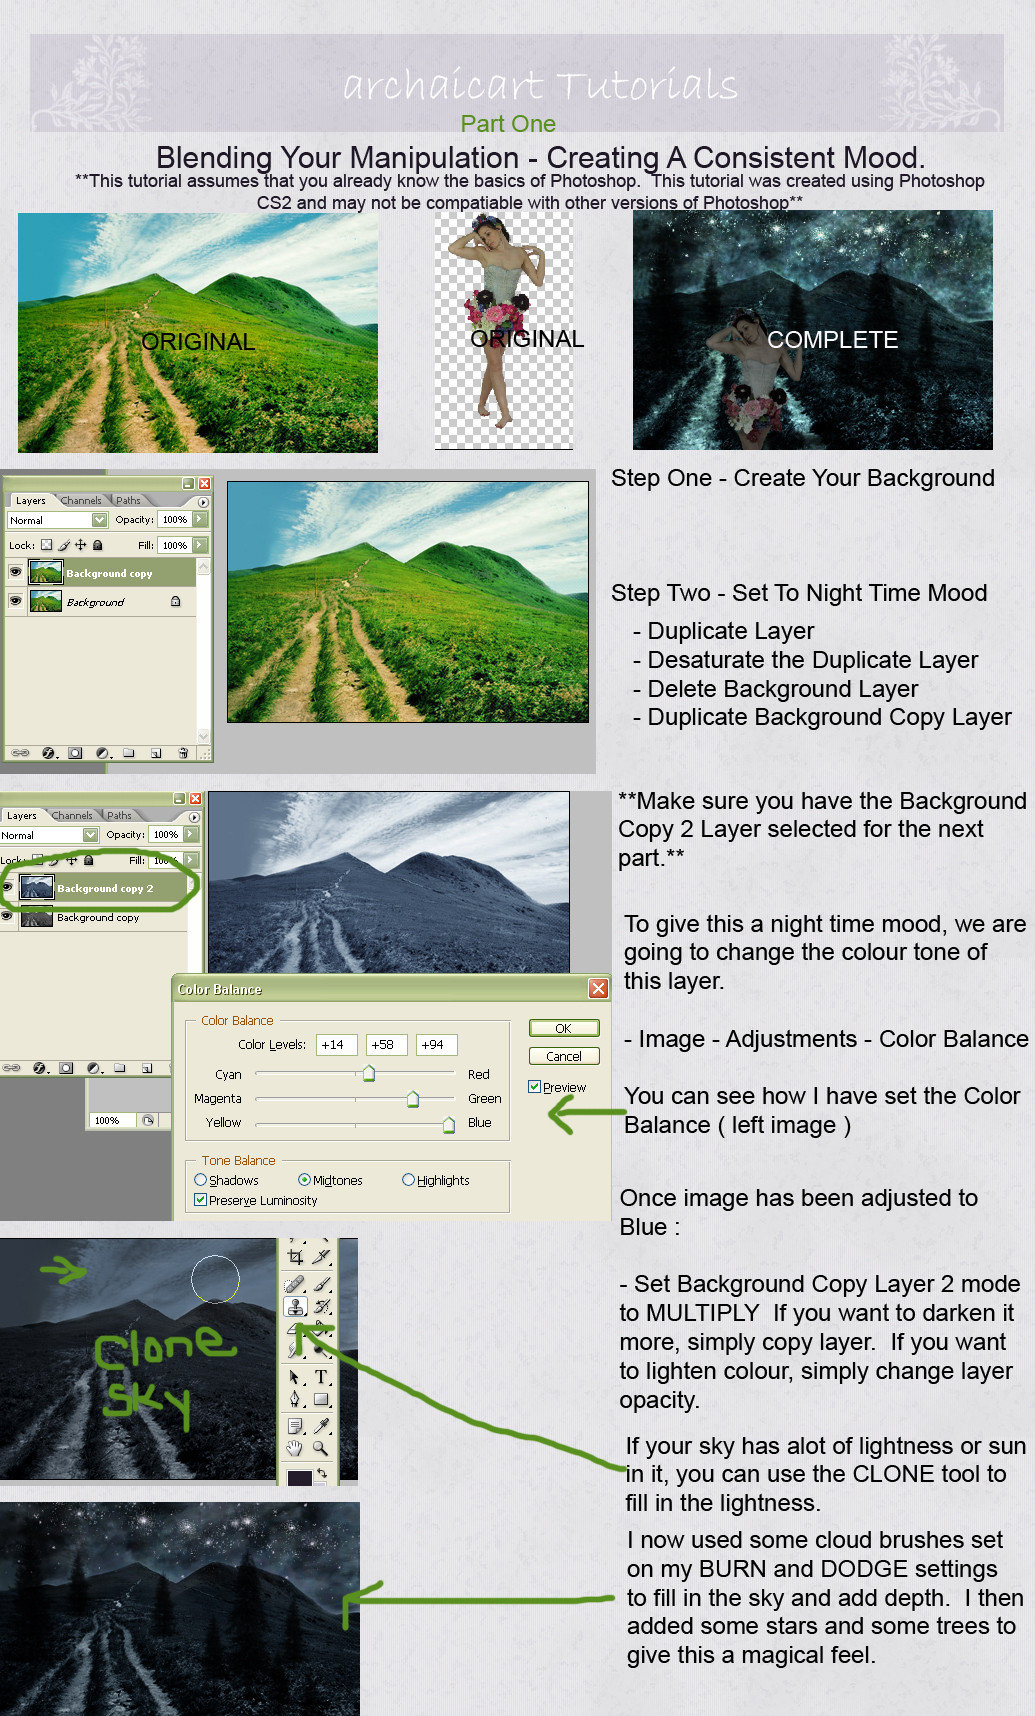
Blending Your Manipulation - Creating a Consistent Mood
Part One
**This tutorial assumes that you already know the basics of Photoshop. This tutorial was created using Photoshop CS2 and may not be compatiable with other versions of Photoshop.**
Step One - Create your Background
I am not going to get complicated here and will just use a stock photo from Breiwistock that has been unaltered. However, you can always blend multiple stock images etc ( if you want to). Just make sure that your background is complete and all layers are merged into one.
Step Two - Creating a Night Time Mood
Once you background is complete and ready, we will turn this day time photo into a night time mood.
Follow the following steps:
1. Duplicate the BACKGROUND layer.
2. Desaturate the BACKGROUND COPY layer ( Image - Adjustments - Desaturate )
3. Delete the original BACKGROUND layer
4. Duplicate the BACKGROUND COPY layer
5. Change colour tone of BACKGROUND COPY 2 layer ( Make sure you have the
BACKGROUND COPY 2 layer selected )
STEP THREE - How to Change Colour Tone
To change the colour tone of BACKGROUND COPY 2 layer, we will make sure it is selected! Go to Image - Adjustments - Color Balance
I want to create a bluish tone for this image. This will help to give it that "night time" mood and feel. However, you could really change this to any colour or tone that you desire.
Once you have the tone you would like to use, hit OK
Now set the layer mode to MULTIPLY. This will help darken the image. If you want it even darker yet, simply copy the layer. If you would like to lighten the tone, simply change the opacity level of your layer.
STEP FOUR - Fix Your Sky
Alot of times, when you change a daytime photo into a nigh time photo, your sky will still have alot of light from the sun etc. You may want to remove this.
I use the CLONE tool to remove any unwanted light from my sky. This helps to make it look a little bit more realistic. If you do not want to use the CLONE tool, you could try to use the BURN tool to darken the sky.
Step Five - Completing Background
This is the step where you are going to complete the background by adding all your finishing touches.
I like to use my BURN tool ( set on a cloud brush ) and I begin to lightly burn the sky. I also do this with the Dodge tool ( set on a cloud brush ). This helps to add interesting colour and depth to my image. I will also add stars for some added flair and eye appeal.
I also have added trees ( falln-brushes ).
Once your background is complete and is exactly how you like it, merge all layers.
Related content


Comments: 2

Your deviation was featured in my article Know your Basics - Colour Theory (the manip way) .
Should you not want your work associated/featured in the journal, please tell me and I'll remove it.
👍: 0 ⏩: 0

 (Smile)")