HOME | DD
 Athrennn — How To: Basic Eyes

#eyes #tutorial
Published: 2015-08-03 02:52:39 +0000 UTC; Views: 3882; Favourites: 186; Downloads: 29
Redirect to original
Description
Keep in mind I do this on 1-2 layers, with one brush.
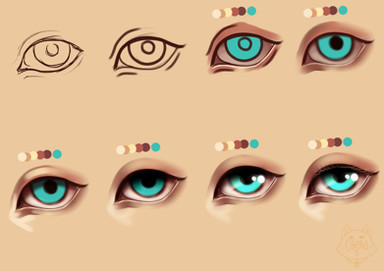
1. Pretty simple. Obviously the farther apart these will be the bigger the eye/ the more cheerful and vice versa. (smaller=more angry).
2. Added a basic eyelid/eyebrow + where the iris will go. I have it touching the bottom and top of the eye. (Usually how it works).
3. I picked a color for the eye to be, and filled it in. Then I added a pupil to the eye. Pupil shouldn't be too small (theyll look crazed) or too big (wink wonk).
4. Here I filled in the eye white. I usually pick the eye white color by taking the eye color and moving it closer to pure white on the color wheel. I don't use pure white because later on I will go back over with pure white for shines and I want it to be noticeable! Plus pure white is just boring.
5. I DON'T KNOW WHAT HAPPENED. GUESS THERE IS AN EXTRA.
6. I added a new layer above my base, and set it to "Multiply" (Paint tool Sai). I used a purple to shade because it catches the eye more than just a monochromatic scheme. I pretty much took it and did a single stroke across the entire eye.
7. Okay, now I'm going to shade around the eye. I usually shade the bridge of the nose, the eyelid, and a bit under the eye. Leave a section of the lighter skin under the eye.
8. I blended the skin, and added some eyelashes. I also took my two points from step one and turned them into lashes. For males, I usually just erase the top point and blend out the skin into that area.
9. Here I blended the eye white area/eye. I also took the base color of the eye and added a line right where the iris and top of the eye meet to add some color.
10. I added shine/ some details. Pretty much used a darker color and made the eyelid a bit sharper, and added more lashes. For shine placement I usually do a little line under the whole eye, and two small dots by the pupil and one other extra little one somewhere else to make it look really glossy.
Feel free to put shine where you feel necessary.
Related content
Comments: 14

what settings is the brush on? btw love the tutorial~!
👍: 0 ⏩: 1

Thank you! This is kind of an old tutorial so I can't tell ya what the brush settings are as I don't use this program anymore ; v ; <3
👍: 0 ⏩: 0


