HOME | DD
 BloodMoonEquinox —
Color Tutorial
BloodMoonEquinox —
Color Tutorial
Published: 2012-11-24 05:04:34 +0000 UTC; Views: 18386; Favourites: 887; Downloads: 274
Redirect to original
Description
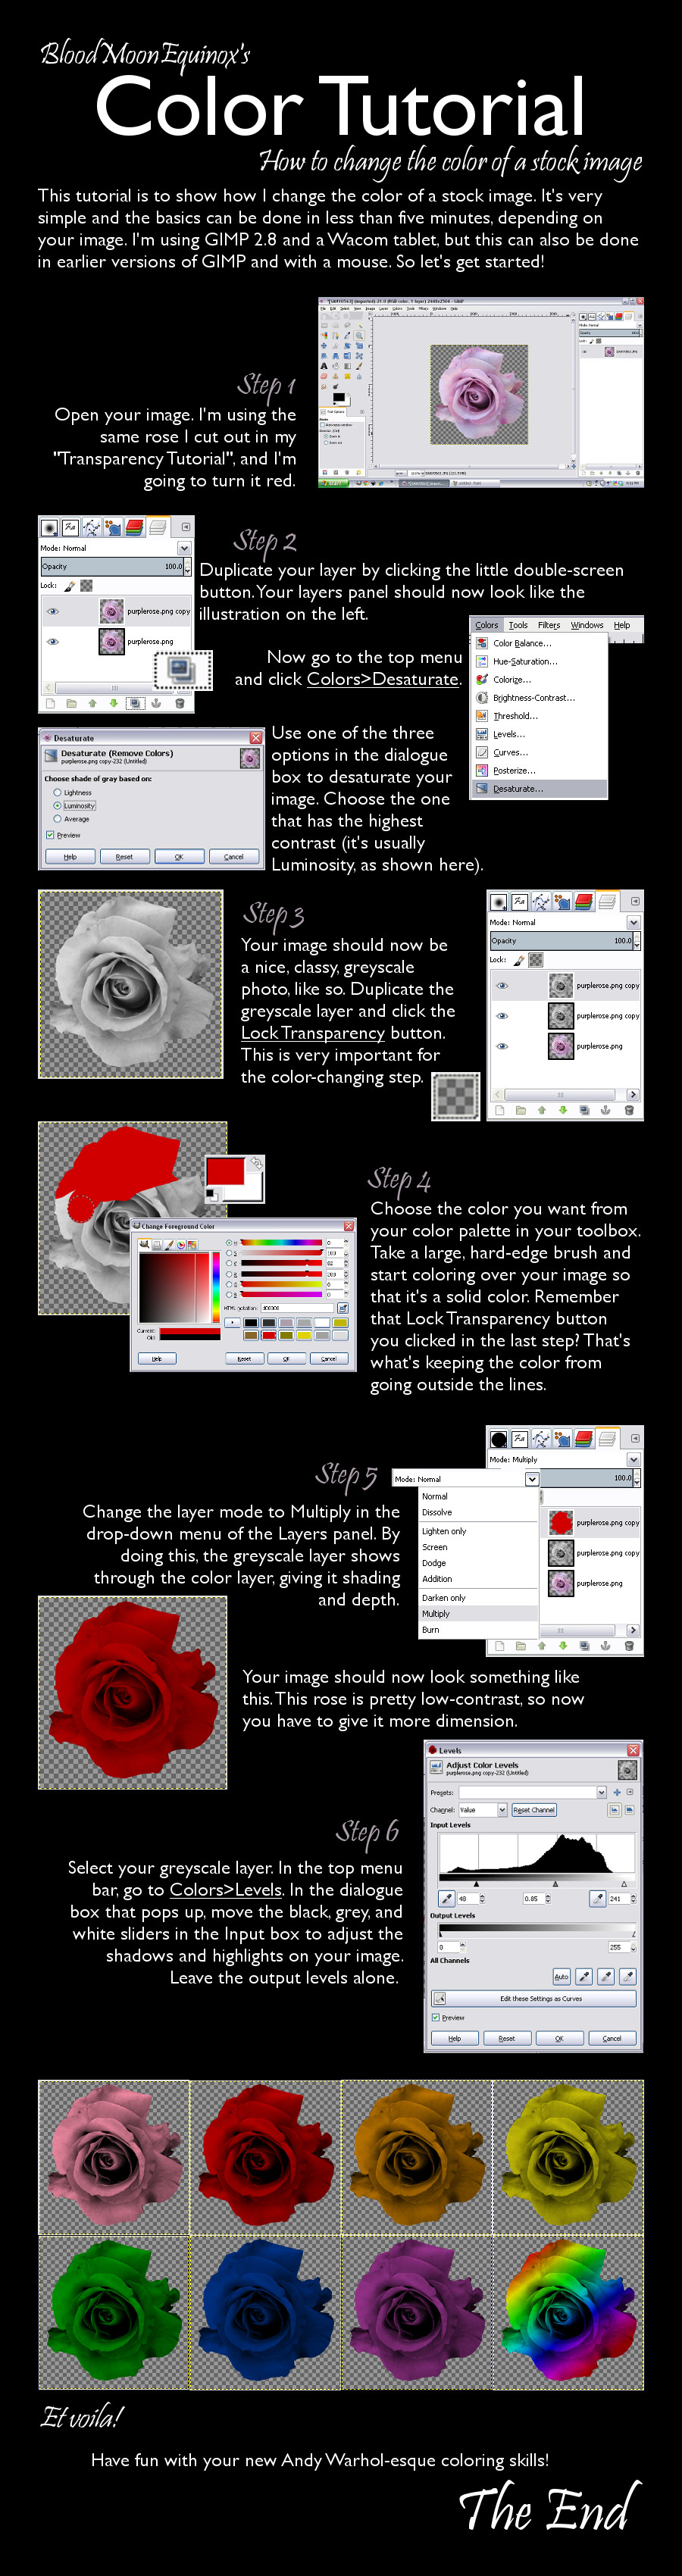
November 23, 2012Another tutorial!
 This time is on how to change the color of an image.
I forgot to add in the tutorial itself, to get the rainbow effect, you just select a rainbow gradient, set it to linear, and drag it across the flower. It conforms to the transparency lock just like the solid color does.
I'm sure there're already tutorials like this out there, I just discovered this method on my own a few months back. It might not be original, but hey, if it ain't broke, don't fix it.
 (Smile)")
EDIT 12/29/12: OMG I got a DD!
 I was wondering why I had 250+ feedback messages this morning when my average is around 30!
  It'll take me awhile but I promise I'll give thank-yous and llamas for everybody!
  Thanks so much to ^PirateLotus-Stock for featuring it!
Related content


Comments: 99

Thank you very much! ")
And absolutely, GIMP doesn't get enough credit! I actually prefer it to Photoshop, much to the dismay of my graphic design professors!
 (Wink)")
👍: 0 ⏩: 0

wow so helpful!
graats on the dd!!!!!
👍: 0 ⏩: 1
Thank you very much!
👍: 0 ⏩: 0

Or in photoshop
create a new layer on top of the rose
go into blending mode and create a color overlay
adjust blending mode options in the drop down menu'
1 min at most
👍: 0 ⏩: 1
Yes, other blending modes work with this as well--I've found that for some images, Overlay or Soft Light work better than Multiply!
👍: 0 ⏩: 0

Thanks for the work! Congratulations on the DD!
👍: 0 ⏩: 1
You're quite welcome, and thank you!
👍: 0 ⏩: 1
My sincere pleasure!
👍: 0 ⏩: 0

I hope it works out well for you!

👍: 0 ⏩: 0

Nice. This looks very useful. Thank you for creating and sharing this!
👍: 0 ⏩: 1

Nice, straight forward tutorial. One of those things one wonders how to do effectively. Congrats on the DD! I use Photoshop, but this is the sort of tutorial that is easily adaptable for Photoshop!
👍: 0 ⏩: 1
Thank you! 
👍: 0 ⏩: 0

cool! pretty interesting. Congrats for the DD :3
👍: 0 ⏩: 1

Great!
👍: 0 ⏩: 1

You're so welcome!
👍: 0 ⏩: 0

Congraaaaaaaaaaaaaatz for the DD!


👍: 0 ⏩: 1
Yay! Thank you so much, Mache!!!!

👍: 0 ⏩: 1
👍: 0 ⏩: 0

But it is broke. It kills the nuances in the mid- and -shadow ranges by flattening it to b/w on beforehand. Colour correction layers and masking would be preferable.
👍: 0 ⏩: 2
That may be true, but this method works well for me when I'm doing a quick photomanipulation and I don't want to waste a lot of time nit-picking over tiny details. This tutorial was meant for beginners who are still learning their way around GIMP.
👍: 0 ⏩: 1
Well, I usually use photoshop, since I got it through my school. Right click>Select pixels>my custom shortcut for new mask for the masking and the Colour replacement tool for well... Replacing colours.
👍: 0 ⏩: 1
I see.
late reply is late
👍: 0 ⏩: 1
[link] <-- You are welcome~
👍: 0 ⏩: 0

I agree. Nothing ever has a black shadow. It makes the rose look gritty and unrealistic, like colouring a newspaper cutout with a red sharpie. If that's the look one wants, it's effective. I wouldn't recommend using this to achieve a realistic effect though.
👍: 0 ⏩: 2
The black shadows can be adjusted to the artist's taste in Step 6 using the Levels tool.
👍: 0 ⏩: 0
Exactly! I was thinking "Gee, that looks photocopied and printed onto coloured paper" when I saw the end result. And eve so, there are colourising options in the colour correction tools, making half of the steps double-work.
👍: 0 ⏩: 0

Congrats on the well deserved DD!
Have a nice day and Happy Holidays!

👍: 0 ⏩: 1
Thank you so much!
Happy holidays to you as well!

👍: 0 ⏩: 1


That's so great to hear!
👍: 0 ⏩: 0

just what I needed thank you sooo much

👍: 0 ⏩: 1
You're so welcome!
👍: 0 ⏩: 0

Wow...thats easier than paint. -__- Should look into this.
👍: 0 ⏩: 1
I hope it works out well for you!
👍: 0 ⏩: 1

Nice tutorial, well presented and easy to read and follow.
👍: 0 ⏩: 1

This was pretty much the first method of coloring i discovered while messing with gimp, i still use it when i feel lazy lol
The bad thing with it is that multiply chews up all the highlights and you have to go in again and paint them manually if you are not careful
I recently discovered the combination of overlay and dodge tool is also quite good for coloring grayscale stuff.
")
👍: 0 ⏩: 1
It's true, the highlights can get pretty washed out using "multiply" mode. 
Hmm, I haven't tried overlay/dodge yet... 
👍: 0 ⏩: 0
👍: 0 ⏩: 0
<= Prev |