HOME | DD
 BramastaAji — how to draw a falcon

Published: 2011-05-19 10:06:01 +0000 UTC; Views: 4133; Favourites: 37; Downloads: 490
Redirect to original
Description
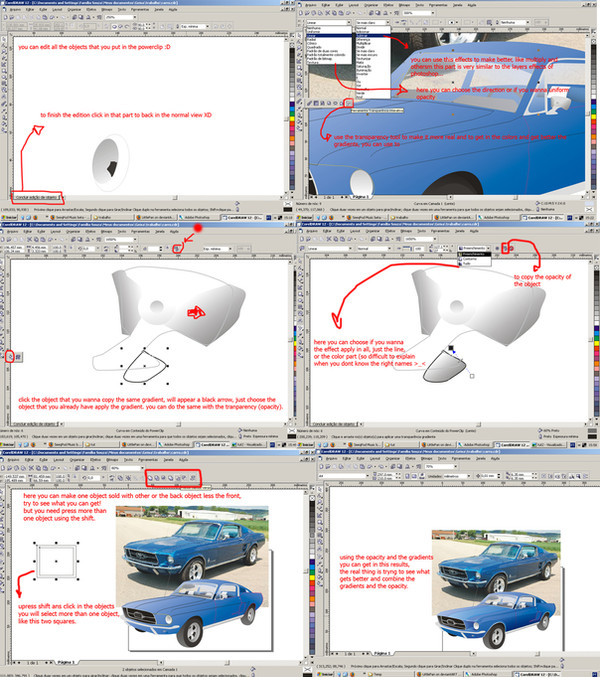
before we go for this, we need several preparation such pen tablet, software(in this term i use photoshop) and some references1. first, we need to draw the perspective line to decide the car angle. after we got a perspective line, start draw the rough sketch, u need some references here. i pick several ford falcon image in different angle, and draw the sketch based on references.
2. enhance the line to get clearer details, just lowering the sketch opacity and redraw it with cleaner brush in different layer.
3. before i trace the line, i decide to give some color test, just pick necessary colors on this.
4. not really happy with the scene, i add a girl.
5. do some BG testing on the sketch, i plan rocks and clouds so it will looks like at the top of cliff.
6. now tracing the sketch, i use ordinary round brush to make a sharp line of the car and the girl. each line are drawn in different layer.btw, i chane the girl position a bit.
7. just pick all colors from our last color test, and brush it through the bottom layer of the line *some gradient tricks will be helpful*. a little bit here, a bit there and we're done. make a new layer, add a yellow gradient from left and set the layer mode to overlay, make another layer, add a grey-bluish gradient from bottom right and set the layer mode into hardlight,then the car colors are stand up now.
8. now we have to go with the girl, i pick simple colors on this bcoz i want the car as the major object. for the rocks, i use chalk brush and oil pastel brush to create some textures, for the clouds, i use some custombrush *dodge and burn tool also important here*
9. we are almost done now, do enhancing on the clouds,rocks and body, a few color balance and masking tricks and VOILAAA!!
Related content


Comments: 7

")


 (Smile)")

ooo kereen
posenya berubah di step 6
yg step 9 tuh ngaruh banget ke feelnya ya ternyata
thanks for sharing!


👍: 0 ⏩: 1

Pose sebelumnya rada kaku, yg step trakhr itu trmasuk yg penting jg,hbs dimerge, lgsg duplikat2, sama color balance..biasanya sh yg temperature warm aq balance ke red-yellow , yg temperature dngin ke cyan-blue ato green
👍: 0 ⏩: 1

Terima kasih telah berbagi, 
👍: 0 ⏩: 0