HOME | DD
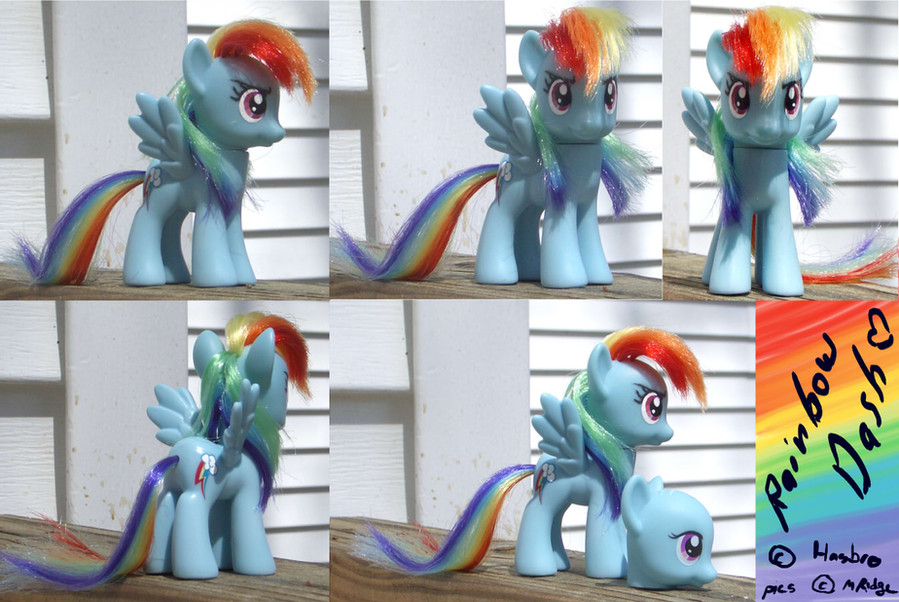
 brewing-trouble — Customized Rainbow Dash
Published: 2011-03-23 19:33:54 +0000 UTC; Views: 47072; Favourites: 947; Downloads: 2580
Redirect to original
Description
So, pretty much everybody's seen the latest My Little Pony incarnation, right?Well, if you're a fan, you're probably rather painfully aware of how much the toys don't really look like the ponies they're supposed to represent?
Anyway. Rainbow Dash is my favorite character on the show. And she probably has the most inaccurate toy of the bunch. So, I decided to fix her. This is how Rainbow Dash SHOULD look. I customized her myself. She is re-haired with all her own original hair, except the red, which was too short for me to re-use. So I got some "Pomme d'Amour" Dollyhair, which was almost a perfect match to the original red, and used that instead. I also touched up the pinkish-maroon in her irises and reshaped the eyelash line to look more like Dash and less like Fluttershy, and tried to give her that "determined" look. I also had to touch up all the white on her, in her eyes and on her cutie mark. The decapitated Dash head there (which will belong to my ponysona) is there for comparison.
So, fillies and gentlecolts, I'd say this is at least 20% cooler, wouldn't you?
")
No, she isn't for sale. And I don't really have plans to mod and sell them because this took a lot of time and I have a real job and a life and other hobbies.
Lauren Faust is one of the few people that I would GIFT one of these girls to, though, for making such an awesome show. She's free to ask for one at any time.
 (Smile)")
sorry about the edits if you're seeing them all. It's been so long since I uploaded anything that I realize I keep forgetting stuff like the keywords and things...
ADDENDUM:
Okay, unfortunately, I have to reiterate this. While I appreciate that other fans like this mod,
No, I am not selling this toy, and
No, I do NOT do commissions for these, and I do not plan to. There was only ever one exception, and that was at a different point in my life, so please do not ask.
Thanks.
Related content


Comments: 358


This Deviation was featured in the following Equestria Daily Post www.equestriadaily.com/2016/02… Thank you for providing pony material for all of us to enjoy
(This bot is unofficial, it is NOT affiliated with Equestria Daily. If you do not wish to get these notifications anymore, please just block this account.)
👍: 0 ⏩: 0


Well, not particularly well... because I didn't take photos of it when I was doing it. But the process is pretty straightforward:
pre-preparation:
1) order some "Pomme d'Amour" Dollyhair from dollyhair.com. This is the red hair that you will need. There will be way more than you need, but that's how they sell it.
2) buy a RD toy.
Actual process:
1) remove toy from packaging and take off all the plastic tape/rubber bands holding the hair together.
2) remove head from toy. Recommend using a hair dryer or hot water to soften the vinyl before you start pulling as the heads are usually on there really good. The hair can withstand boiling water (212 degrees F), but don't use an actual heat gun or the hair may melt.
3) using an xacto knife and a small screwdriver to pry with, VERY CAREFULLY remove the plug from the neck that allows the toy's head to turn. I typically use a sort of "work your way around cutting just the glue then pry, pry, pry" to leave the plug/body area as intact as possible (there's a little lip of body vinyl that the plug sits on, and it is good to leave that as intact as you can!) but that does take a long time to do, sometimes over an hour (I put on a movie to watch while I pried). It's pretty tough to tear the vinyl but be careful not to. If you are in a hurry you may just cut around close to the plug, but you will have to be VERY CAREFUL not to slice the neck... one slip and it's over. MAKE SURE TO SAVE THE PLUG.
4) Use a hair straightening iron on a low setting, and gently flatten the tail hair, then remove the tail from the body through the neck hole. You don't have to save the tail hardware, you won't need it. Just pry it apart gently to leave the hair as intact as possible. Sort the hair by color (this is a PITA... but at the end you'll have one pile of blue hair and one pile of purple hair) and set it aside in a safe place. Put the body somewhere safe to dry thoroughly.
5) Warm up the head with a hair dryer, and then roll it between your fingers while squeezing hard. You will feel/hear a crunching noise as the glue holding in the hair starts to separate from the inside of the head. Sometimes they glue it in there REALLY GOOD, so be patient!
6) flatten the head hair with a hair straightening iron on a low setting.
7) Remove the plugs of hair from the head through the neckhole in the bottom of the head. I recommend using locking forceps (can be gotten at Harbor Freight for $5) to grab the glue wads. Lock the forceps on a wad of glue and pull HARD, and the hair will come out. You can keep rolling and scrunching the head, that sometimes helps loosen it. Sort the hair plugs by color. Throw away the red hair, and set the orange/yellow/green hair aside. Take note of about how big each plug is. You don't have to count each hair in the plug, but just get a feel for the average thickness of how much hair there is in an average plug.
8) Cut some of the red Dollyhair to be about the same length and same size of a pile as the orange/yellow/green hair. You now have all your hair colors. Now, IIRC, the blue and purple are about twice as long as the other colors are because they were folded in half with the tail hardware in the middle to make up the tail, so you'll want to cut the blue and purple piles in half at this time so that ALL the hair is about the same length, give or take. It doesn't have to be perfect so don't worry about trimming anything yet.
9) You'll notice that the hair on the head was added in "zones". You're going to make your own zones now. You may want to use a light pen or a pencil to make your own zone guides, because you're going to do more colors on the head than were on the toy originally. You may also choose to add more holes to fill in the corners of the"T" shape where the mane hair meets the forelock so the forelock can be nice and thick and neatly shaped, or a plug here and there between the two mane rows if you plan to part the mane in the middle of the back like I did. Use a thumbtack to add these extra holes. Plan, plan, plan. Once you have your zones, count how many plugs of each color you will need. IIRC I usually needed about 12-18 plugs of each color but ymmv. They should all be pretty close to the same number for each color though.
10) Save some - about 1/3 to 1/2 - of each color of hair for the section of color in the tail (making sure that the sections have about the same amount of hair, AND making sure that it looks like it will fit in the tail hole easily when all 6 colors are combined).
11) make the new head hair plugs. Take a SINGLE premade plug of your first color of hair, cutting a bit of glue free if needed to get it singled out (I'd leave the red, blue, and purple til last, to REALLY get a feel for the size of a plug... so start with orange, green and yellow). Now, there are a few ways to make this hair into new plugs. I prefer the melting method. First, trim off the glue that's holding it together. Then cut the hair in half and put one half to the side. Carefully hold the newly trimmed ends of one side of your half close to a flame (I used an oil lamp as it was easy to control the size of the flame) to the point they start to melt, then mash the ends all together into a single flattened blob (I prefer to use flat nose pliers!! You WILL burn yourself if you don't use a tool of some sort for this!), repeating if necessary to make sure the hair all gets stuck together. Even so, you will probably burn yourself at least once. Then do the same to the other half of that plug. You now have two new plugs for every original plug. Then take another plug size section of hair, etc. When you get to the red, blue, and purple you should have a good idea just how much hair to use! Do that for all the colors until you have enough plugs of each color for the head.
12) Take a sturdy needle and cut about 15" of some strong thread (I use 5lb fishing line). Put the two ends of the thread together and put both ends through the eye of the needle. These free ends are going to be the "short" end and the loop is the "long" end.
13) You may need to use your locking forceps again to push the needle through a plug hole in your head (I start from the top/forelock, it seems to be easier). Pull the thread through until the end loop is ALMOST about to enter the head. push the end of a plug through the loop and then continue pulling the thread through. You may need to pull pretty hard. Eventually there will be a "POP" and the hair will pull through. The flattened melted end will stop the hair from pulling all the way through the head, leaving a plug of hair wafting in the breeze. It will look pretty funny at first! Now keep doing that (replacing the thread as you break it, because it will break sometimes), following your pattern, until you have a lovely head of rainbow hair. You may want to bend your needle, if it's straight and giving you problems. If a plug is a bit too big for its hole, it will break the thread repeatedly. You may either use a thumbtack to try to widen the hole, or you may use scissors to carefully cut the plug so there is less hair in it. Start cutting from the flat end.
14) Use hot tap water or boiling water to style your hair. Hot tap water is probably easier because you'll have to use your fingers to mash the forelock hair forward and into place. When you are done, allow the head to dry thoroughly inside and out! You don't want the head to grow mold inside it later on!!!
15) Using the plug method (and leaving the hair long this time, instead of cutting it), make plugs of tail hair. These will be much bigger plugs so you'll probably have to do a fair bit of re-melting. the flat/plug end should be somewhat rectangularish in a 1:6 ratio if possible. Try to make the other colors the same way.
16) still using your flame carefully melt the red and orange flat ends together, then melt the yellow and green together, and then melt the blue and purple together. Then melt the orange side of the red/orange to the yellow side of yellow/green, and the green side of this super-plug to the blue side of blue/purple. If you made the flat ends right in the 1:6 ratio, the plug end will be almost square. You may want to use a bit of hot glue to reinforce the shape. This will keep your tail colors from mixing too badly and the big plug end should stop the tail from pulling all the way through the hole. You may want to use hot water or a straightening iron to flatten the tail rainbow-wise. If you use water, allow the tail to dry thoroughly.
17) Using a thicker piece of thread and your needle, draw a thread loop through the body out the tailhole. Use the loop the same way as the plugs - to pull the tail through the hole. The tail MAY POSSIBLY be too big to fit... you can either trim it as with the smaller plugs, being careful to approach from the side and get all the colors, so as not to remove a color completely... you can try to widen the tail hole a little with a drill bit or xacto knife (be VERY. VERY. CAREFUL), or you can try wrapping the loose ends of the tail in scotch tape so that it looks like a needle itself, and pushing it through then unwrapping it. It's up to you. You may also like to pull the plug end of the tail back through the body PART WAY and apply a little bit of glue to the plug (any... hot glue, super glue, tacky glue...) to help the tail stay in position with the purple on top when you pull it back into position... I didn't, but it's up to you. Allow the glue to set/dry according to the instructions.
18) Trim and style the tail to your liking, and dry thoroughly.
19) DRY. Thoroughly. I'm not kidding. You're about to seal everything up now.
20) If you had to cut out the neck plug, fit the plug to the neckhole now so that it fits nicely. mark it if necessary so that you can get it back in without delay. If you were able to pry it out, it doesn't matter as much. either way, pull the plug back out and apply a little bit of super glue all the way around it. I really like the locktite gel super glue because it doesn't run everywhere. You don't need a whole lot of it, so don't apply too much or it will spatter. Put the plug back in and allow it to dry and set thoroughly.
21) Take the head and warm it with a hair dryer, especially that neck hole area. DO NOT USE HOT WATER, just hot air. Put the head back on the plug. It will require some twisting around but you'll get it eventually, just keep the head warm.
22) Style and trim the mane/forelock however you like.
23) At this point, you can repaint the eyes if you want/if they need it. Craft acrylics are fine, just don't apply it too thickly.
24) DONE.
For further details on any of these processes, Google is your friend.
👍: 0 ⏩: 0

This has got to be the most show accurate Rainbow Dash toy I've ever seen. Take notes, Hasbro!
👍: 0 ⏩: 0


How does one rehair, especially the tail? I have a Crystal Empire RD with movable wings that I would love to mod like this, but I have no idea how ;A;
👍: 0 ⏩: 1

Ppl post hair tutorials on YouTube, so you can look it up and follow instructions.
👍: 0 ⏩: 0

aaaaah!
👍: 0 ⏩: 1
oh, my bad. i didn't read the whole description. oh well, it was certainly nice to stop by and look at this
👍: 0 ⏩: 0

Why ? Why ? Why did not Hasbro do this ? T_T
Seriously... May I buy you a Rainbow Dash like this ?
👍: 0 ⏩: 0

I would love to do that, but im afraid to mess everything up
")
👍: 0 ⏩: 0

Damn this is DAMN BETTER! XD
COME ON HASBRO WHY!?!!??!?!?!?!
CAN DO BETTER THAN YOU GUYS! THIS TOY IS THE REAL RAINBOW DASH!
👍: 0 ⏩: 0

WOW! That's so AWESOME! Oh and Haters.... YOU need to be 20'/. Cooler! I'm going to put up my ponies with styled hair too! Well, ill put up pics of ALL my MLP FIM Merch! GREAT job by the way!
👍: 0 ⏩: 0

When I tried to do that to Rainbow Dash, I winded up making her hair look like rainbow scene hair xD
👍: 0 ⏩: 1

lol scene RD, actually sounds pretty entertaining xD
👍: 0 ⏩: 1
I know right? I might post a pic of her later
👍: 0 ⏩: 1

So how'd you get the hair in?
This puts my attempt at fixing my own figure to shame...
👍: 0 ⏩: 0

20% cooler is not enough.
i have the default one :/
👍: 0 ⏩: 0


")

her hair is much better on this one then the other one
👍: 0 ⏩: 0

YES! so im not the only one who complains about this *feels special ^^ this is awesome btw
👍: 0 ⏩: 0

This is awesome! You did an awesome job of getting my hair right!
👍: 0 ⏩: 0

I'm in the middle of customizing my Dash too! just wondering,
Did you have to make more holes to root the hair at the front to make it thicker?
Nice job btw!
👍: 0 ⏩: 0

Ah! great job!
I'll have to get me a second Rainbow Dash to do something like this (she doesn't look like in the show, but that hair is gooorgeous >_<)
👍: 0 ⏩: 0

This is bad ass, I too am a Rainbow Dash aka Rainbow Glasses fan. ^_-
👍: 0 ⏩: 0

Do you have more angled shots of this so I can use them for reference on making my own?
👍: 0 ⏩: 0

how did you remove the hair, I have to fix one for a friend and it just need more detail on how to do it.
👍: 0 ⏩: 0

um question how do you make it cause id like to make one when i buy a rainbow dash
👍: 0 ⏩: 0

Now I want to make one.
Just gotta get the money...
👍: 0 ⏩: 0

was your rainbow an older version that had the forelock or did you add it yourself?!?!
👍: 0 ⏩: 0


oh really nice. i styled her today,but i didnt manage to get her mane on head so fluffy
👍: 0 ⏩: 0


tutorial on how to do it? I just got my dashie toy.
👍: 0 ⏩: 0


You should like, sell these for $10 more than they cost. I'd love to buy one of these!!
👍: 0 ⏩: 0

Think you can make a tutorial on how you did this?
👍: 0 ⏩: 0

That is sooooooo much better. I have the original and it sucks >_<
👍: 0 ⏩: 0


Congratulations this awesome custom and correct version of Dash is the first Pony-related artwork added to my faves.
And you did an amazing job too! I saw someone's owner pics of her toy form and I was speechless for a moment. Too gentle and too girly looking to be the Dash we know and love but this...Is the right. I wish Hasbro had made them look like they should.
👍: 0 ⏩: 0
| Next =>