HOME | DD
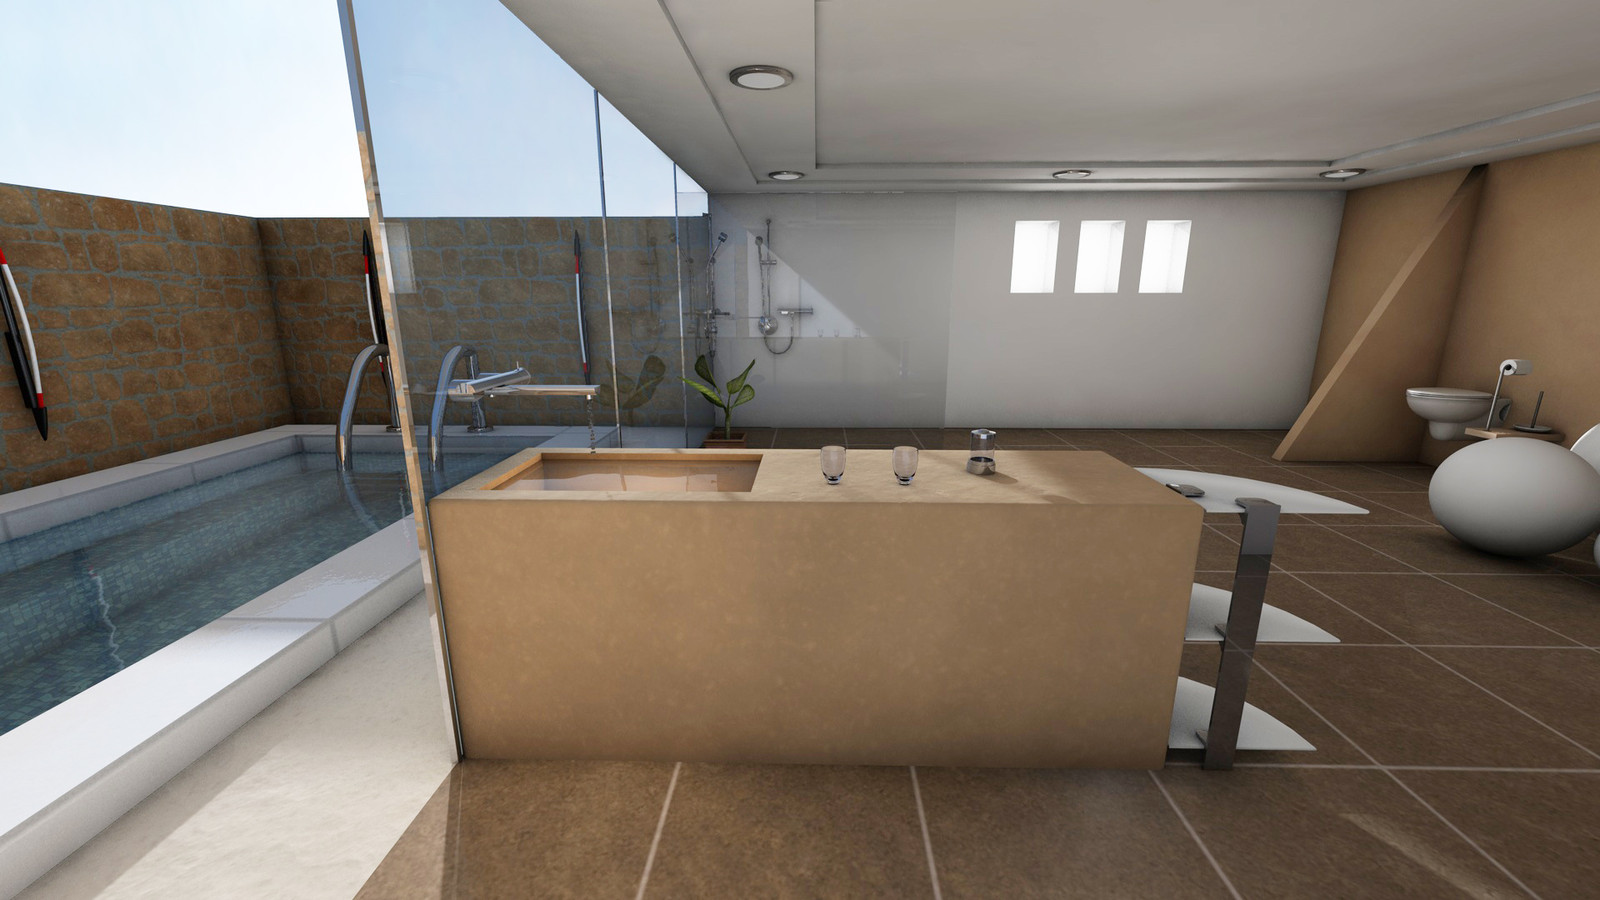
 capsat — Room Modeling C4D tutorial R10
by-nc-nd
capsat — Room Modeling C4D tutorial R10
by-nc-nd

Published: 2008-07-23 14:19:28 +0000 UTC; Views: 80445; Favourites: 190; Downloads: 4668
Redirect to original
Description
If you want further video tutorials on C4D please visit: [link] (Smile)")
Related content


Comments: 57


thanks for the tutorial .im gonna try this one out

👍: 0 ⏩: 0


")


I wanted to follow this tutorial, But I am stuck.
When I use the Sweep NURBS and the rectangle, I just get a mess. :G
Not a room
👍: 0 ⏩: 2


Hey, sorry for taking so long to respond, I've been busy in non-DA related things lately.
Most probably your problem is corrected if you invert the order of the splines inside the sweep (1st spline should be second and viceversa). If that doesn't work, your rectangle is pointing in the wrong direction.
👍: 0 ⏩: 1


Awesome tutorial... just began some C4D work, so it's sure to come in handy!
👍: 0 ⏩: 0

de haber sabido que eras de México mejor hubiera escrito en español, jajaj, ¡saludos desde Monterrey!
👍: 0 ⏩: 1
XD, cualquier cosa ya sabes, Saludos!
👍: 0 ⏩: 0
hey, I'm sorry if I'm a bother now, but, I have a question regarding something outside of the tutorial, I managed to get it done but, I started looking for textures for concrete floor tiles, and I found some, but, it includes the Diffuse, Bump and Specular Map, and I'm pretty confused as how to achieve the look in your tutorial, could you please help me out by telling me where do I have to set these textures in the Material creation??
Thanks a LOT for all your help, sincerely, keep up the GREAT work!
👍: 0 ⏩: 1
hola! no me había dado cuenta de que eras de México XD
Lo del techo me parece extraño, creo que puede ser porque tienes muchos polígonos, en teoría deberías tener 1. Sino se puede trata de hecer nuevamente el techo pues lo que haces parece el procedimiento correcto.
De las texturas sólo hay que asignar cada mapa a su respectivo canal (el specular map lo puedes ignorar) pero el resto ponlo en el canal que se llama igual.
Saludos,
Alejandro
👍: 0 ⏩: 0
yaaay, I did it, thanks a lot dude, I'll look into the shading tutorial now to see how that works out for me, thanks again!
¡viva México!, jajaj
👍: 0 ⏩: 0
hey there! thanks a lot for this tutorial, I'm very excited about doing this but, I'm sorry for asking a question that's already been asked but I'm really confused about steps 7 and 8, lime some more around this comment section, I'm pretty much new at C4D, so, I'm sorry for not understanding, I guess If I'd used the software longer I might've understood, but, sorry.
I select the "Extrude NURBS" layer that contains the spline which makes the Ceiling, press "C", then I click the + sign to select both caps AND (?) the "Extrude NURBS" poly.
That creates ANOTHER object, which is the one that I try to Inner Extrude and Extrude, whenever I do, when I see from the camera's POV, I don't see any difference, so I get rid of the original ceiling layer to see and I can't see anything either, no depth to the extrude on the ceiling, what can I be doing wrong??
I'm almost done with this tutorial, I'd really REALLY appreciate it if you (or anyone around here) could clear this up for me, really thanks a lot for sharing your knowledge and creativity, it means a lot to me and all of us who want to learn.
Thanks again!!!
👍: 0 ⏩: 1
Hi! No problem there. Once you've made editable the poly (with the "C" key), just select Objects and then "Connect" this makesthe ceiling a single object. Now select that new polygon (you can delete the old ones) and go to the polygon mode, select the polygon that makes the ceiling (it should turn yellow) and use an inner extrude (I on the keyboard and then click and drag). Then use the Extrude function (D on the keyboard then click and drag) to create an engraving on the ceiling.
Try experimenting with the tools, it really helps to get the hang of them.
I hope this clears things up otherwise comment again
👍: 0 ⏩: 1
tanks a lot for answering so quickly, I'm trying again but, again I'm finding trouble, I'm selecting the 3 elements, the Extrude NURBS, Cap 1 and Cap 2, then Object,Connect, using the live selection tool and the polygon tool I select the roof (after deleting the other "layer"), after it turns yellow, I press "i" to use the inner extrude but when I do, the whole ceiling starts to deform, bringing out spikes everywhere, then when I use the extrude function it's still the same, I'm still experimenting, thanks a lot for clearing a couple of things up, I'll try it out some more, if there's anything I'm doing wrong, please help me out if you can.
thanks a lot, again!!
👍: 0 ⏩: 0

")

Can i please have permission to post your tutorials in hidden-designers.com with a link back to your DA profile or any link you desire?
👍: 0 ⏩: 0

How did you cut holes in the wall to make the windows again? Ehehe....I'm kinda new with C4D.
Also, could someone help me with the creation of cameras and lights..../facepalm
👍: 0 ⏩: 2
You cut the holes by using a Boole object. Set the walls as the first child of the boole (drag and drop) and the "cutting object" as the second child. Refer to the help manual for detailed info on boole objects. As for the camera/lights, just go to the objects-scene menu
👍: 0 ⏩: 1
Never mind, got it. But when I put an infinite light on the scene, it doesn't shine through my windows but instead casts everything into a horrible shadow.
👍: 0 ⏩: 0

also what do you mean by connect the caps in step 7??? (srry for all the questions..I'm fairly new to 3d modeling)
👍: 0 ⏩: 0
What exactly does sweep nurbs do?? also is there a more efficiant way to make multiple windows??
👍: 0 ⏩: 1
Sweep Nurbs create geometry based on splines. A boole object is the easiest way to create holes (windows). I would recommend that you read the manual and start with beginner tutorials before tackling on GI,etc.
👍: 0 ⏩: 0
Hi! Step 5 is the boole step, do you know how that object works? I recommend you to read the boole section on the manual, it's pretty detailed. Once you understand the works of it it's pretty easy, just setup the objects as in the picture. Basically you have two objects as children of the boole, the first one is the sweep nurbs and the second one is a null object which has a lot of cubes inside (these are the windows).
👍: 0 ⏩: 0

And i dont understand the 2 part D:
Everytime i add them to nurbs it just goes to some flat wierd looking thing, no walls.
If i make a rectangle room it works but if i add some different corners it wont.
So basicly i dont know where to place the rectangle.
👍: 0 ⏩: 1
It's possible that your rectangle is badly orientated, change the orientation to "XZ" or play around with the other two modes. If that doesn't work you may have the hierarchy backwards so just put the rectangle on top of the spline.
👍: 0 ⏩: 1
Alright i will try that. Thanks.
Seems to work sometimes and sometimes not but ill keep trying.
👍: 0 ⏩: 0
Hi man, thanks again for the great tut but i have a problem.
I dont understand how the camera works.
Like, i place it right as you showed and when i press render it doesnt pic the camera spot.
It just uses the current location.
Do i need to apply some certain render options or what do i have to do to get the camera view to render?
Thanks.
👍: 0 ⏩: 1
It's weird that it doesn't work by default, but check that this is done:
On the object manager make sure you are seeing through the camera (There is a small black square next to the camera object). That square should be white, if it is black just click it. When it turns white it means you are looking through that camera.
Now go to your main perspective viewport and choose edit (the viewport button, not the menu button) and make sure the "use as render view" option is selected. That should work.
Please let me know if you have any problems.
👍: 0 ⏩: 1
Oh so everytime i want to take the render shot from the camera perspective i simply click the black box to white.
I still cant make it work so that it renders the camera view when its black box and i guess its impossible to do that?
I cant even disable the use as render view, its always selected so i dont know if that matters but at least i know now how to go to camera perspective easily.
Thank you.
👍: 0 ⏩: 1
To disable it you need to choose that option for another viewport, say the "left" one, so you can render out from that one.
Basically the black-white square indicates if you are seeing through that camera or not, so everytime you want to render from that camera just make it white, otherwise (say you need to change something and you need to close up but you don't want to alter the final camera position) just deactivate it.
Hope it helped!
👍: 0 ⏩: 1
Yea i noticed that already, but thanks alot!
Sorry to bother you all the time but found a another problem.
👍: 0 ⏩: 0


The room in the tutorial looks so nice and I want to be able to create a room like that, but I am lost- how do you use the boole tool? The tutorial doesn't say. Looking ahead, I might need some help with step 7 too. I'd be grateful for any help! Thank you.
👍: 0 ⏩: 1
Thanks for the comment!
If you want more than one window use a null object as the second child and make your multiple windows childs of that null object.
Step 7: Make your ceiling editable by hitting "C" on the keyboard and select the polygon. In the polygon editing mode select the inner extrude tool and make an inner extrude  (Wink)")
Perhaps you should watch some basic tutorials on using the tools. [link] is a good resource. You can also try lynda.com or cineversity.com but they require a subscription.
Furthermore, if you want to know in detail how I make my architectural scenes you can take a look at my series of video tutorials: [link]
Cheers!
👍: 0 ⏩: 0

Faved - very helpful and information is understandable!
👍: 0 ⏩: 1

| Next =>