HOME | DD
 Cataclysm-Theory — Kanda Yuu Mugen Tutorial
Published: 2009-08-26 01:11:02 +0000 UTC; Views: 12250; Favourites: 72; Downloads: 434
Redirect to original
Description
Okay, so here is a tutorial on how to make Yuu Kanda's mugen. n.nForgive me if this isn't amazing, this is my first time doing something like this.
Step 1: First off, before anything, I would /highly/ recommend looking at some swordmaking guides. I'm not going to go over basics, so you'll need to know those first which is basically: putting an edge on the sword, drawing a curved blade and cutting it out, painting, etc. *chioky has some amazing tutorials on swordmaking, that will be great to get you started. So, once you feel you're ready, or if you've been ready then stop wasting your time reading this and start making Mugen!
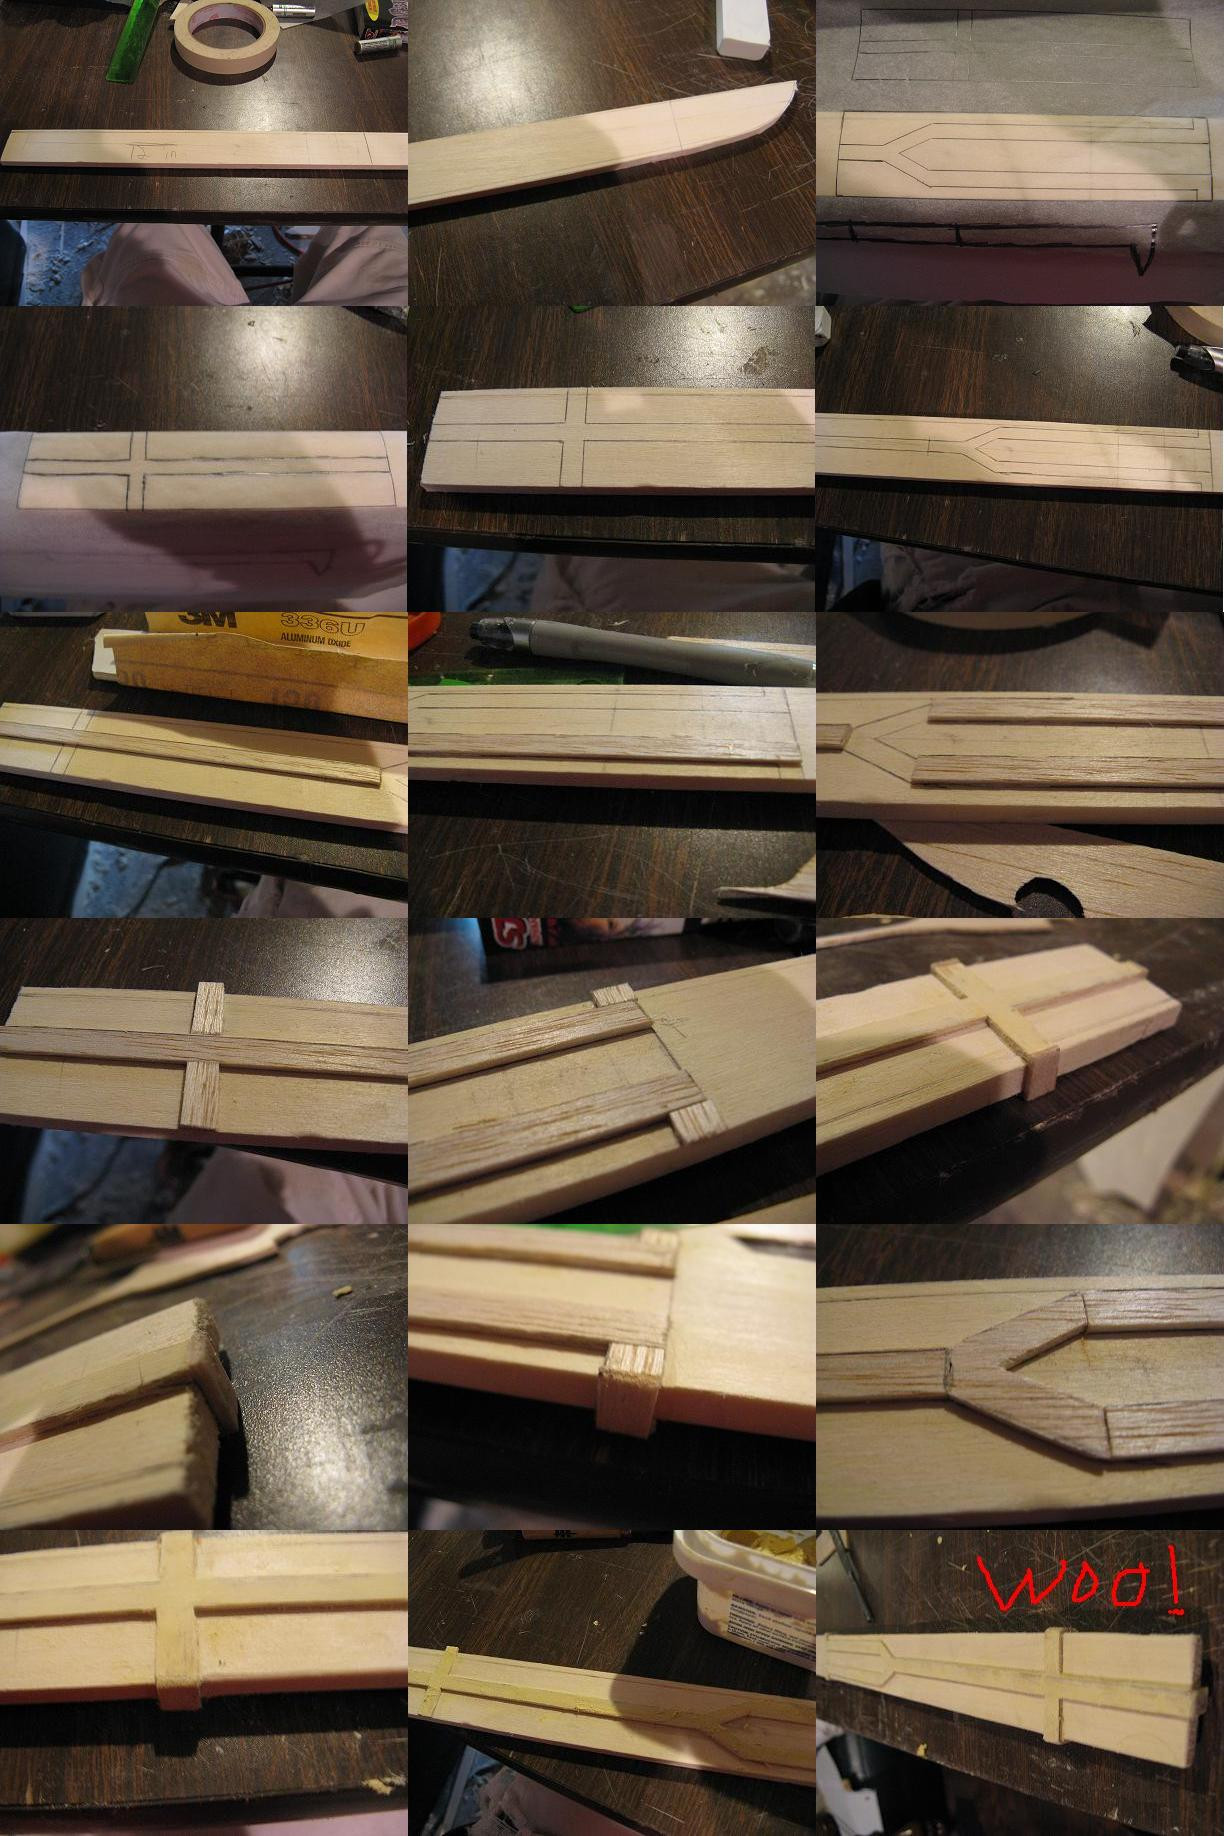
Step 2: Okay, so you want to draw out your blade on a piece of pine/aspen/whatever wood you use, and cut it out. ~piratecaptain has an amazing and brilliant way to make very nicely curved swords on youtube. Link here The specifications are as follows: Handle length: 12 inches. Handle width: 3.5 cm. Blade length: 28 inches. I'd make sure to have a reference of two from the manga and anime just so you know how to shape the blade an everything.
After much research and looking at the same pictures of Kanda and his Mugen over and over again, I've discovered that the handle is incredibly thin; just as thin as the blade. So there is no need to build up the handle with more wood, once you have your curve smoothed out and your handle straight, we can get to the most important thing on Mugen: the handle details.
Step 3: The handle details are kind of a pain to freehand, so I drew them up for you already. So basically, go to this page , download the fullsize version of those, and print them out. I would also double check and make sure that everything came out the right size after printing, if not, well.. unfortunately you're gonna have to play around with your printer settings until they print at the right size.
Once that is all ready, you'll need your tracing paper, a ruler, and a pencil! Trace out both of the handle pieces carefully. Once that is all done and you have copies of both the upper and bottom pieces of the handle details, you're ready to transfer them onto your actual handle.
Step 4: Well, this is where being exact in your cutting and measuring pays off. If your handle is very close, or exactly 3.5 cm wide all round, then lining these up will be very easy. Just flip the upper part of what you just traced, the split part, then line it up with the 12 inch mark on your handle. You might want to use masking tape to tape it in place while you transfer, just so it doesn't move. When it's all lined up perfectly, draw back over the lines you traced. Make sure to press hard to it transfers. After that's done, do the same thing with the lower half then flip your sword over, make another 12 inch mark, and do the same thing as the other side.
You may have to go back over the transferred lines using your ruler to make the lines darker, that's fine.
Step 5: So now basically you have all the guidelines for the details on both sides of your handle. Here comes the very tedious annoying part.
Get out your 1/18th thick balsa wood and your pencil/ruler combo and prepare to want to saw your own leg off.
All of these balsa pieces to be cut are 1/4th an inch wide and have varying lengths. An exception, of course, being the part that looks like an arrow.
")
First, start out with the longest piece, which goes from the bottom of the handle to where the split pieces merge. This one is 6 3/4 inches long and 1/4 inch wide. Use an exacto knife to cut it out, then you can sand it down until it has two straight sides. Make sure not to sand off too much though! That would be bad. Once you are happy with it's size and think it lines up good, past it on.
Do that one more time exactly the same for the other side. While those dry, you can cut out more pieces.
Next come the slightly smaller pieces. These are the upper parts, or the two split parts near the top of the handle. These ones are 4 1/2 inches long and 1/4 inch wide. Same procedure with these ones as with the last ones.
Do it again. <3
While those four dry, we can do the small cross-looking details at the bottom of the handle. These ones are 1.5 cm long and 1/4 inch wide. Once all four of those are glued on, we have two more easy parts.
Next up, the two very small pieces at the top of the handle. these little guys are only 5 mm long by 1/4 inch wide. Now with these, it's perfectly okay to cut them longer then just sand them down to the right size once they dry. That's what I did. XD Do the same for the other side, then back to the balsa!
Last easy part. Cut out 5 pieces of balsa, all of them are 1 cm long by 1/4 inch wide. These 5 pieces will be the parts of the details that wrap around the handle to meet up with the details on the other side. (the pictures help, lol) Go ahead and glue these onto the sides, making sure to match up the parts. Once they are dry and lined up, very carefully use a small file to round the edges between the pieces that wrap around. You just have to soften the edges a little.
Now for a hard part! While all those sexy little details are a dryin', we need to cut out the little arrow chunk thing that is missing. I would highly recommend getting that tracing paper out again, using a ruler to re-draw over the lines of the angled parts, then transfer them lightly onto your balsa wood. After that is out, cut them out carefully and sand/file them down to the right size. Once you have done that for both sides, glue them both on. Feel free to sand away a little to make them fit right. (:
Step 6: Woo! Hardest part of the sword: done! Next up, we need to use woodfiller to fill in all those ugly gaps. Sand it up once it dries and make it look pretty.
") Once that is done, your handle details are sexy! I mean, done! So yay! Hardest part is done.
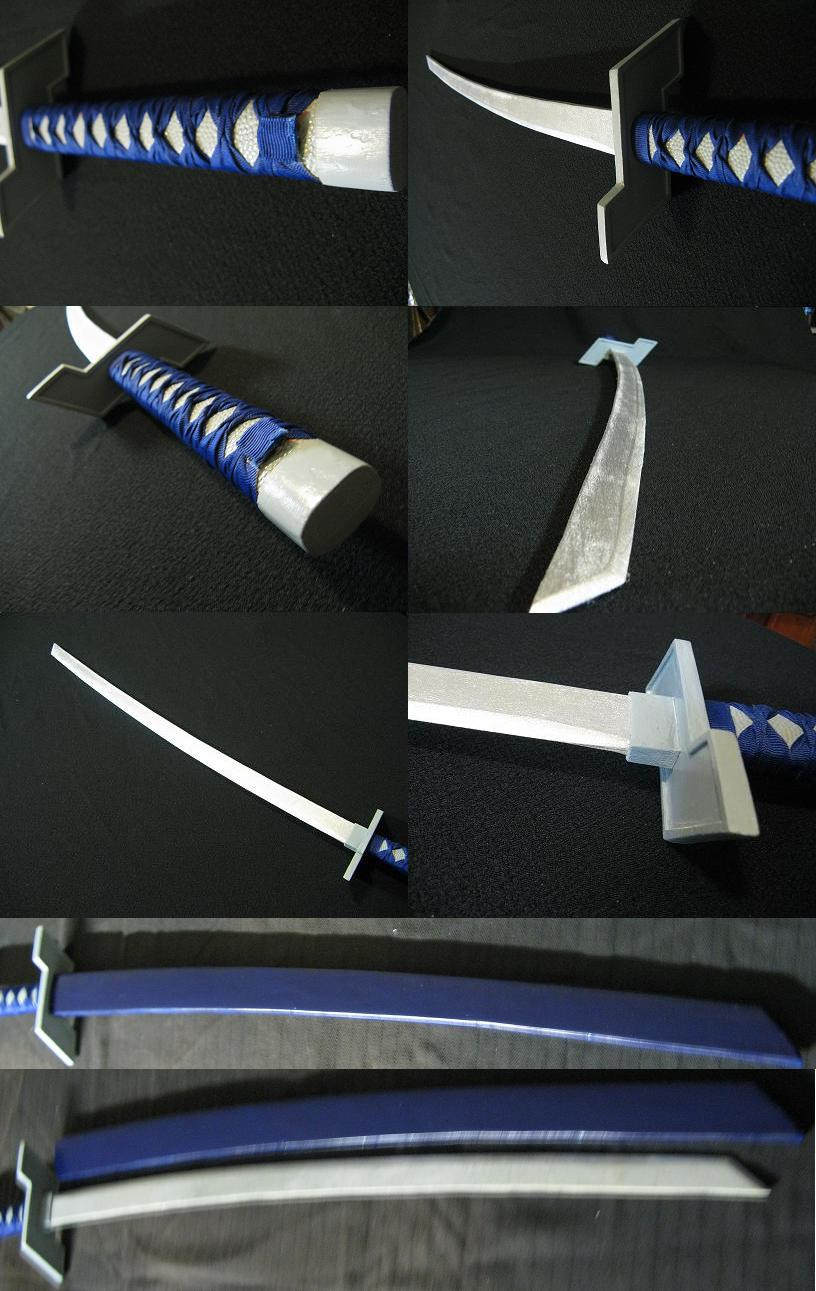
Once that is done, your handle details are sexy! I mean, done! So yay! Hardest part is done.Step 7: Use a file and some very fine sandpaper to round the handle edges that are not covered in balsa. You dont have to go crazy on it, just a light filing to take away the sharp edge, then a light sanding to make it nice and smooth. Once everything is smooth, the handle is done! Throw a tiny party, pat yourself on the back, shake off your hands, and get ready to file your worries away!
Step 8: I have no pictures for this, so I would practice putting an edge on some leftover wood, or other projects even, just so you have an idea of how to use your file. Once you do, put an edge on the blade. Just be careful when you are down by the handle no to accidentally file into your balsa details! Give your edge and sanding, make sure everything is smooth, and you can commence to painting.
Step 9: Well, I have no pictures for this either(yet) because it's raining and I can't paint. So, Basically, once again after everything is smoothed down and clean, put a few coats of primer onto it. After 2-4 coats, get out your preferred black spray paint.
Choosing what kind of black spray paint is completely up to you. I used an ultra flat camouflage black because I really liked how it looked, but feel free to use a more glossy black or whatever you prefer.
Next up, moar paint detailing! After you have a solid coat of black on the whole sword, you can paint the handle parts white. Get out some painters tape and lay it down around all the balsa wood. Make sure you don't have any gaps! From there on you can choose to either,
A: Cover the entire blade up then spray paint the balsa pieces white.
or
B: Hand paint the details with a brush.
Either one is fantastic. (:
Step 10: Finally, just put whatever kind of protector on it that you wish. I usually try not to, since even when I have gotten clear coats that are supposed to not be glossy when they dry, they are anyway and it ruins my sword, but do whatever you wish. (: If you want it to be protected from minor scratches and stuff, use a flat polyurethane spray paint to finish it off.
Well, there you go! I hope this helps out anyone who needs it. (: I will probably make a sheath tutorial soon too.
Cheers~
-CT
Related content


Comments: 17


Hopefully will come soon, but no promises as of right now ):
👍: 0 ⏩: 0

So my father decided to make mugen. How do you get superglue off of wood that has been polished?
👍: 0 ⏩: 1
Bluhhhhhhh superglue. I usually don't work with it, I usually use gorilla wood glue. I would honestly say just sand it, a lot, and very delicately. Maybe use a fine file.
Having never really worked with either superglue in woodworking projects or polished wood, I'm not entirely sure how to help. D: I'm really sorry!
👍: 0 ⏩: 0

hey dude i love you tutorial but i have one question, what kind of knife did you use to cut the wood for the blade ????
👍: 0 ⏩: 1
Just a craft knife, like those silver ones with the changeable blades. (:
👍: 0 ⏩: 0


Dude, this tutorial is amazing. I'll be sure to make Mugen with it. I'm going to watch you as well, I admire your skill.
👍: 0 ⏩: 1
Great to hear you will use it! n.n I can't wait to see the results. (:
I really like your creativity, too. 8D A wooden Sweeney Todd razor, that's epic. (:<
👍: 0 ⏩: 1
I'm going to make the handle curved, though. This shouldn't be too hard XD
Thanks for the compliments. I'm working on a few other projects too, meaning commissions for people (which consists of Kamina's katana from Guerren Laggan, and a dagger-thing for another friend), Lightning's gunblade, etc.
On another note, I'm holding a feature journal at the moment, and if you comment on it you'll be able to be featured for 3 deviations that I like from your galley for others to see. You should try it, I think a lot of people would enjoy looking at your art.
👍: 0 ⏩: 1
XD That may be difficult with curving all the balsa pieces as well. ")
I've only seen Lightning's Gunblade done by Fevereon, and it looks so complicated. XD;
👍: 0 ⏩: 1
Oh, I wouldn't be using balsa, but instead I would cut it out of basswood.
Yeah, Feveron's gunblade was actually the inspiration for me to try and make it XD
👍: 0 ⏩: 1
Don't blame you at all. Basswood is harder to cut, but way more sturdy. (:
👍: 0 ⏩: 0

this is perfect! thank you so much! I'm so excited to get started (: thanks again for taking my request!
👍: 0 ⏩: 1
Of course! 8D
n.n Good luck with your Mugen!
👍: 0 ⏩: 1
why thank you!!! im excited!
👍: 0 ⏩: 0