HOME | DD
 Catgoyle —
Tutorial - Polymer clay roses
Catgoyle —
Tutorial - Polymer clay roses
Published: 2008-05-17 11:22:15 +0000 UTC; Views: 206348; Favourites: 3282; Downloads: 31855
Redirect to original
Description
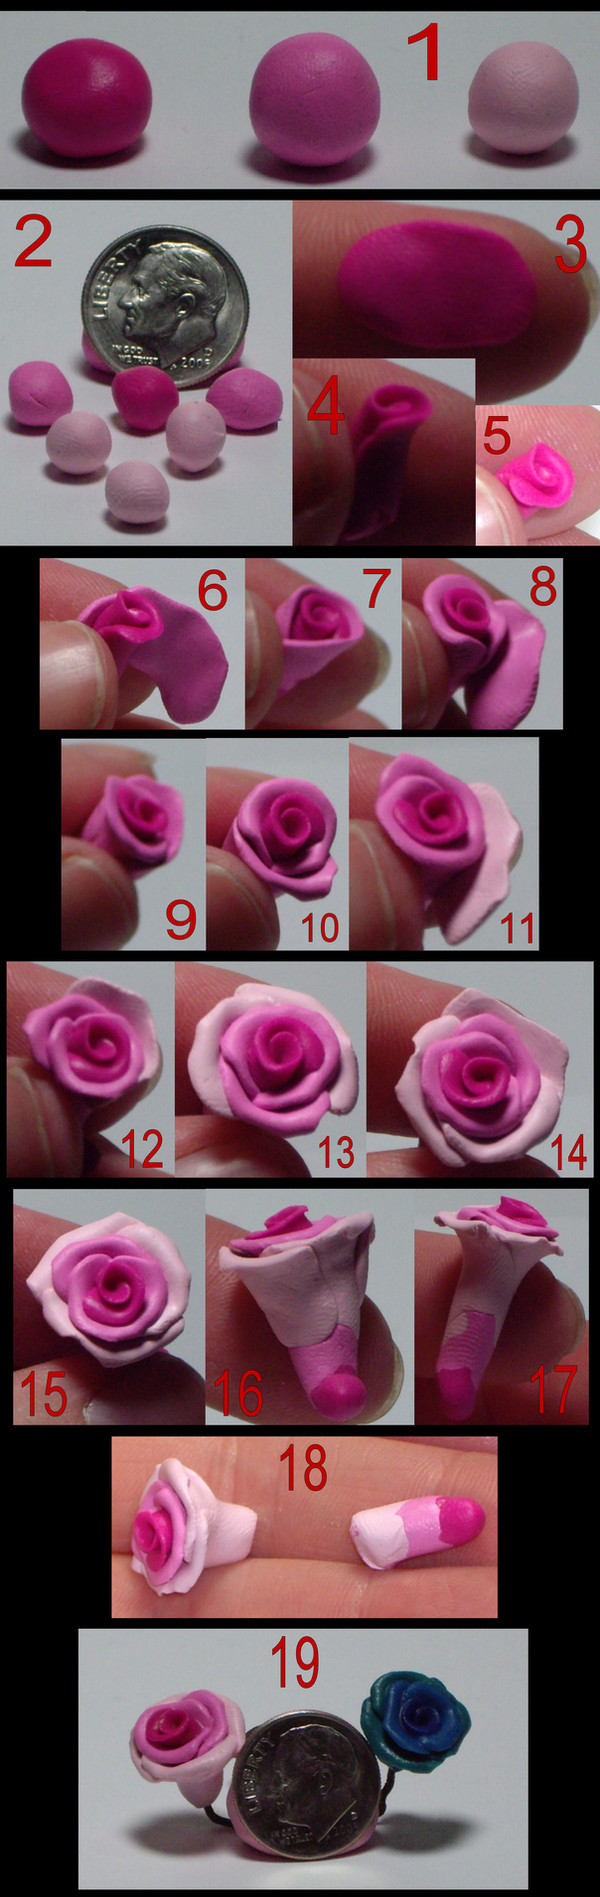
I find these really easy to do, and hope this will be pretty clear. If it's not, let me know. It's my first real tutorial. This should work for any polymer clay; work the clay first until it's soft and pliable, then follow the instructions below.1) Choose your colors. This is a sample set requested of me.
2) For mini roses (what I'm showing), you don't need a lot of clay. The American dime is pretty small; you really don't need much clay to do this. The center will be one ball, the next ring needs two (or three, if you want it a bit thicker), the third ring requires 3 or 4, depending on what you want. I've done it as 1-2-3, and rolled up the amount I'll need as shown here, with only one of the darkest pink for the center and 3 for the outer ring.
3) Flatten in an oblong shape your center ball of clay. The edge that will be the upper edge of the bloom should be flattened/stretched a bit more than the base. Make no real effort for this flattened/stretched area to be perfectly even; having it somewhat odd-edged will enhance the final bloom. Brush finger gently over the clay that will be rolled in the center until fingerprints are removed, or you will have to live with them being there.
4) Start on one short end and roll along the wide length until you have the core of the bloom rolled snugly. If you want it smaller/narrower, now is the time to roll it a bit extra between your fingers (not too hard) to thin it out.
5) Brush the tip of your finger from the center out very, very lightly along the thin lip of clay; this causes it to curl outward slightly, the way the petals should.
6) Repeat step 3; when you've removed your fingerprints from the inner edge, carefully add this side to your core piece. Make sure that the end of the center piece is either centered or not to either end of this piece.
7) Roll it between your fingers a bit so that the clay is snugly attached. Repeat step five.
8) Add the second piece of mid-color clay; I advise an eyeball centering of this one, so that the seam of the first mid-color clay is in about the center of this one. If you're doing three petals in this second step, DON'T center it, but place them more in thirds.
9) Roll it between your fingers a bit so that the clay is snugly attached.
10) Repeat step five.
11-14) Start the final ring. This goes the same as for all of the second ring of petals; space them as you see fit, but try really, really hard not to stack the seams on each row so that they line up, or your bloom will look very odd.
15) Step 5 again; this time make sure to go over all of your petal lips one final time to remove any fingerprints on them with very gentle strokes.
16) Side view; not so pretty, is it?
17) I've rolled it between my fingers (perhaps a bit much) to thin it down a bit. Now it's way too long.
18) Trim off the extra. The tail that's not being used can be saved, blended and (especially if you're doing a lot of the same blend) can be recycled for future use. I find that it usually ends up matching (or close to it) the mid-tone.
19) I use a twist of wire to spear it and bake it on. The clay used for this demo is Sculpey III; I bake it for about 3 minutes. DO NOT OVER BAKE. These burn really quickly. When cooled, I painted over it with Liquid Sculpey and baked it again for a few minutes. Liquid Sculpey appears to keep it from burning, so the length of time is a bit more flexible. I still only bake it for a few minutes, but it's more forgiving at this step. Brush on a very light coating, careful of leaving it pooled in cracks. It does NOT look attractive if you glop it on and let it fill the cracks, trust me...
If you wish to add leaves, they can still be added after this point, or if you want to add anything else to it as well. Use a spot of super glue to attach any findings to it for jewelry, or they will be able to pull out. Super glue should be the last step, after you're done with all the baking.
EDIT:
[link] *kittykitty5150 is the first one to send me a link to the finished product of using my tutorial. Thank you, *kittykitty5150 !
Related content


Comments: 334

I used to do this with play doh all the time. but they would always crack  (Smile)")
👍: 0 ⏩: 1

Poly clay is a wonderful thing!
👍: 0 ⏩: 0

i used to make little roses out of play doh.
👍: 0 ⏩: 1

Aha, I learned this technique a while ago xD It also helps if you thin out the ends of the petals and rip it slightly, to make it look more delicate and stuff. I make these all the time I get my hands on some clay lol
👍: 0 ⏩: 1
(nods) I don't tend to rip it, but I do pluck on the petal edges to make them each different.
👍: 0 ⏩: 0


WOW you did a really good job!
👍: 0 ⏩: 1
What else do you make out of clay? Just curious.
👍: 0 ⏩: 1
Mostly beads. I've pictures of some online here. Some don't photo well; you lose too much when you take the picture. But some of those that photo well are posted here. Green and blue ones, I think. I have some that are pink, white and traces of gold and black, but I don't have the photos of those ones posted.
👍: 0 ⏩: 0

This is amazingly "easy"! This will be very useful because my mom asked me for some polymer clay roses, thanks! ^^
👍: 0 ⏩: 1
(smiles, hugs) Very pleased that you find my tutorial to be easy to follow! I took so many pictures in the hopes that it might be clear enough =without= referring do the words below. Some tutorials don't seem to have enough pictures to tell the story well enough, and sometimes text just doesn't cover it.
👍: 0 ⏩: 0

So glad you found it to be helpful!
👍: 0 ⏩: 0

")

now this is something I would love to make.
👍: 0 ⏩: 0

Very nice, thank you for this tutorial!
👍: 0 ⏩: 0

SUPER!! I was looking for a tutorial of this and did some googling. Found nothign useful. Then I went here and whoopla, you solved the riddle. Thank you!!
👍: 0 ⏩: 1
You're very welcome. And try YouTube; they have some interesting tutorials, and I've collected some into my Favorites under "tutorials" that I've seen and liked, for various different mediums. If you use it, I'd love to see what you come up with, certainly!
👍: 0 ⏩: 0

Wait, do you just bake this in a regular oven? Or do you need a special oven?
Sorry, I'm a noob at clay :s
👍: 0 ⏩: 1
(grins) I've been away for quite some time, sorry for the delay. You can use a regular oven; I use a small toaster oven for mine. The packages of clay give you baking instructions, but you can also look up the company sites online to get instructions, free project ideas and all sorts of suggestions I can't think of at the moment.
👍: 0 ⏩: 1
Thanks
👍: 0 ⏩: 0

You're most welcome! I'd love to see any that you do based on my tutorial, certainly.
👍: 0 ⏩: 0

I really appreciate this tut
I used it for charms for some felt & ribbon bookmarks I made...
Guitar and Cloud
Lightning Bolt
Music Note
Sunflower
👍: 0 ⏩: 1
Sounds lovely! Thank you for stopping by and commenting. Someday I'll have to come up with more tutorials. So many have liked how clearly I show each step. Sadly I can't ask a non-English speaker to tell me if they can follow it without the words!
👍: 0 ⏩: 0


You most certainly do! I've looked at some of your work, which is far and away more detailed and intricate than what I do with clay. Thank you very much for your kind words.
👍: 0 ⏩: 0

You are very welcome! I would love to see it if you use the tutorial.
👍: 0 ⏩: 0

Simple enough. Thanks I'll try it out ang give all the credits to you!!
👍: 0 ⏩: 1
(chuckles) Please, keep at least some of the credit as your own for doing the work, but post a link for me, as I'd love to see what you come up with, too.
👍: 0 ⏩: 0


Thank you!
This helped so much on making mini bouquets!
>W<
👍: 0 ⏩: 1
Sweet! I'd love to see your mini bouquets!
👍: 0 ⏩: 0

I just started using polymer clay and learning to sculpt, and now I'm really looking forward to making my mother a rose pin to remind her of my grandmother who passed away.
Thanks so much for this tutorial, I really appreciate it c:
👍: 0 ⏩: 1
You're very welcome, and I hope you find or have found this tutorial to be very useful. If you do use it, I'd love to see what you come up with.
👍: 0 ⏩: 0

I am very glad you made this tutorial.
It was very helpful with this [link]
👍: 0 ⏩: 1
Thank you for sharing, and I'm very pleased I could help you out with this.
👍: 0 ⏩: 0

Wow thanks! They look stunning *adds to to-do list for tomorrow morning*

👍: 0 ⏩: 0


thank you so much! i love this i made a keychain with it
👍: 0 ⏩: 1
You're very welcome! Have you taken pictures of it? I'd love to see how yours turned out.
👍: 0 ⏩: 1
no i haven't but I put it on a keychain I made for my mom, and it fell out! It was so nice too! but it also gives me a reason to make another
👍: 0 ⏩: 1
<= Prev | | Next =>