HOME | DD
 Catgoyle —
Tutorial - Polymer clay roses
Catgoyle —
Tutorial - Polymer clay roses
Published: 2008-05-17 11:22:15 +0000 UTC; Views: 206336; Favourites: 3282; Downloads: 31855
Redirect to original
Description
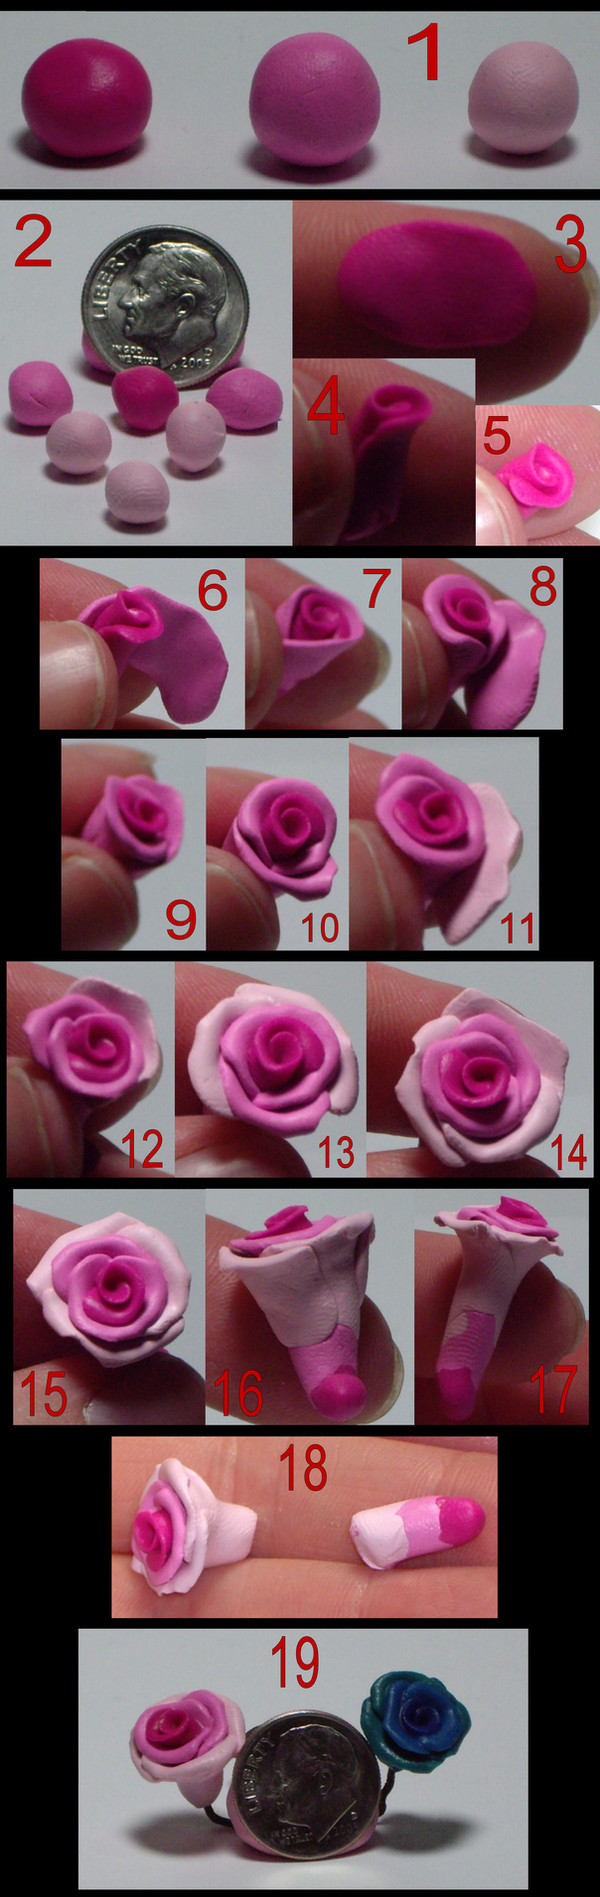
I find these really easy to do, and hope this will be pretty clear. If it's not, let me know. It's my first real tutorial. This should work for any polymer clay; work the clay first until it's soft and pliable, then follow the instructions below.1) Choose your colors. This is a sample set requested of me.
2) For mini roses (what I'm showing), you don't need a lot of clay. The American dime is pretty small; you really don't need much clay to do this. The center will be one ball, the next ring needs two (or three, if you want it a bit thicker), the third ring requires 3 or 4, depending on what you want. I've done it as 1-2-3, and rolled up the amount I'll need as shown here, with only one of the darkest pink for the center and 3 for the outer ring.
3) Flatten in an oblong shape your center ball of clay. The edge that will be the upper edge of the bloom should be flattened/stretched a bit more than the base. Make no real effort for this flattened/stretched area to be perfectly even; having it somewhat odd-edged will enhance the final bloom. Brush finger gently over the clay that will be rolled in the center until fingerprints are removed, or you will have to live with them being there.
4) Start on one short end and roll along the wide length until you have the core of the bloom rolled snugly. If you want it smaller/narrower, now is the time to roll it a bit extra between your fingers (not too hard) to thin it out.
5) Brush the tip of your finger from the center out very, very lightly along the thin lip of clay; this causes it to curl outward slightly, the way the petals should.
6) Repeat step 3; when you've removed your fingerprints from the inner edge, carefully add this side to your core piece. Make sure that the end of the center piece is either centered or not to either end of this piece.
7) Roll it between your fingers a bit so that the clay is snugly attached. Repeat step five.
8) Add the second piece of mid-color clay; I advise an eyeball centering of this one, so that the seam of the first mid-color clay is in about the center of this one. If you're doing three petals in this second step, DON'T center it, but place them more in thirds.
9) Roll it between your fingers a bit so that the clay is snugly attached.
10) Repeat step five.
11-14) Start the final ring. This goes the same as for all of the second ring of petals; space them as you see fit, but try really, really hard not to stack the seams on each row so that they line up, or your bloom will look very odd.
15) Step 5 again; this time make sure to go over all of your petal lips one final time to remove any fingerprints on them with very gentle strokes.
16) Side view; not so pretty, is it?
17) I've rolled it between my fingers (perhaps a bit much) to thin it down a bit. Now it's way too long.
18) Trim off the extra. The tail that's not being used can be saved, blended and (especially if you're doing a lot of the same blend) can be recycled for future use. I find that it usually ends up matching (or close to it) the mid-tone.
19) I use a twist of wire to spear it and bake it on. The clay used for this demo is Sculpey III; I bake it for about 3 minutes. DO NOT OVER BAKE. These burn really quickly. When cooled, I painted over it with Liquid Sculpey and baked it again for a few minutes. Liquid Sculpey appears to keep it from burning, so the length of time is a bit more flexible. I still only bake it for a few minutes, but it's more forgiving at this step. Brush on a very light coating, careful of leaving it pooled in cracks. It does NOT look attractive if you glop it on and let it fill the cracks, trust me...
If you wish to add leaves, they can still be added after this point, or if you want to add anything else to it as well. Use a spot of super glue to attach any findings to it for jewelry, or they will be able to pull out. Super glue should be the last step, after you're done with all the baking.
EDIT:
[link] *kittykitty5150 is the first one to send me a link to the finished product of using my tutorial. Thank you, *kittykitty5150 !
Related content


Comments: 334

Thank you so much! You should look at the ones I did in other colors, too, if you like this one.
👍: 0 ⏩: 0

I did basically that exact same thing when I was a kid and loved to play with clay ")
👍: 0 ⏩: 1
Thank you very much! I tried very hard to make it clear and easy to follow! Some tutorials don't have enough visual aids to help me piece together what they're trying to show you, so... I worked to make that not happen here.
👍: 0 ⏩: 1
You're welcome! It was definitely clear and informative
 (Smile)")
👍: 0 ⏩: 1

Roses are among the most tricky things for me to get right for some reason, drawing or making. Thanks for sharing!

👍: 0 ⏩: 1


Congratulations! I worked it out from trial and error working from some wordless and fast-paced YouTube videos.
👍: 0 ⏩: 0


Congrats on the DD! This amazing tutorial totally deserves it
👍: 0 ⏩: 1
Thank you so much, that's very sweet of you to say!
👍: 0 ⏩: 0

I used to make these from Tootsie Rolls! My mom taught me how.
👍: 0 ⏩: 1
Did you then eat them? I can't imagine any other reason to make something out of chocolate or other edible materials, so... I had to ask!
👍: 0 ⏩: 1
Yes I did! It didn't take long so it wasn't like I just made them to look at. hehe. I just played with them a little by making little roses and then made them. hehehe
👍: 0 ⏩: 1
(grins) Chocolaaaaaaaate!!! Made to be eaten.
👍: 0 ⏩: 1


You know, you can get rid of your fingerprint by working with thin latex gloves on
👍: 0 ⏩: 1
...do you know all the ones I tried always had wrinkles in the fingertips to annoy me while shaping things? Much more vexing to work around than smoothing my prints before baking. Sadly it's something I've tried, and it did not work for me. But if it works for you, I'm happy for you!
👍: 0 ⏩: 0


awesome...i should do that...thanks for telling us how to do them....they're beautiful..but I don't have any clay...maybe i'll try when I go for vacations back home...
👍: 0 ⏩: 1
There are many craft stores that sell polymer clay, and some that aren't "craft" stores. Walmart often has some in their craft area, near the children's crafts. Fred Meyers, Micheal's, JoAnn Fabric and Crafts, Craft Warehouse, Hobby Lobby... all of these places sell polymer clay, usually for between $1-$2 per 2ounce brick, more for larger bricks. Walmart only sells packages, not single bricks, unless the Walmarts in your area are very different, and they just may be. Just tossing out ideas to tempt you...!
👍: 0 ⏩: 0

I've actually got a video tutorial of this same thing somewhere, made it for class though I never posted it online.
👍: 0 ⏩: 1
Oh, I'm certainly not the only one to have posted a tutorial on this subject! But I do like to think that I did a rather good job with the pictures and all without having used moving pictures.
Maybe you should post your video for others to use, too.
👍: 0 ⏩: 1
You did a fantastic job in fact... my video was horrible XD lol it had started raining in the middle of working on it.
👍: 0 ⏩: 1
Rain! You must have been working with it outside. I can see how that would cause problems. Ah, well...!
👍: 0 ⏩: 0

This is very helpful! Thanks for sharing. And congrates on the DD.
👍: 0 ⏩: 1
(grins, blushes) Thanks! I found out about the DD over a month after getting it, as I just moved.
👍: 0 ⏩: 0


Cute!
I'll defiantly be using this tutorial!
👍: 0 ⏩: 1
I'd love to see what you come up with!
👍: 0 ⏩: 0


<= Prev | | Next =>