HOME | DD
 Chellosia — Process~ Chase the Sun + Step by Step Description

Published: 2017-06-20 01:52:39 +0000 UTC; Views: 1325; Favourites: 42; Downloads: 11
Redirect to original
Description
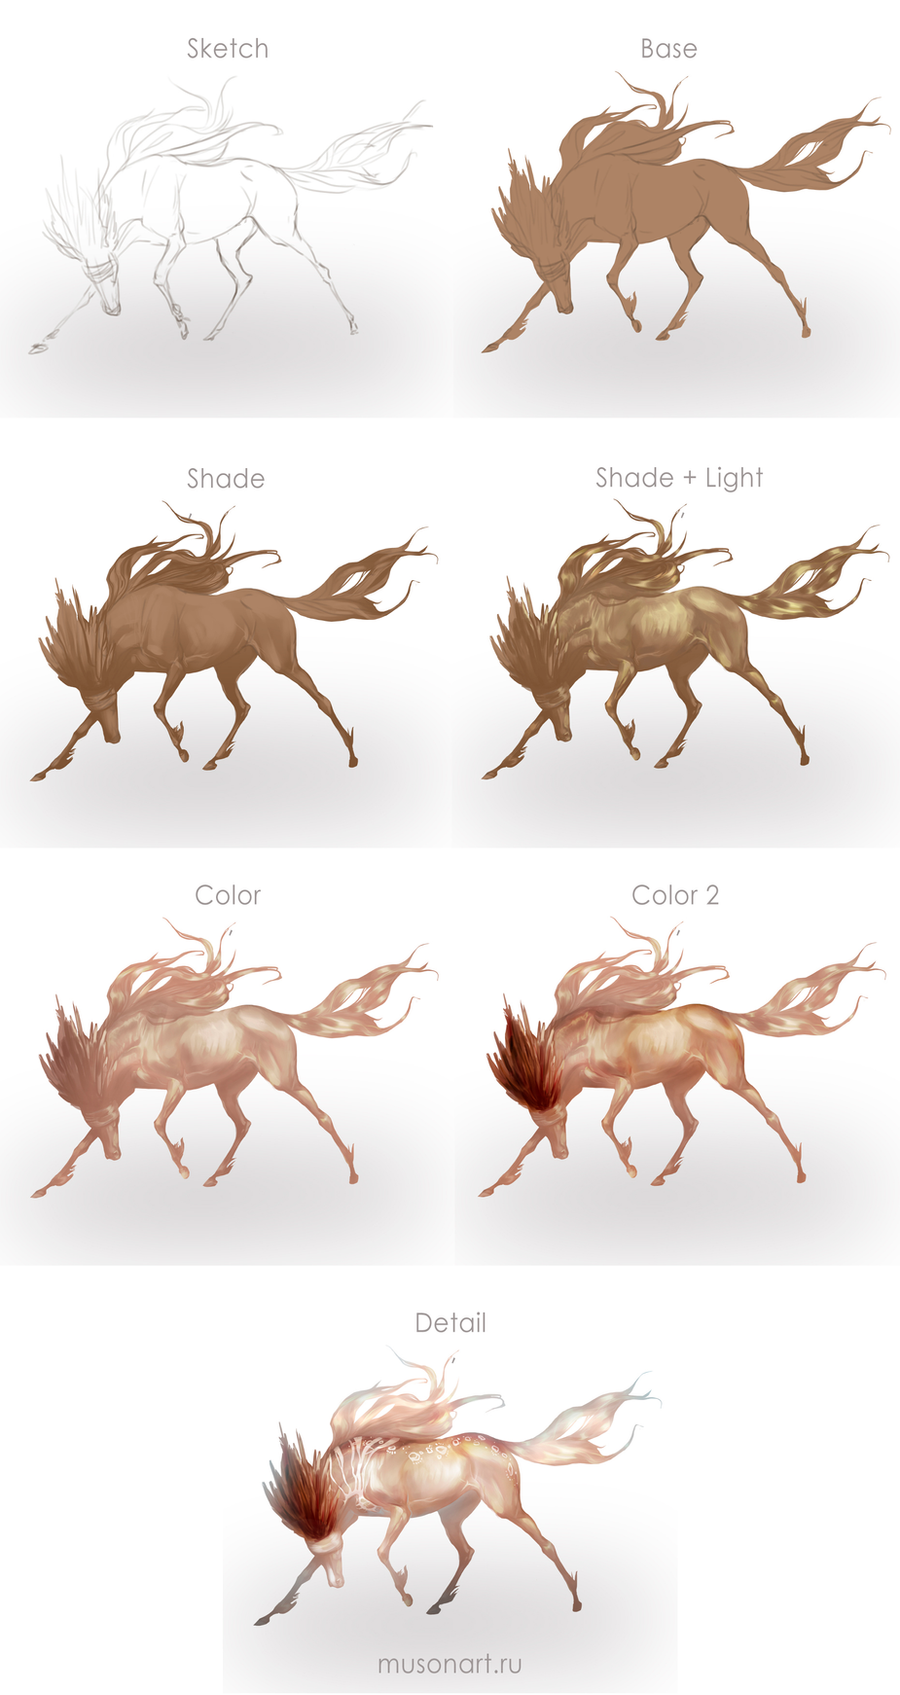
Process of my latest painting, viewable here: fav.me/dbcuxlpDescription is from left to right, staring from the top.
First picture: Rough sketch/concept. Because the background I had in mind was rather simple, there are no background lines. Captures the basic shape, expression, movement of the subject. Tack is included as is the mane. Since there is more detail in the tack and mane, I put a little extra effort into sketching the braids, the buckles, etc.
Second picture: Base colours. Basic idea of the background and colours sets the mood for the subject. I lay down flat colours for my horse. Although chestnut horses are pretty much all one colour, the mane on this one is a little more saturated so I make sure to include that in my base.
Third picture: Starting shading. I start by fleshing out the horse bit by bit. I like to concentrate on the body of the horse before the mane, and the face in particular. Slowly carving out the muscles and adding a base for the nostrils, ears, and eye.
Fourth picture: Big jump. I continued building up my tones. I add the eye, finish up the nostrils and the ears. I don't add too many highlights yet. I concentrate on trying to blend everything out a bit. Fill out the tack. I then begin work on the braids, which was a bit tedious. I start by tracing out the shape of the braid with a dark brown. I then start adding the strands of hair from dark to light. Later I will add stray hairs and some highlights so they don't look like rigid bricks on the horse's head LOL
Fifth picture: Braids are done and look much more flowing. More like braids, less like bricks is good. I go back to the body of the horse and really blend everything. I then add some highlights, especially on the shoulder muscles, bridge of the nose and the top of the horse's neck. I begin work on the fur layer, starting from dark-light as I always like to
") This is the perfect opportunity to strengthen the highlights and bring a wider range of colours to the subject. Note the furry ears :3 I also add some more definition to the horse's wrinkly chin and muzzle.
This is the perfect opportunity to strengthen the highlights and bring a wider range of colours to the subject. Note the furry ears :3 I also add some more definition to the horse's wrinkly chin and muzzle. Sixth Picture: Finishing touches. I fix up the background, but it looked a little too bland. I decide to add some particles of light. This is a fantasy piece so we can get away with such things
 (Wink)") I add a lot of highlights, especially around the edges of the horse and tack. I add shadows to the reins, tack, braids and behind the ears- anywhere that makes sense.
I add a lot of highlights, especially around the edges of the horse and tack. I add shadows to the reins, tack, braids and behind the ears- anywhere that makes sense.Final piece: Just some slight colour corrections, little bit of blurring. I played with motion blur but didn't like it. Also I forgot the second rein -_- Clearly IN the sketch. Did not remember it until... Okay so actually just now as I was writing this but SHHHHHHH. >.>''
Okay, I hope it was helpful. I'm kind of tired from a ridiculous cleanfest I just undertook and exercise earlier XDD I hope it makes sense.
Refs (for final piece):
Zelda BOTW screenshots.
www.lusitanohorsefinder.com/wp…
Related content


Comments: 4

It is very beautiful! Such a beautiful horse. It's amazing! Thank you for the tutorial!
👍: 0 ⏩: 1

No problem!! I hope it's useful
 (Smile)")
👍: 0 ⏩: 0

This looks really nice and kind of informative. I'm actually trying to learn more about how to use technology and art myself, but this looks really nice! I look forward to seeing more of your work
👍: 0 ⏩: 1
Thanks! Let me know if you have any questions. I have more processes and a fur tutorial available in my gallery
👍: 0 ⏩: 0