HOME | DD
 chukadrawer — -Sonic-snap and boom -progress(read!)-
Published: 2012-06-30 04:19:32 +0000 UTC; Views: 3071; Favourites: 70; Downloads: 79
Redirect to original
Description
i think that it'd be usefull, somehow, to you so i made this kind of tutorial for the last animation [link]i will explain you, as short as possible, the way i do the animations:
 step1_the idea "!": it's about proyecting your first "idea" of the animation into a piece of paper , whether written or in rough drawing, but it's always better drawn
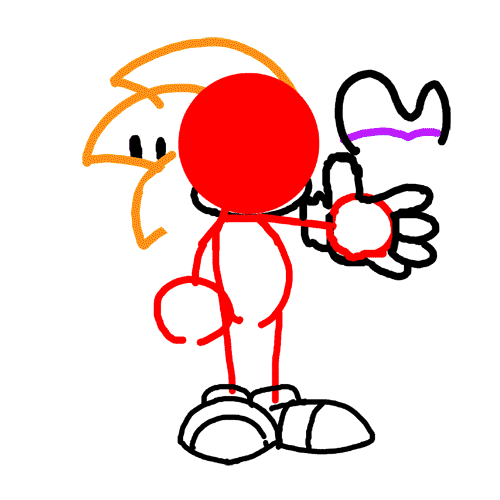
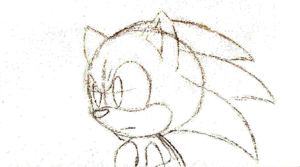
 ") step2_have a reference: as you can see in the first image in red, we should do a reference of sizes that will guide us for all animation in parts like: the head, the body, the extremities and their conection, joints, etc.step3_the movements: all the moves have an important part,if we have one "harsh" move, then it wouldn't fit very well, so we have to make it soft.
step2_have a reference: as you can see in the first image in red, we should do a reference of sizes that will guide us for all animation in parts like: the head, the body, the extremities and their conection, joints, etc.step3_the movements: all the moves have an important part,if we have one "harsh" move, then it wouldn't fit very well, so we have to make it soft. as you can see again in the last animation (the link above) our character wasn't just standing and suddenly snap, he goes up like stretching'up, then goes down and back balancing himself by stratching his left foot and finishes bouncing like a spring, that is a very common example for guide,finally he just run away stretching again to the uper left side. all the moves should be as soft as possible, take examples from the classics! they are very expressive with any actions, and all based in the "spring".
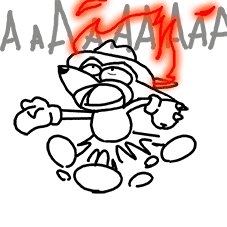
step4_the moves' points: in any animation we have points of animations that would be most "pronunced" than others because the moves changes at those points. here we can see that the moves, who are in blue, are just the sequences of the most pronunced frames of the animation:standing,going up, going down and back, etc, as we already mentioned. in our animation we have to start with doing those move points first than all the other sequences frames.step5_the transition frames: we already have the most importants points or frames in our sketched animation, but i'd never be finished without all the other ones, so, depending in how far in time are your firsts points between we'd be doing our transition frames,best known as "in-between" frames. in this case we have just one in-between frame because our action in the animation is short and have enough pronunced points/frames. in the working program we should be doing it all in differents layers so we'd be viewing the first and the second pronunced frame (in this animation we have use the 2nd and the 3rd one), if it's possible we'd be changing their opacity to sthg like 30% or less and would be working in a different layer in 100% of it's opacity, as in the animation. finally , and acording the move we are doing we will draw each part of the body in between their respective place of each one of the other two layers,i mean, to draw a head in the middle of the first and second pronunced point's head, the body in the middle of the first and second P.P.'s body, the hands ,the feet, and else. then just do the same with all the other frames and that's all!.step6_the production: this part will depend on how produced you want your animation. in this tutorial the animation was separated in some parts:_the eyes: you'd be seeing that in the top right corner of this animation is an eye next to the character that shows when is it open , when is it close and when is it half open/closed. this is just to show that there's a transition too, also that we never distorted the size of the the eyes because of the references.
_the spines: them as the ears and the tails have a similarity in reactions, they "react late",or in a second time haveing a spring effect again, they act at the same time of the previous action. we have the arows in black showing our character moves and in other colour the spines movesas if they were acting late or aginst the actual action. this aplies to any other part that have not or have just a few muscles and is not being consciusly controlled.
_the hands: as they are acting in controll, they don't have this effect, they are acting with an "intention".
_the feets: they are working in an intention but they are (in an espesific time) totally stretched, makeing it a (short)spring effect anyways.
_the mouth, the body, and else: they all work with those rules and make the animation as soft as possible.
and at the ending i just did all the same steps to add the scape and added some effects with blur, oppacity and the layer's mode.
i really hope it works for all of you, and mostly for those ones who are constantly asking who to do it. i'd be pleasant to answer any questions
 (Smile)")
hope ya all like it!
Related content


Comments: 7


...
i was just to submit it with blue arms, ya know?
👍: 0 ⏩: 0