HOME | DD
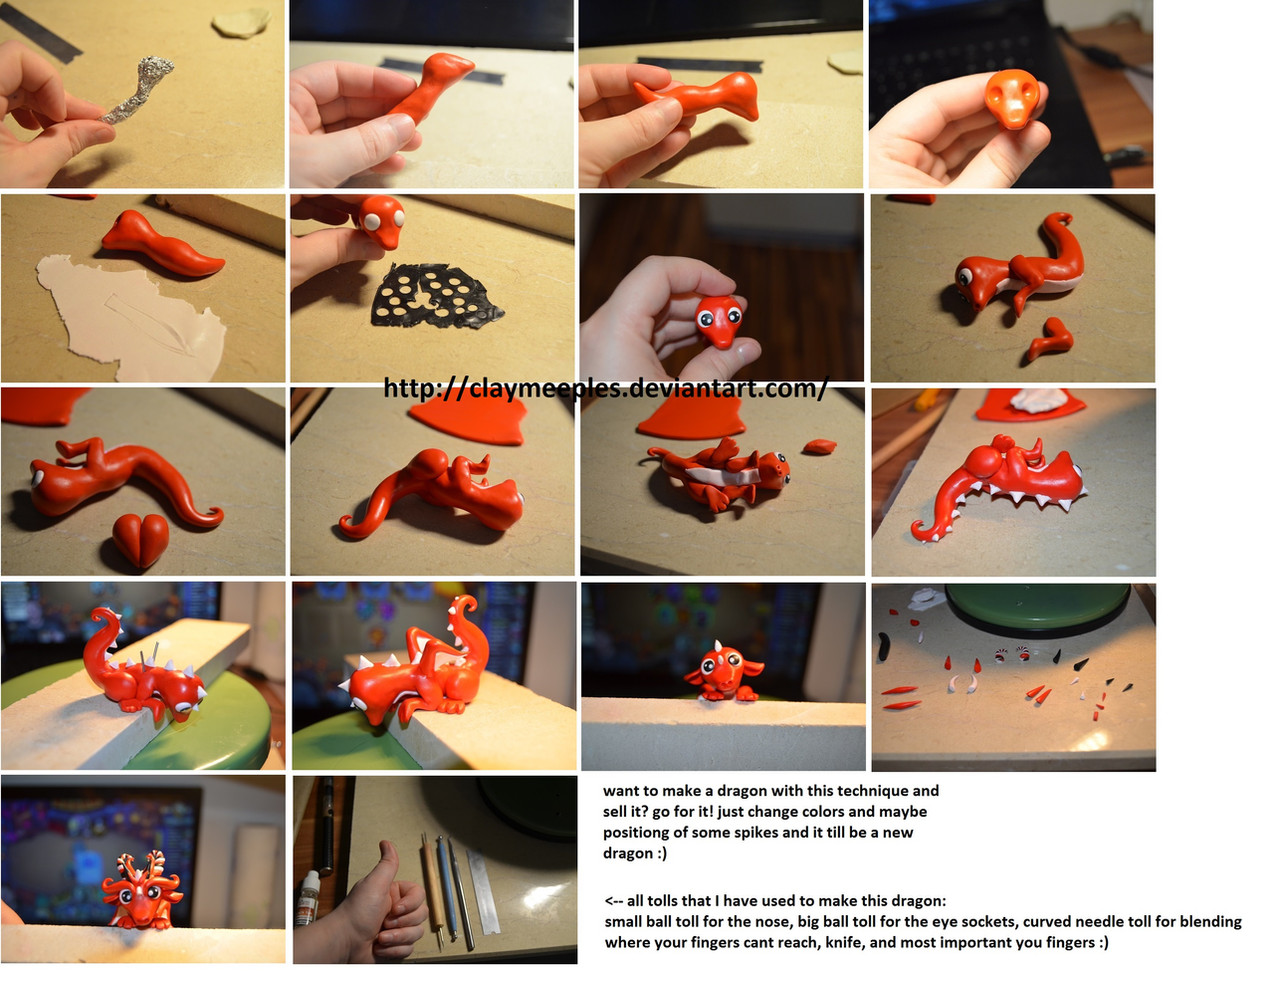
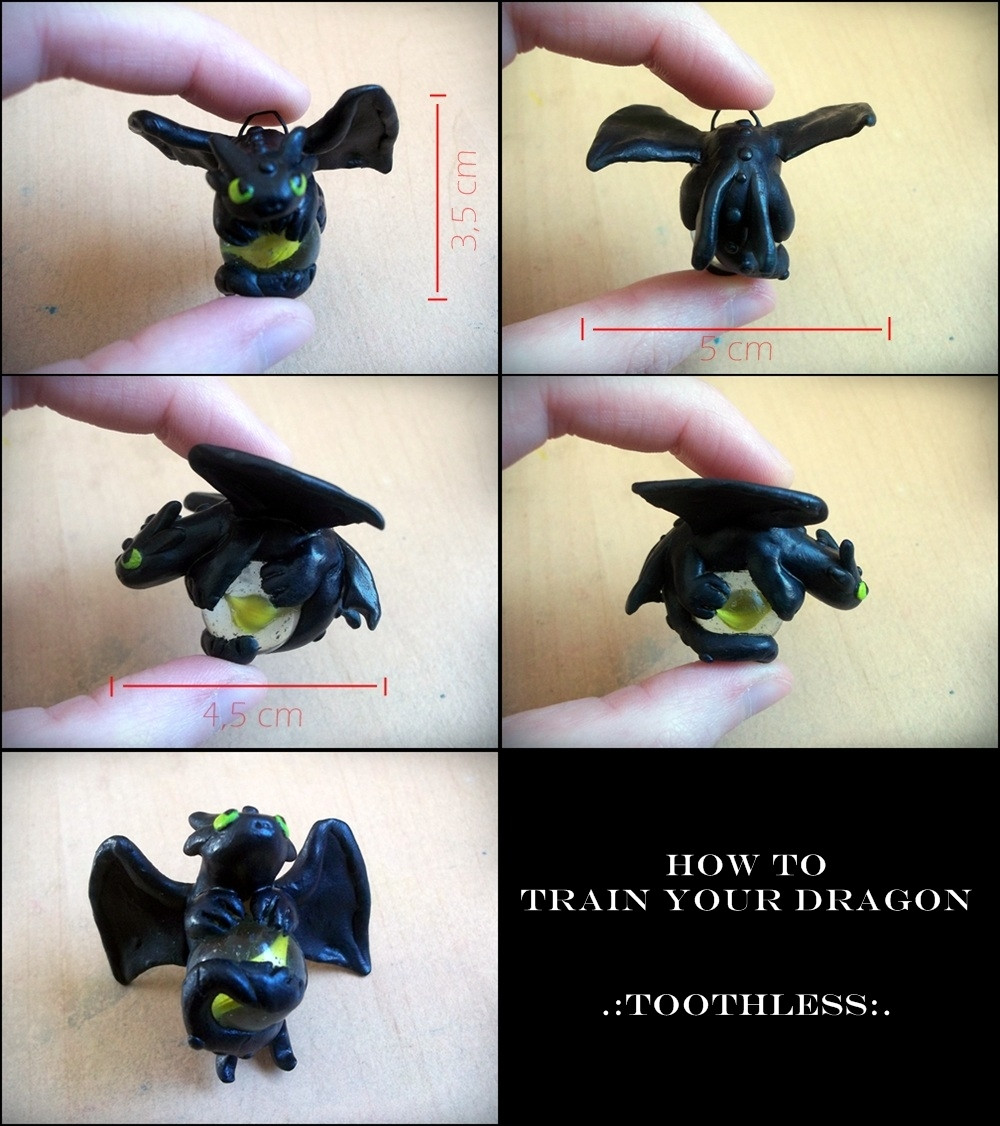
 claymeeples — dragon photo tutorial
Published: 2017-02-16 13:59:00 +0000 UTC; Views: 1055; Favourites: 38; Downloads: 5
Redirect to original
Description
I dont own this technique and I dont belive you can claim ''technique of sculpting'' as your propertie, so feel free to use it to make your creations.You can find more tips on sculpting on youtube - thats how I know 70% of methods that I use - 30% is practice.
here are some youtube channels that I watch and learn in the process
1. --link--
2.--link-- - a lot of technical stuff of how to bake clay, keep it clean etc.
3. --link--
Be careful if you start watching them it may increase your creativity
 (Smile)")
my facebook
my shop on etsy
Related content


Comments: 26


Super. Zawsze mi się podoba jak one wyglądają takie "łyse" a później dodajesz kolce / grzywę / rogi na głowie i zaraz jest efekt ")
👍: 0 ⏩: 1

smiesznie wygladaja bez kolcow
👍: 0 ⏩: 0

So awesome to see your technique!  (Cool)")

I also found that laying down a finished sculpture on/in a bed of baking soda as support helps to prevent drooping while baking. The baking soda completely dusts off easily afterwards (still depending on what clay you use?... I use super Sculpey [has a matte finish] and generally paint the figure afterwards so I'm not concerned with that straight-out-of-the oven 'high gloss' look).
👍: 0 ⏩: 1
I use the foil mostly for support a lot of my early dragon collapse in the oven
I use premo, I have some super sculpey and I made a few things with it but I like the colors of premo. i'm still a beginner artist (I started in november 2015) and I'm not very good at painting figurines
Premo has a mat finish after baking I just like to glase them after to give them extra straight (shipping can be hard on them) It might get glossy on the parts that though the ''ground'' in the oven but it can be fixed with some toilet paper under
there is also a new polyform product called souffle I heard that it is more mat then premo but I never try it myself.
I also bake my work for 1h to make it stronger.
It just looks glossy on this tutorial because it is raw
I wish super sculpey had some more colors then grey...
I will definitely try the baking soda
Hope i understand it right with the baking soda: I should use a small bake safe container put baking soda in and the submerge dragon in right?
")
👍: 0 ⏩: 1
Oh... so you spray your sculptures after they've been cooked with a glossy sealer? Makes sense.
Then, I'm quite sure you can use the bed of baking soda to help support your creations during baking... (you can always try a small test to see how the Premo turns out)
(Btw, the Super Sculpey I use is 'flesh' tone (not grey -- that's a different Sculpey, not sure of other colours...) I'm good with that because I prefer painting my sculptures.
Yes, with the baking soda... use a bake safe container (I form a small, shallow bowl out of aluminum foil) and fill it about an inch or so (for smallish sculptures) with baking soda. I don't bury my sculptures, I just make an appropriate indent (with my finger) for the sculpture based on its shape and very gently lay it on top of the baking soda. If needed, I can build up/add the baking soda around the item to help give it more stability.
Two more things I do:
I place my small aluminum make-shift container that holds the baking soda (and sculpture) on top of a ceramic tile (which helps with slow radiant heating [even baking] and slow cooling after baking [helps prevent cracks and breaks]) which sits inside a larger sturdy metal baking tray.
Then, I cover the whole thing with a sheet of aluminum foil (careful not to touch the sculpture) and crimp the edges of the foil over the sides of the larger metal baking tray to create a seal. This foil cover helps with even heating and also prevents the item from burning.
This method seems to work great especially for small ovens.
👍: 0 ⏩: 1
so crack happen when clay is getting warm to fast and cooling to fast? i heard opposite things on internet that you should get the oven to the right temperature before baking and after baking when figurine is hot you should cool them fast (i put mine in cold water and it seams to seal small cracks but not big cracks...) now I'm very confuse I quess i will have to do more testing
the crack is my main problem with clay so maybe my method is not working
about the sealer I just use a small brush to glase them
I never have problems with burning clay, my oven is covered in kitchen tiles for insulation
👍: 0 ⏩: 1
Hehe yes it's confusing!
Yes, you want to have the oven at the correct temperature before you put your sculpture in there. It takes time for an oven to warm up to an even heat and, until that happens, the elements can cause super-heated areas inside the oven -- not good.
When I place my sculpture into the preheated oven, the ceramic tile underneath the sculpture plus the baking soda bed plus the aluminum foil cover all helps to slow the heating of the sculpture so I get gradual heating. (The fact that your oven is covered in kitchen tiles is nice, but it's the tile directly underneath the sculpture that is what is helpful here).
Fast cool down of polymer clay can increase chances of cracks and breakage. It's not advisable to quickly cool down a sculpture ever. When cooking is complete, turn off oven and do not open oven door. Allow oven to cool down slowly before taking out the sculpture.
Heating and cooling something (especially quickly) is very stressful on material. It's all about expansion and contraction.
This same idea applies to architecture built in continental climates (largest temperature variation). The greater the range of seasonal temperatures, year after year, the more the strain/stress on building materials and structural integrity resulting in all kinds of damage to buildings.
Another example (often argued) is electronic equipment -- whether to leave it on all the time or turn it off when not in use (eg. computer). Constantly turning on and off equipment means there is added stress to the electronic components from being turned on (heating) and turned off (cooling) causing expansion and contraction. That means more potential damage/breakage to equipment and a shorter equipment lifespan.
Yes, I've heard about placing a sculpture into water to 'heal' small cracks. I've not tried it myself, but IF I did it, I would definitely do everything at room temperature (that includes the water and the sculpture). Personally, I'm not sure about this water 'treatment' as it seems to soften the sculpture permanently (my experience having polymer clay sculptures in/on a water fountain). At least to me, the water seems to compromise the polymer clay permanently especially when the water is in contact with the material for a long period of time.
Still, some feel polymer clay is completely waterproof. You would have to do your own experiments!
I have found that oils especially soften polymer clay (function like plasticizers). This is why you can use petroleum jelly (eg. Vaseline) as a slip or 'glue' to connect baked polymer clay to raw polymer clay.
As a tip, if you have a sculpture with fine, delicate parts that you want to protect and cook more slowly than the rest of the sculpture, carefully cover/wrap those areas with (extra) aluminum foil to insulate them.
Please note: I'm NOT an expert... This is just some information I've gathered along the way combined with my own experience and observations. I'm always open to new information and suggestions.
gave me this very helpful and insightful link (advice/information on polymer clay):
thebluebottletree.com/seal-pol…
👍: 0 ⏩: 1
I wish my 1st language was English but it is Polish so I cant get into ''science'' discussion like this because I dont know the terms
About the 3d printers. I dont own one but I heard that there are different kinds of polymers for example ABS need to be cooling slowly but with PLA it does not make a differents, thats why you dont need a heated bed when you 3d print with PLA
Who knows what is exactly is in polymer clay the recipe is secret right?
I have hot spots in my oven, there are on the top of the oven and on the button where are 2 metal rods that produce heat but I keep my sculptures on the middle of the oven and there is a fan in the oven so the warm air can spread evenly
I dont like to put for example vaseline into raw polymer clay (to soften it) because I believe it is a formula and you should not mess with it, so I use liquid polymer clay from the same company -polyform, but that just my crazy opinion not back up by any science facts
thank you for your good advices
👍: 0 ⏩: 1
Well -- I don't know about your Polish, but your English is super!
Oh sorry! 
I don't know much about 3D printers -- just that they are still (deliberately kept) in their infancy (multiple reasons) and way overpriced (of course). Anyway, you seem to know a lot more about 3D printers than me!
Anyway, sounds like you use a larger oven which is always better for baking polymer clay. You'll have less problems with 'hot spots'. And, you have an oven fan that helps to circulate the air inside the oven and, as you say, you place your sculptures in the middle of the oven which is all very good!
Ah -- to clarify, I do not put Vaseline into raw polymer clay to soften it. I agree that the formula should not be messed with (too much
This 'liquid polymer clay' has many other uses. Apparently, they encourage mixing this material with other foreign materials like oil paints and pigments/powders. NOTE that when it comes to paint, they say use oil paint -- not acrylic paint (which helps to backup what I've been saying about oils with regard to polymer clay).
www.sculpey.com/product/sculpe…
I'm glad I've been helpful and thanks for your input as well!
👍: 0 ⏩: 1
when I started I was trying to safe as much money as possible and I have some oil paints in home so i tried mixing super scupley beige with oil paints to make all colors. And what I can say it did not go well... Specially with the red paint. after a week or so the pigment came to the surface of baked clay and stain fingers. I was very surprise by that
I sometimes mix liquid polymer clay with soft pastel powder to make new colors
the best in my opinion is fimo gel it is the most translucent from all liquid polymers and the baking time is 130 C like premo with is a bit surprising because normal fimo clay has 110C baking temperature.
I use something between normal oven and toaster oven, it is a size of big microwave.
the funny story about the oven is my normal kitchen oven broke like a week after I bought my first polymer clay (only available temperature was 180C, over 50C to much for premo) but my birthday was coming in like 2 weeks and my boyfriend bought me a new oven
👍: 0 ⏩: 1
You've done some experimenting -- good for you!
That liquid polymer clay sounds like it's got lots of interesting possibilities for use!
You've got some weird ovens where you come from hahaha!
Well, you seem to be doing great, that's for sure. You do awesome work!

👍: 0 ⏩: 0


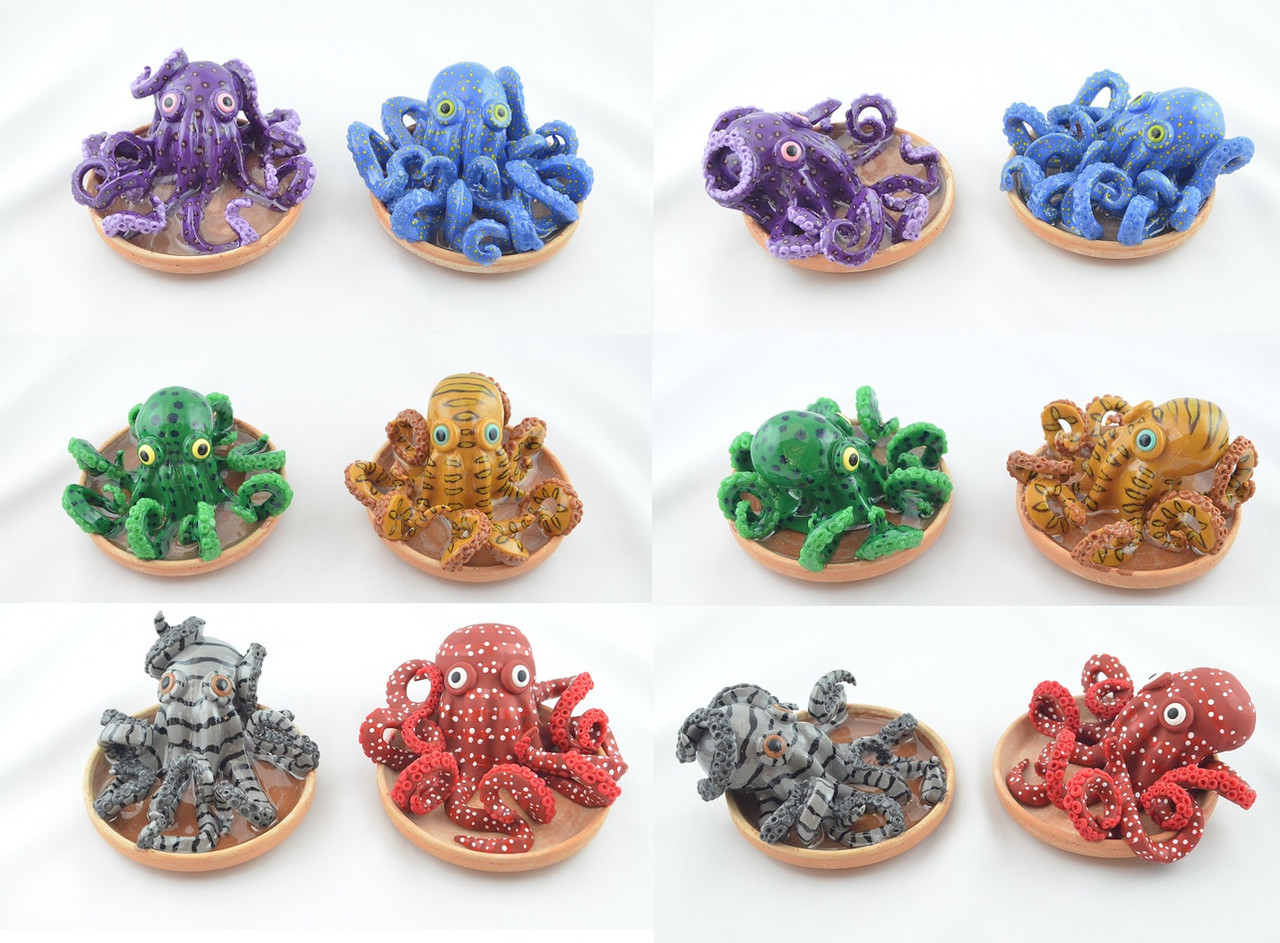
Lovely to see the creative process behind your little figures
👍: 0 ⏩: 1

Ciekawe ^U^ Ja mam gorsze narzędzia do figurek z plastiku Jak będę miała ich dość to kupię profesjonalne.
Też tworzę figurki na części a potem we właściwej kolejności je sklejam
👍: 0 ⏩: 1
tutaj nie sa sklejane bo ta glina jezeli nie jest upieczona to sie klei sama do siebie
To takie klocki lego dla doroslych tylko ze sie robi samemu klocki wiec jeszcze lepiej
wiekszosc narzedzi kupilam dobiero niedawno jakies 3-4 miesiace temu po tym jak juz kilka figurek sprzedalam i jeszcze ciekawa historia ze wiekszosc artystow maluje oczy a ja musialam je z gliny robic bo farbek nie mialam i juz mi tak zostalo. brak narzedzi to czesto atut bo lepiej palce cwiczysz
👍: 0 ⏩: 1
No źle ujęłam z tym sklejaniem ^^" Mówię tak , bo jak się da to masa plastyczna łatwo się łączy prze powierzchnię (oczywiście trzeba ugnieść albo ścierać ale to właśnie zależy od konsystencji czy powierzchni nawet ).
Zgadzam z Tobą figurki robione na części sa jak klocki lego dla dorosłych ^W^
No najprzyjemniej mi się formułuje masę bez narzedzi , ale czasami jednak mi potrzeba , jesczse jak skończę swoje prace to widać , że w niektórych miejscach ich powierzchnia jest nierówna , a Twoje są zawsze starannie dopracowanie i mi się to podoba
👍: 0 ⏩: 1
hmmm... po pieczeniu jak sa jeszce gorace wrzuc je do zimnej wody i powierzchnia gliny bedzie duzo gladsza. wiem ze to brzmi dziwnie ale uwierz mi dziala
wiecej takich technicznych porad masz w opisie tej deviacji link 2 youtube kanal.
Babka robi slczna bizuterie ale zasady te same
👍: 0 ⏩: 1
Może następnym razem spróbuje je zanurzyć w wodzie po pieczeniu
👍: 0 ⏩: 1
a i jeszcze zanim je wsadzisz do piekarnika to nagrzej go
👍: 0 ⏩: 1
Ouł to musiałaś mieć zepsuta zabawę :<
Czytam zawsze instrukcje na opakowaniach jak piec ale za to też miewałam zepsuta zabawę , kiedy figurka mi opadała podczas grzania z masy polimerowej bo wcześniej robiłam bez szkieletu , szczególnie się denerwowałam przy modelinie bo jest dla mnie za trudna xD. |Jak próbowałam je ratować patyczkiem było jeszcze gorzej xD
Szczęście, że ta wpadeczka Cię nie zniechęciła do kolejnych prac
👍: 0 ⏩: 1
wtedy bylam wkurzona ale teraz sie z tego smieje
mozna powiedziec ze 1 na 15 smokow mi cos tam nie wyjdzie. ale na poczatku to bylo 1 na 5. mozesz tez zrobic taki podpornik jakby z drutu w miejscu ktory myslisz ze moze sie zawalic podczas pieczenia tylko nie zapomnij podozyc kawalek papieru toaletowego miedzy drutem a figurka zeby sie drut nie odcisnol. spokojnie mozna piec papier toaletowy - przetestowane
👍: 0 ⏩: 0