HOME | DD
 codeShift — fire tutorial
by
codeShift — fire tutorial
by

Published: 2007-02-20 17:38:10 +0000 UTC; Views: 6778; Favourites: 60; Downloads: 349
Redirect to original
Description
This is a realistic fire tutorial in GIMP, using the solid noise filter, Hue-Saturation tweaking, and layer blending techniques.-PART 1: Shape-
1.) go to Filters/Render/Clouds/Solid Noise
2.) Inside the dialog, change the settings to random, turbulent, and detail of 4 (use less detail for smoother flames). Set the X size to 16.0 and the Y size to 1.0, then click ok.
3.) Duplicate the layer and use the Ctrl+F shortcut to apply the filter to that layer. Set the layer mode to Grain extract. This layer mode should pull out more intensity and complexity.
4.) Duplicate that layer and use Ctrl+F again. This time set the layer mode to multiply. You'll see how it takes most of the flames away while allowing a few to pass with a natural flow intact.
5.) Now right click that layer and select Add Layer Mask... in the drop down box. Use a linear gradient and drag it from the bottom to the top of the layer. Your image should start to look like fire at this point.
6.) Flatten the image.
-PART 2: Color-
7.) make a new layer and fill it with a strong vibrant red. Then, on your new layer, use Ctrl+, to fill that layer with red. Set it's mode to darken only.
8.) Duplicate the layer and use Layer/Transparency/Color to Alpha...
9.) Select the darkest black and click ok.
10.) Then change the color with Layer/Colors/Hue-Saturation...
11.) Set all the values to 44.
12.) Duplicate the layer.
13.) Use Layer/Colors/Hue-Saturation... again to change all it's values to 60.
14.) Change the layer's mode to Soft light.
-PART 3: Style-
15.) Make a new layer
16.) Go to Filters/Render/Clouds/Solid Noise. This time deselect the turbulent option and take the X size down to 8.
17.) This layer gives you a plethora of options quickly.
a.)To bring out some intensity set the mode to Dodge.
b.)To add smoke set the mode to Lighten only.
c.)To limit the amount of flames set the mode to Burn.
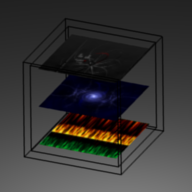
18.) Flatten the image.
19.) Go to Layer/Scale Layer...
20.) Click the chain icon to the right of the X and Y options. After the chain thing is broken, change the Y value to about 1/2 to 1/3 of it's original value.
The finished product is an example of realistic fire.
Related content


Comments: 11


This works brilliantly if you follow the instructions correctly. I got some lovely fire. Thanks, I'll make use of this!
👍: 0 ⏩: 0

ok i did the exact same thing as ur directions told me but all i got was a yellow box.
👍: 0 ⏩: 0
i am having trouble at numbah 5. I dont understand when ur talking about linear gradient and stuff. explain plz
👍: 0 ⏩: 0

This is cool, I used a bit of it to make a tree background. Thanks for posting!
👍: 0 ⏩: 0

The problem with this type of tutorial is that you can't tell when you're doing something wrong halfway.
👍: 0 ⏩: 0


Didn't come out the way I wanted it to. It came out cool looking though, nothing I couldn't make with Ultra Fractal with just two clicks though. Still, was worth the try. I guess it was the overlay setting inside of the hue change that didn't work for me.
👍: 0 ⏩: 1
Ok never mind. I figured it out, it was the fact that the plain coloured layers should have been soft light.
")
👍: 0 ⏩: 0
