HOME | DD
 ColorfulArtist86 — Step by Step Tutorial: Ariel
Published: 2011-09-08 23:17:13 +0000 UTC; Views: 9215; Favourites: 167; Downloads: 0
Redirect to original
Description
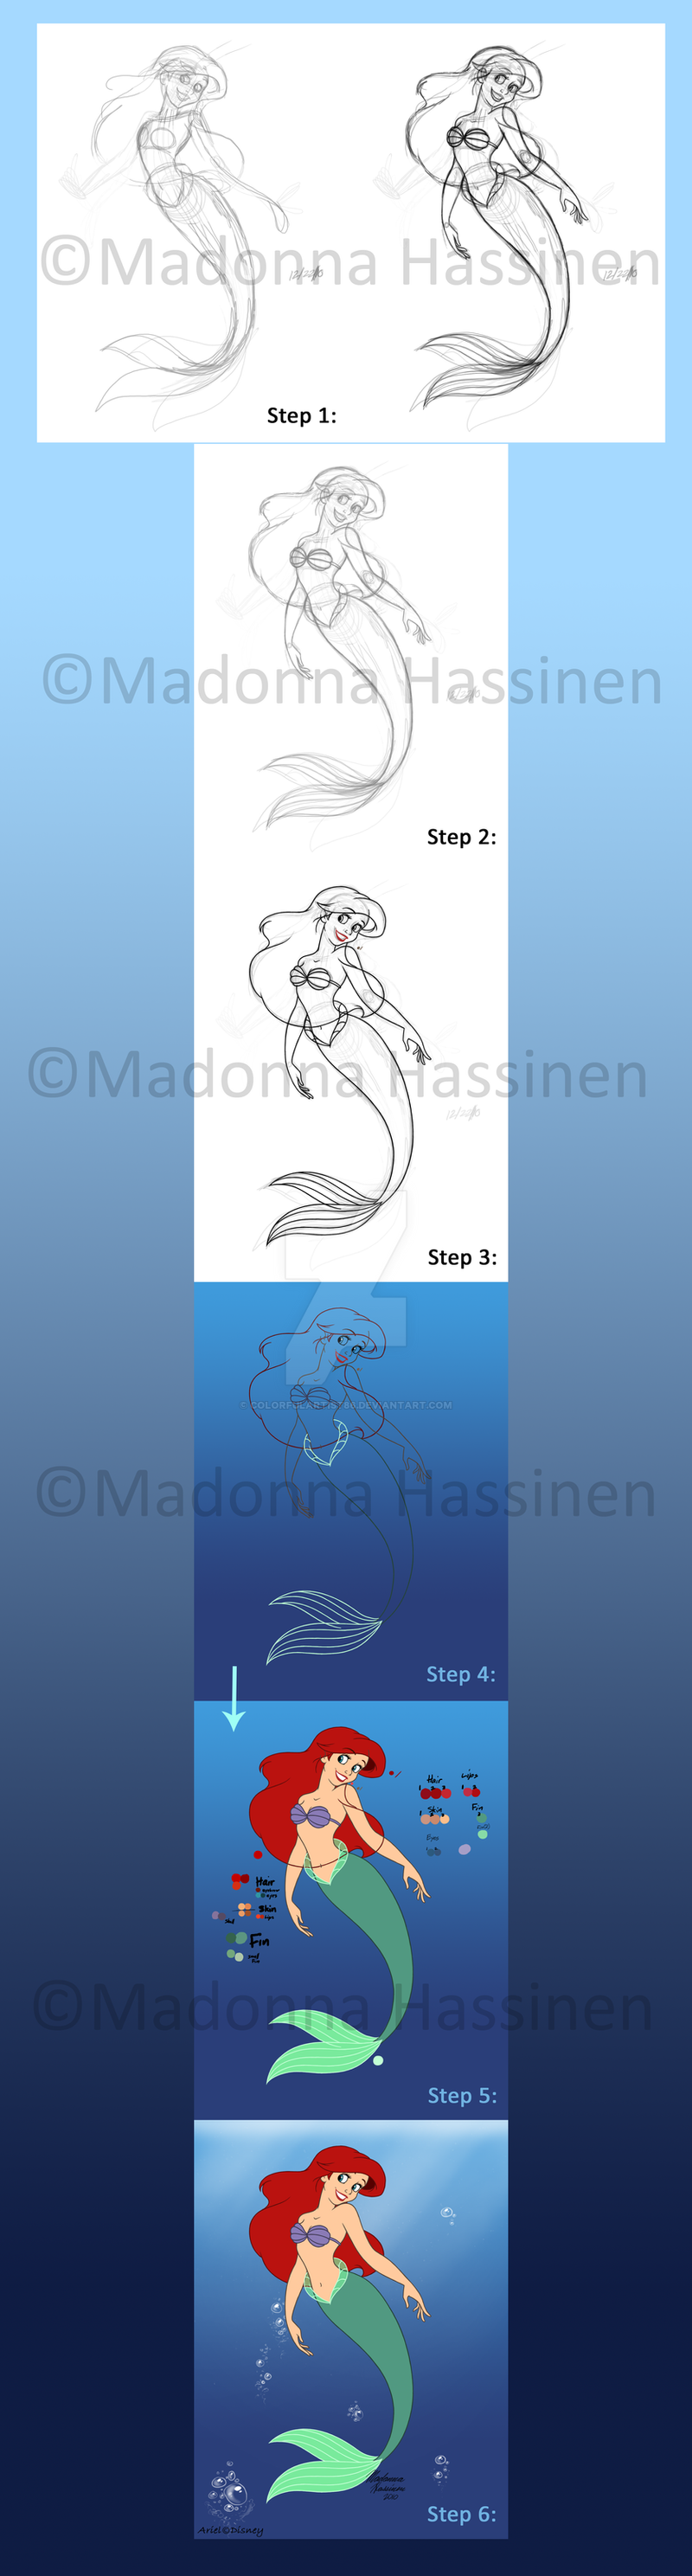
Few people once asked me how did I draw Ariel and others.So, here’s my way of starting things with Photoshop
 (Smile)") . Please, let me know if you don’t understand the steps
. Please, let me know if you don’t understand the steps1.) First, I did a rough sketch (I know, it’s kinda weird when you look at the first
 ) and deciding the poses that you want to draw like I choosing the right arm position as you can see. Then I add some layers in Photoshop to add more features on the rough sketch (2nd picture) because I like it to be more details.
*Tip: Find some references for the features like looking at the pictures of Ariel from the original movie or watch the movie itself.
2.) When I’m done and satisfied with the result (there’s some few mistakes but thanks to Photoshop tricks, it can be fix
") ), now I’m going to start to draw the Outlines. But first add one Layer on top of it and use Paint Bucket Tool to make it white, make sure that the opacity is in 50% from the layer so you can able to see through the sketch.
), now I’m going to start to draw the Outlines. But first add one Layer on top of it and use Paint Bucket Tool to make it white, make sure that the opacity is in 50% from the layer so you can able to see through the sketch.3.) Now start the Outlines (in black color and Round Hard Brush size 3). Some people only use one layer for the outlines. For me, I like to use many different layers of the outlines (example: one layer titled “Hair Outline”) so I don’t have to make some mistakes (also use some Photoshop tricks for this, which later be explaining). You will notice that I went ahead with her lips outline because I want to see the right color for her.
4.) Now here’s the trick that I mentioned. You will notice that I pull down the head/face a bit that almost touches her shoulder. It’s because I selected some of the layers that are connected (Hair, Face and Mouth Outlines) and use Move Tool (V) to lower it down a bit.
When done with the outlines, then I can start color the outlines*. Thanks to one trick that I learned from deviantART ([link] ), I can select one of the layers and click Lock transparent pixel from the layer window. For this, I can color the outlines with no problems or mistakes
.5.) Now to choose and color the work
. I added one layer for testing the colors as you can see (Step 5)*. Once I’m satisfied with the specific colors, now I add one layer titled “Colors” behind all of the outline layers and start coloring. 6.) When done with the colors and of course satisfied with the results, now I can start erase unnecessary part of outlines like the hair outline for example. Now I can have fun with rest of it with backgrounds and other things.
The light beam brushes are found in Obsidian Dawn site and the bubble brushes is from this ([link] ).
Well, I really hope this helps. Thank you
ArielⒸDisney
Related content


Comments: 21

Seriously, how do you do it? Is it by photoshop?
👍: 0 ⏩: 1

Yep, hand-drawn in Photoshop with my Wacom Intuos Pro
👍: 0 ⏩: 1
Really? I don't have one of those just Photoshop. I just wish I could use it better though.
👍: 0 ⏩: 0


You're welcome!
👍: 0 ⏩: 0


wow! this is soo beautiful my friend*gives hugs* u r such a talented artist! FAVE!
👍: 0 ⏩: 1
Thank you very much
👍: 0 ⏩: 0
