HOME | DD
 darkhorse5 — HorseTutorialForAllSkillLevels

Published: 2006-03-05 19:28:21 +0000 UTC; Views: 16505; Favourites: 209; Downloads: 116
Redirect to original
Description
*Foxfairy24 suggested that I make a tutorial so of course I jumped and ran with the whole idea. Yes, I do have a lot of time on my hands. I hope you enjoy this!A note to the reader: This is a tutorial. Thus, I provide a very in-depth look at the way I see the world. While I recommend that you read all the way through, it is of course optional. For your benefit I have put large subject headings that are bolded so that you can skim the text while still seeing the parts that interest you. Also, I may say ‘I don’t recommend that you do things this way’. This criticism is not aimed at anyone personally. It is only my opinion and I’m sorry if I offend.
This technique is only really effective in some kind of pencil. Not shading pencils, just ordinary colored pencils or one ordinary graphite pencil.
Steps in Drawing
Basic Steps: When you’re creating your art, you want to begin with the skeleton. No, not literally, I just recommend that you sketch out where the head, neck, back, legs, and possibly tail of your animal are. This need only be a stick figure, as it is only so you have the pose there in front of you. Even if you’re using a reference, it will help you with proportion. For more help with proportion, see the relevant section.
Outlining:The next step is to outline your sketch. At first make it very informal, with many lines where one will be in the end. Gradually, it should be more defined, and darkened, until you have your final outline.
Adding shading:You want to first lay down whatever color you want your horse to be, without any shading whatsoever. This may cover parts of your outline, but that should not be too much of a problem if you remember where everything is. Before you actually start to shade your piece, make sure to choose a light source. This is extremely important. It does not really matter what is casting the light, just where it is coming from. Without knowing the light source, you can accomplish nothing. People have asked me where the shadows go on a horse, but I can’t tell them what to do until you know what parts are in shadow. Once you have chosen a light source, you can begin shading, as described in the next big section.
Highlights: Believe it or not, you don’t have to have a super steady hand or really careful attention to add highlights. You can add them by simply erasing partially the parts you want to appear shiny. This means that adding highlights can be a last step instead of an intermediate one. Also, if you make a mistake, and a part is too dark, you can fix it. Remember, when you’re highlighting parts of it, to add secondary highlights and highlights along the top. Think about where the top is, relative to your picture. The top is where the light comes from. That’s important. Again, there’s more about that in terms of specifics in the next section. One warning: this can be smudgy. Add detail after this step. It will mess with any careful details you’ve put in before, unless you’re super-careful. Try on a ‘sample’ before on your best work.
Shading and Highlights—This is only for horses, obviously!!!!
The Head
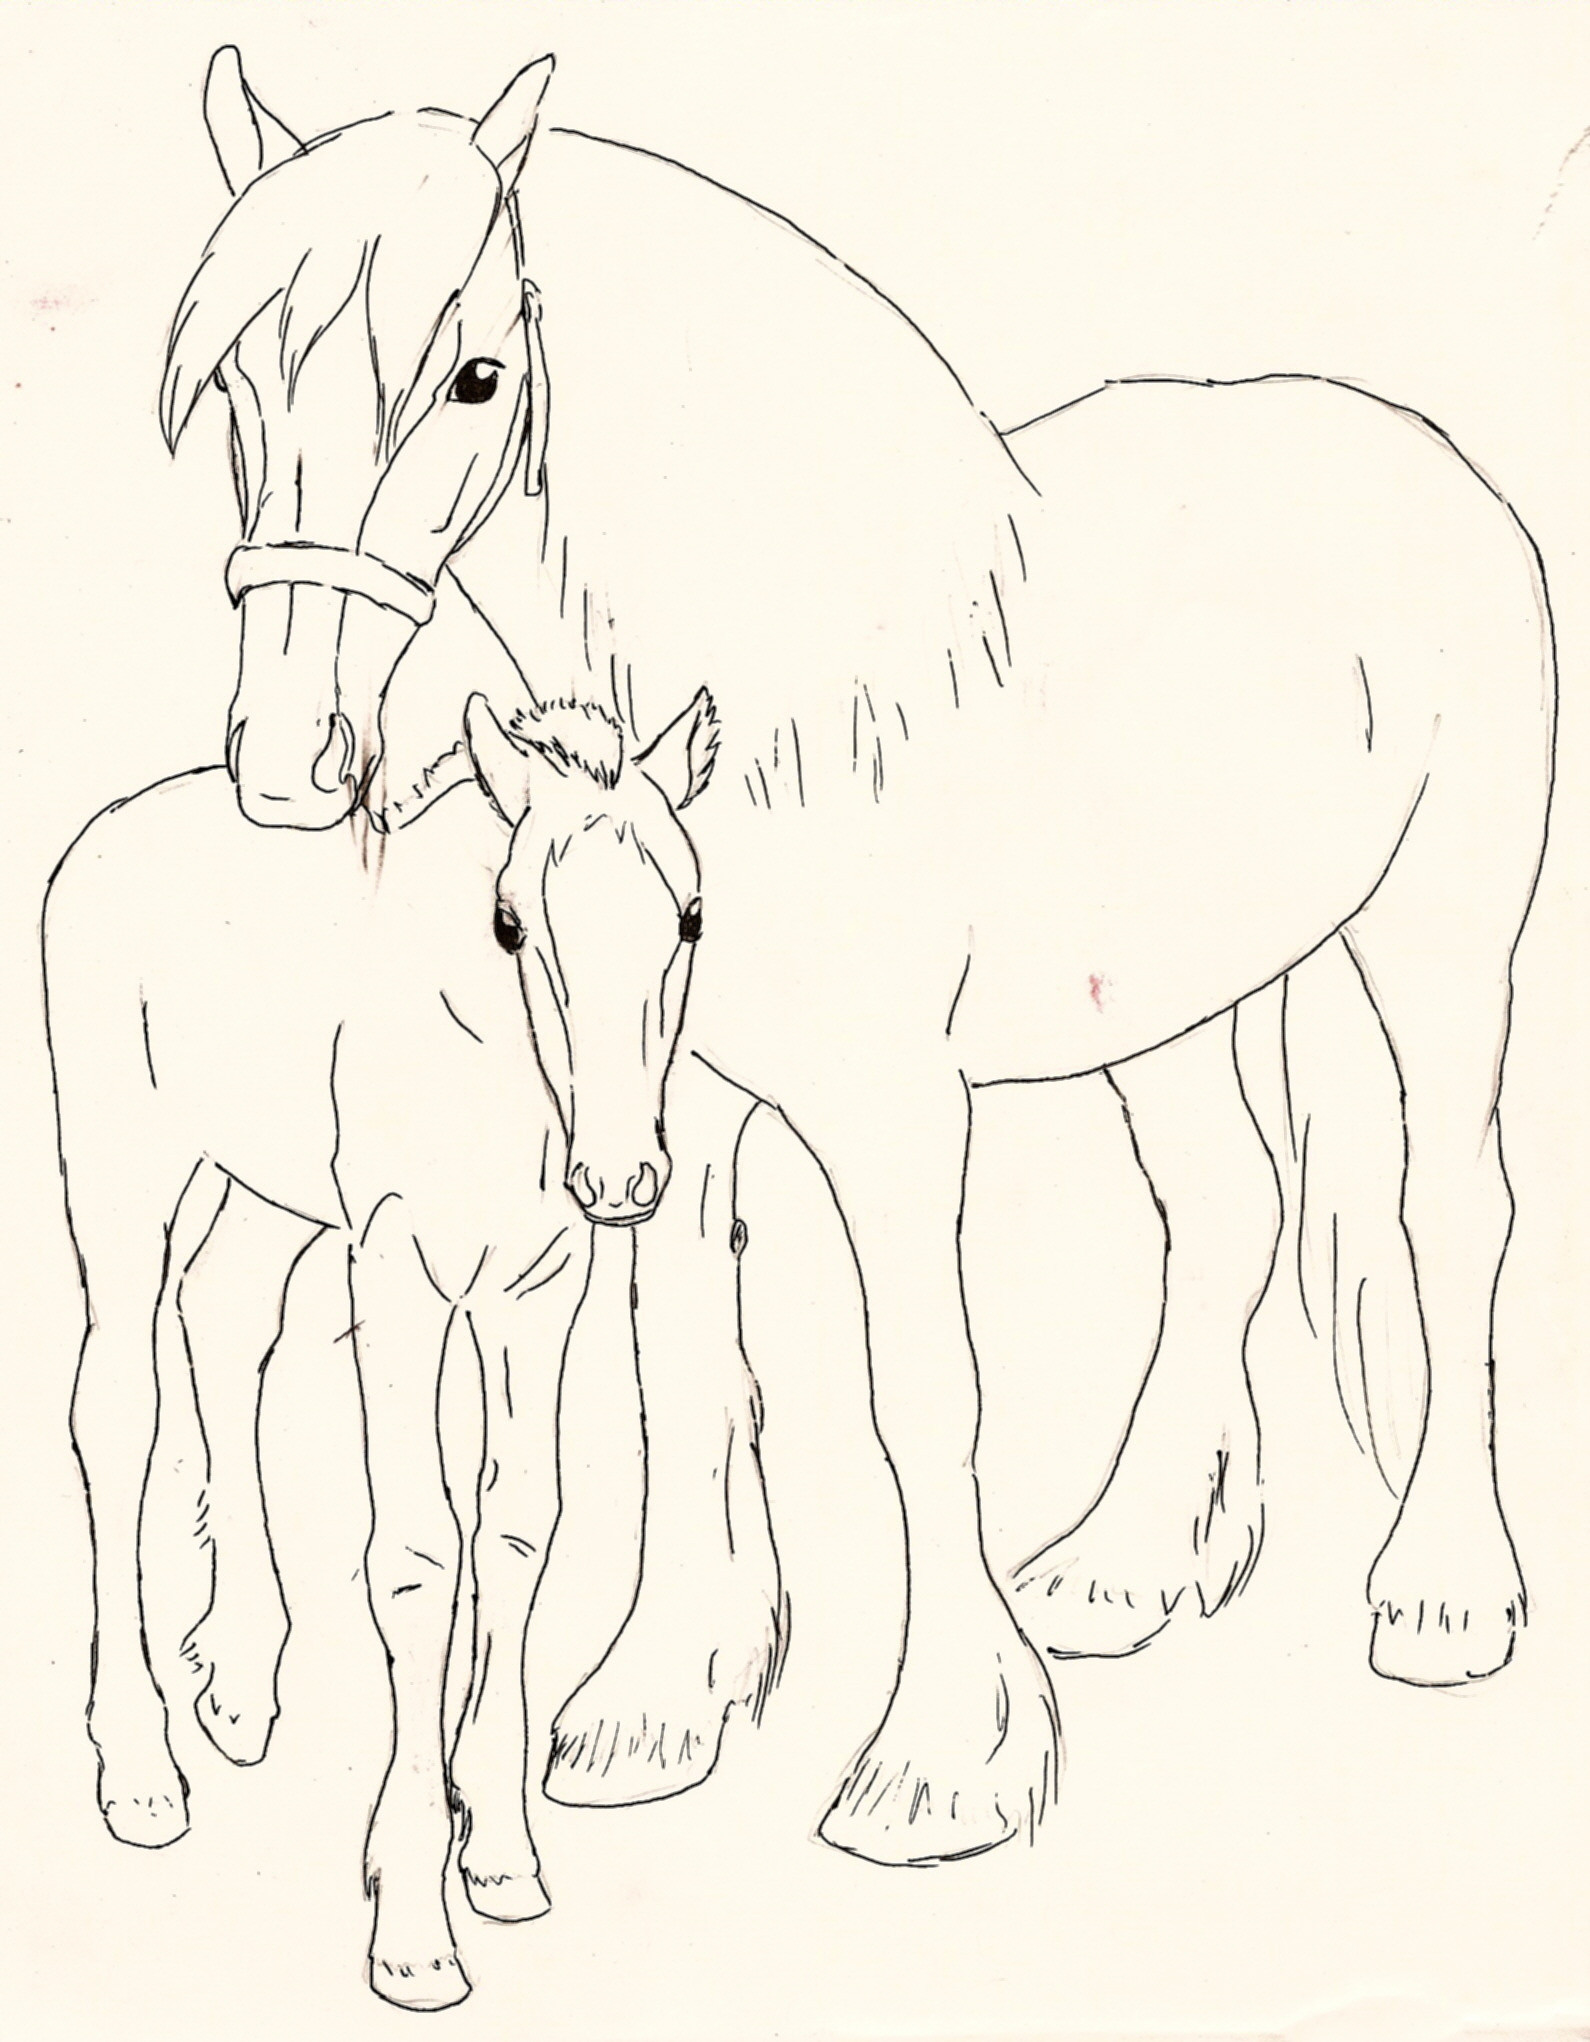
There are several parts to the head to be considered while shading: the eye, the muzzle/nose, the cheek, and the ear. The eye, the way I do this, has three parts. There is the highlight—do not put this in until you’ve chosen where the light is coming from! There is the darker part on top, and a lighter part on the bottom. I realize this makes no sense and recommend that you zoom in on the picture I supplied above to understand. Also, since the eye bulges out from the face you need to shade the ridge that is found above it. *ox-of-ice has a truly incredible tutorial about eyes that’s pretty recent that is more helpful than this.
The muzzle/nose is pretty simple. Notice that the nostril has a rim on it that needs to be shadowed. There is shadowing inside the nostril, which is shaped like a six. You want to remember to have the lips look thick (I know I’m not being very descriptive—looking at the picture should help most of the time) Shading on the mouth goes below it, on the bottom lip. You need dark shading on the chin too. Remember that chin!
The cheek is simple. Just shade under it, and under the cheekbone, which runs from just under the eye to the part where the cheek curves up, in front. This is about halfway down the horse’s face.
The ear should usually be entirely shaded inside and is often highlighted on top.
In the entire face, you should highlight the eye ridge, the cheekbone, and sometimes the top of the cheek. Remember to do it along the top—that is, where the light is coming from!
The Neck: The most important part of this to note is the bone in the neck. There are seven bones in a horse’s neck, but the edges of them are not visible. All that is is a shadow under the line running close to the edge of the neck (the picture makes this clearer) and the highlight along the top of it. Not much to say, really.
The shoulders: I tend to have trouble with this part of the horse’s body. They turn out too big or too small. But basically, just note the shading at their base and the way they’re divided about in half. They should have a highlight on one section and a secondary highlight on the other.
The forelegs: Should not have highlights. At all. Period. Except if you have an exceptionally low source of light. The knee should not bulge in the lineart—you want to create the impression that it’s bulging by shading its bottom and putting a tiny highlight on top. Note the way there is a line near the back of the leg both above and below the knee.
The stomach area…yeah, whatever, you know what I mean!! This should be shadowed all along the bottom, pretty much every time. I don’t know where the highlights really go—they vary a lot when you’re doing this area. Yes, you will notice my knowledge gets shakier the further I get from the horse’s head. I do not draw super skinny anime horses. What I go for is realistic. While how you want to do this can be done several ways, you need to remember that horses are so wide that when you stand in front of them, there stomach is often visible from both sides, even with their shoulders in the way.
The hind legs: Remember which way these bend! You should be able to tell, even though you can’t with the front legs. They’re a funny shape—do your skeleton sketch of them with care. Since I cannot explain, and I strongly feel that the hind legs are one of the hardest parts of the horse, I suggest you use a reference for a while, or if you don’t think you picture looks quite right, even if this picture is the only reference you use. Again, the only highlights should go on the hindquarters—note how the ‘hip’ bone protrudes—and there is a shadow along the bottom of the slab of muscle. Again you should use shading to make the hock (that’s the knee, just in back) and ankle look like joints.
Proportions: Very important section, this one. This one is the hardest. Anyway. You want the distance from point A to B on the horse to be the same as from C to D. (Look at the horse on the left please) The legs should make up just over half the distance between D and C. Oh, that dotted line is irrelevant; it just tells you that the knees should be at about the same distance from the ground on both the front and back legs. The distance from knee to ankle on the horse should not exceed the length of the head by too much. The neck should be about the length of the head. The hindquarters should be bulky, more so on a draft horse than on a ‘light horse’. If you are using any of these in a picture and it just looks funky, try looking at a picture of a horse that does not look distorted—just in case. If you are unable to tell where your mistake is, because something is off but you can’t place what, go on to the next part.
How to fix error in your lineart: These guidelines can be applied to more than just horses and later on in the work, not just on the lineart stage. I’ve always tried looking at the picture in a mirror (you can also usually reverse or reflect it on the computer). This is especially helpful when working with a reference, but sometimes it might be hard to hold a picture (or your computer!) up to a mirror, so you can try holding them upside down. (I got that technique from ~RanaElaseim ) On the other hand, I don't know what horses look like upside down! I’ve even heard people advising that you do the entire drawing with both your art and the reference upside down. Believe it or not, it can actually work.
How to color: It really pays to take your time, put in a lot of careful detail, and use multiple colored pencils for a single horse. It doesn’t matter whether the colors belong on a real horse or not. It’s okay to have a horse of one color with hints of some weird color. It’s all about how you want it to look. Also, beware pressing too hard or putting color too subtle for most scanners. If you want, smudge with your fingers or with a piece of tissue. I’ve heard the oil in your fingers is supposed to be bad for the paper or something, so you’re not supposed to do it that way, but never noticed anything like that. Also: when you're working on shading, something that I'm adding to the tutorial is something that I'd never really given thought to before. When you're making shadows, they do not all have to be equally dark. In fact, they should not be. For that matter, all highlights are not equally shiny--make sure to pay attention, and put in as many different values into your picture as possible. There should not just be 'light' 'dark' and 'in between'. There should be 'the lightest possible shade of the color I'm working with, nearly white', 'the darkest possible shade of the color I'm working with, nearly black', and 'lots and lots and lots in between'.
Finally… Practice is the most important step in this process. It’s the only way to achieve the effect you want. Any really good artist (no, not talking about myself) used to draw just like the rest of us. What makes them different is the way they looked closer at what they were drawing. They noticed what they’d missed before, and realized where they were going wrong. But they kept going. And got better, and made it to where they are today. So that’s my message: if you’re not satisfied, try again.
If you’ve read this far and would like to disagree with something I said, that’s fine. I’m always learning. But understand that I did not just throw this together. I spent more than two hours putting this together. Please respect that—at least a little. Thank you! Hope this helped.
Related content


Comments: 50

Wow, that's... Super duper helpful. When it comes to coloring, I'm usually like "What is this 'shading' that you speak of?" So I shall try to follow your steps for once XD
👍: 0 ⏩: 0

 (Wink)")

nice work...it good..i will try drawing it
👍: 0 ⏩: 0

Thanks for this  (Smile) - =)")
👍: 0 ⏩: 0

Wow! That's really helpful with shading and highlighting! It sure looks like you took a lot of time with doing that! I wouldn't have as much patience. xD
👍: 0 ⏩: 1

way way helpful. haha I usually suck pretty bad at shading.
👍: 0 ⏩: 1

Thank you! I doubt that you suck though--with practice anyone can improve, as well.
👍: 0 ⏩: 0


ya made some errors drawing the right leg of the horse on the right side.The leg is badly done because the wrist looks like broken and the leg is too long.
But I like this one on the left ")
👍: 0 ⏩: 0

WOW!
massive tutorial.
MASSIVE HELP
^_^ congratulations on a nice and rare tutorial
👍: 0 ⏩: 1
Thank you! I'm glad to hear that you like it.
👍: 0 ⏩: 0

well then.... this explains to me so much! im so grateful to have come across this piece.. in fact, im going to start now... *l*
👍: 0 ⏩: 1

I would have never believed if someone had said to me that you'll be doing tutorials some day! But you have developed SOOOOOO much!!!! REALLY! I know because i have whatched you almost the whole time you have been here in devianART!
(I just hope I cuold be on your friend list too....)
👍: 0 ⏩: 1
You don't know how much that means to me. Thank you--I really appreciate that you would say that.
👍: 0 ⏩: 1
NP. It has been really a joy to watch your works
BTW have you checked out my scraps? there's a preview of the picture, which I was making last week... I have it ready but I don't have a working scanner to scan it and put it here... must wait 'till I meet one of my friends again
👍: 0 ⏩: 1
Which picture is it in your scraps? There were a few I thought might be the one you said. (You don't need to put a link, just say what it looks like.)
👍: 0 ⏩: 2
Uh, I forgot... sorry, the pic is so bad and I do have better... I'll put it there and put you a link then, ok?
👍: 0 ⏩: 1
I'd really appreciate that! I look forward to seeing it.
👍: 0 ⏩: 0


It did take me quite a while...
👍: 0 ⏩: 0

You're welcome...when I have time, I'll use it because I DEFINITELY need it
👍: 0 ⏩: 0


Thank you! I'm sorry it's so long, and not really the right format, but I'm glad you found it helpful.
👍: 0 ⏩: 1

Nah, it's good! I really needed help with the whole highlighting thing.
👍: 0 ⏩: 1
What is with you people?
👍: 0 ⏩: 1

holy macaroli.....sorry macaroli
👍: 0 ⏩: 1


Yeah, it took me a lot of time...
👍: 0 ⏩: 0

You say it's for skill-levels. Does it go from Expert to Intermediate to Beginner to Worm to Stercus, or does it not even reach down to my level of skill?
👍: 0 ⏩: 2
It reaches down to your skill level--provided that you actually put some effort in.
If you draw a horse, post it.
👍: 0 ⏩: 1

Interesting way of making a tutorial... Usually you see it in the format of a very long strip with examples in the form of pictures taken while working on a certian piece. The other format, although it takes muchlotcrapfultons of time, allows for the reader to get a better sense of 'how-to'
👍: 0 ⏩: 1
I would if I could...but I'm mentally incapable of figuring it all out.
👍: 0 ⏩: 1
*reminds you of what she said at school and pokes you to note her about it*
👍: 0 ⏩: 1