HOME | DD
 DaughterofTheGalaxy — Headshot Tutorial (Coloring + Sketch)
#dragon #roar #tutorial #whatarethesetags
Published: 2021-03-01 22:33:43 +0000 UTC; Views: 3370; Favourites: 55; Downloads: 0
Redirect to original
Description
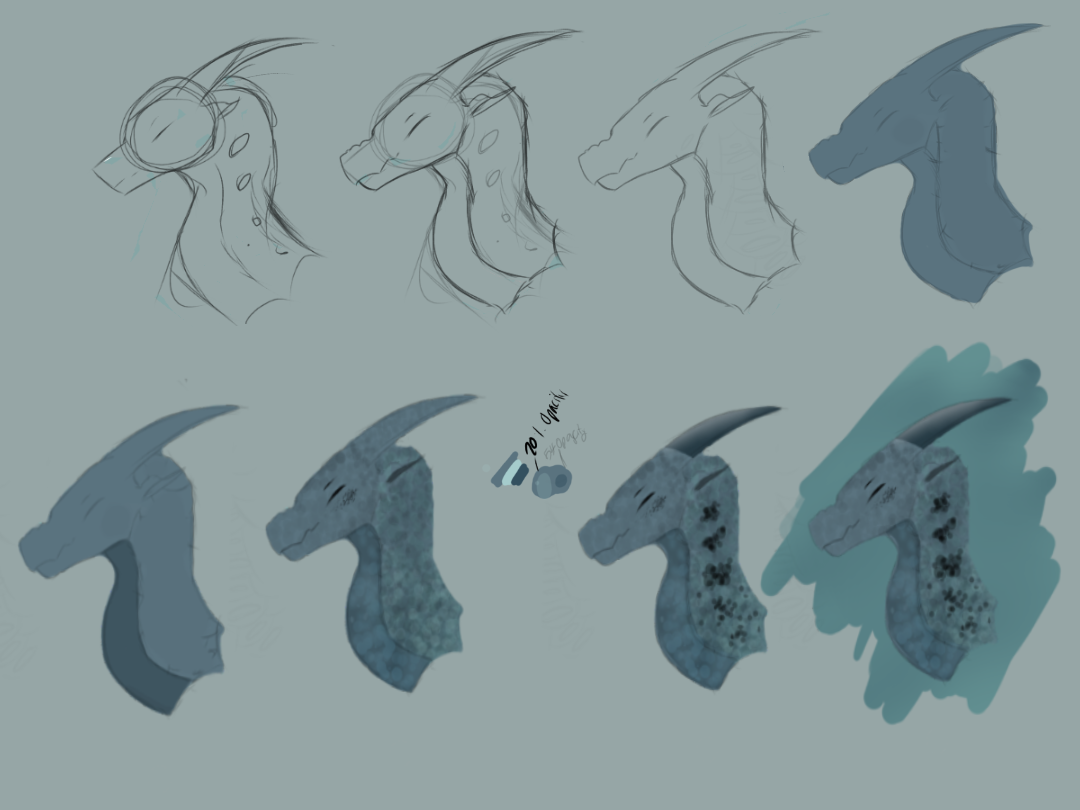
okay so- it’s finally here lol. Now time to explain-So we have step 1. Get your basic sketch down. I normally start with a circle, add a slanted rectangle, horns, neck etc. it’s normally a very messy sketch, but it’s just to go the main idea down.
step 2: i lower the opacity of the original sketch, add another layer on top, and do the cleaner lineart there. I also get the expression a bit better. For this, I did a crinkly nose smile, so I just did two bumps at the top of the nose, and made the eyes closed.
Next, we have step three, where I put the first layer on invisible, and lower the opacity of the cleaner lineart. This is just so the lineart isn’t so... noticeable I guess?? It also makes it look a bit better in my opinion.
for step four, i add another layer of the base color that I’ll be using for the dragon, and color it below the lineart, that way to lines are still visible. In this case, I used a sort of blue hue. For this, there are two options. You can color the whole lineart, and then add a clipped layer to add the coloring of the stomach, or you can color the stomach and main scales separately.
Step five is rather simple. Just fill in the underbelly with the color you want.
After step five, we get to step six, which is the step of how i color and texture my dragons. Try and find a brush or circular tool where you can make circles. Add a layer and clip it above the colored layer that you just made, that way it doesn’t go out of the lineart. Get a darker or lighter color than the base color, then Lower the opacity and start dotting all around to give it the layered effect. I’d recommend using both darker and lighter colors, that way it can give it more.. color? If you’re doing a fade, doing the same thing, but lower the more opacity at the part where it fades into another color, and then slowly make the opacity darker. You can see an example of the fades I do here —> www.deviantart.com/daughteroft…
Also, move on to doing the underbelly. Do the same thing.
On the picture, you can see an example of what colors I would use and how much I would lower their opacity. (20% and 54%)
for the little scales under the line, i used black, lowered the opacity, and just did random lines. That was a bit of a new thing i did. Also, i defined the eyes and mouth a bit more on here. That is optional as well.
step 7: alright, now we’re almost done. Time to get on the final scales and horns. For the black scales, do the same thing. Lower the opacity, but keep messing around with the sizes of the dots, and kinda move them around a bit to show how they scatter. This is completely optional, as you can just leave the scales like step 6. For the horns, carefully color them in, then add an above layer to add a dark color on the bottom, and light color on the top. This will give the lighting effect.
finally, step 8, which is the background. I didn’t keep this background for the final drawing, and this part you can feel free to go wild with!
hope this tutorial can help! If you do post your result, please tag me! I’d love to see how it turned out!
Also, feel free to ask questions below! I’ll try my best to answer them.
Related content


Comments: 6

👍: 1 ⏩: 1

👍: 0 ⏩: 0

👍: 1 ⏩: 0

👍: 1 ⏩: 1
👍: 0 ⏩: 0
👍: 0 ⏩: 0