HOME | DD
 davidyardin — Spidey Step by Step Process

Published: 2008-06-18 15:57:18 +0000 UTC; Views: 21777; Favourites: 295; Downloads: 551
Redirect to original
Description
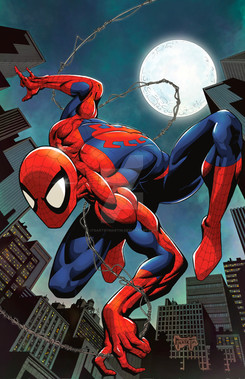
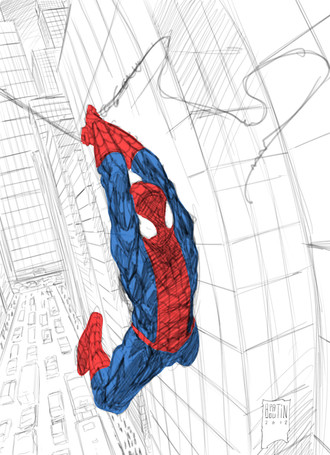
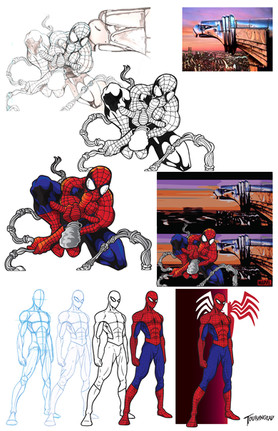
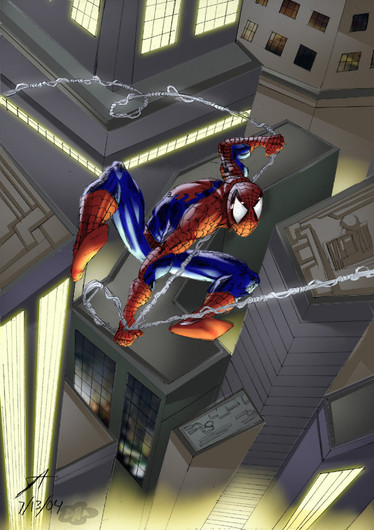
OK as promised a while back, here is the step by step process I used to create this Spider-man piece.Step 1. Intial Layout
To start off with, I did a few quick thumbnail sketches, of Spidey in different poses. Nothing too detailed or even anatomically correct here, I was just focusing on the gesture of the pose, and this one captured best what I wanted to do i.e. Spidey swinging and shooting webs high above New York City.
Step 2. Pencils
You'll note I rotated the image 90° clockwise from my initial layout. I did this so Spidey could work better with the perspective I had in mind for the background (even though I hadn't drawn it in yet, I had a very clear idea of where I wanted to take this piece).
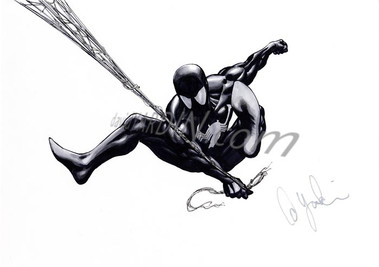
While these are the finished pencils for Spidey, they are still very loose since I knew I was going to be inking this piece myself. Usually I'm a pretty tight penciller when I work with other inkers (as you can probably see from the other examples in my gallery).
Step 3. Inks
At this stage I used various size Rotring Rapidographs and a Windsor & Newton Series 7 #2 brush to ink Spidey.
Step 4. Backgrounds
I actually toyed with the idea of deviating from my initial idea for a cityscape background, in favour of a montage of Spidey's rogue's gallery, head shots framed by webbing. However while it probably would have turned out cool, I stuck with my intial idea, as it makes this Spidey piece, a nice companion to a cover I did a little while back (which I can't show just yet).
Anyway as for the background, I've been doing a lot of backgrounds with Sketchup in my recent work. I really couldn't be bothered drawing perspective grids, with long ass rulers and vanishing points off my desk, anymore. I've found with Sketchup I can quickly construct a loose model and use that as my perspective grid, with the added bonus of being able to rotate it into any position I choose, change the field of view, and also add faux fisheye effects with Photoshop too if I want (though I didn't do the latter here).
With this piece I cheated a little further though, as I was really pressed for time. So I grabbed a couple of buildings from Google Earth, to add to my model too, since they have low res textured images of the buildings on their faces (which is what people were seeing as photo reference).
After I sync the model up with the image I have in my head and with the main figure, I print it out to use as my "perspective grid", lightboxing it under my page. I usually pencil at this stage with a ruler, but I chose instead to just attack it freehand with my brush, eye balling some areas in, and changing the basic model where needed.
Step 5. Flats
At this stage I used the polygonal lasso tool and fill/bucket to get all the flat colours in. The webbing was a bit tedious in this part.
I didn't flat the buildings in, as I decided to do that on the fly at the render stage. Plus I didn't want to go too detailed with the b/g by separating all the individual windows and whatnot.
Step 6. Shadows
I suppose I should explain my layer setup here. Basically I have the top layer as my lineart, which I've cleaned up, adjusted levels, and adjusted the threshold on so it is black and white, then selected all the white pixels and deleted them so they are transparent. Under the lineart I have my colour layer which is a duplicate of my flats layer (which is right at the bottom).
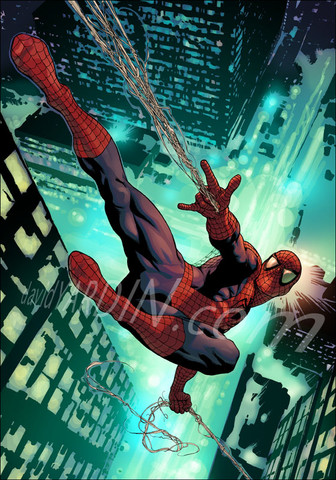
At this stage on the colour layer, I start laying in coloured shadows to work with my colour scheme (kind of like spotting blacks but with colour). For this piece, I decided to use a triad colour scheme (three equidistant colours on a colour wheel). I've already used one of those colours (the purple) as the background unifying colour, so I use another to lay in the shadows (green), and I reserve another for my highlights at the rendering stage (orange).
Step 7. Rendering
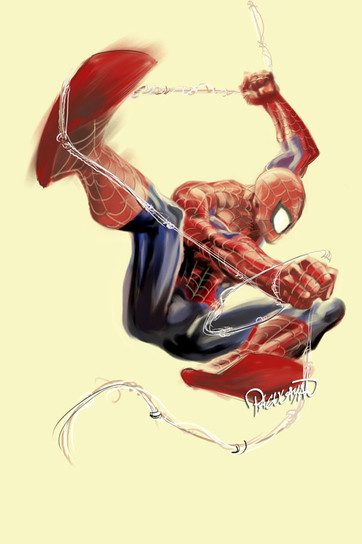
With my shadows in place I start rendering in the highlights with the lasso, brush, and gradient tools, then I render the shadows further. When rendering I use a combination of screen, colour, darken and just plain old picking the colours to get what I want.
Once I've completely rendered the main figure I move on to detailing the buildings in the background. A couple of quick lasso selections and some gradients separates the buildings quickly. Then I go in with the brush tool and add highlights to the windows and lights etc.
I'm drawing with a mouse so it looks a little sloppy in places, but I rely a bit on the lineart to cover up a lot of stuff, as well as the printing process.
After the main rendering is done I also make another layer for any effects. I wanted to knockout some of the lineart (buildings in the background) and also stroked a halo around Spidey to make him pop a bit more. So I do all that on layers above the lineart. It's easy to go overboard with effects, so I like to keep them on a separate layer, so they can be modified easily, without permanently wrecking anything I've already done.
Step 8. Final
Lastly I make any saturation adjustments, flatten the image, and voila, I'm finished.
I hope I've explained my process sufficiently. It's late as I'm typing this, so excuse any mistakes. Download for full size image.
Related content
Comments: 40

Eye balling = just guessing where things go with my eyes instead of measuring everything out with a ruler.
👍: 0 ⏩: 1

Interesting. 

👍: 0 ⏩: 0

Excellent tutorial. Thanks for sharing your working method with the rest of us. Humbled.
👍: 0 ⏩: 1

This has really helped me get to grips with photoshop. Untill now i've been over rendering my work. Thanks.
👍: 0 ⏩: 1

thanks for posting it dude! it gives me more knowledge in digital panting. nice.
👍: 0 ⏩: 1

always cool to see this step-by-step pieces mate
👍: 0 ⏩: 0

awesome work!! i understand the first 3 steps.... the rest of the steps about coloring and finishing it up is something i wish i could easily comprehend.... i love the colors though...
👍: 0 ⏩: 0

the rendering looks so much cooler...inks is prehistoric and i cant understand why the dinosaurs from marvel use most time ink
👍: 0 ⏩: 1

Prehistoric
Don't you mean classic & timeless
Glad you like the rendering anyway.
👍: 0 ⏩: 1

Sweet, love to see the process. I still have the most difficulty with the initial gesture.
👍: 0 ⏩: 1

Yeah that's one of the things you have to nail first. Along with the structure, it's the foundation of a good drawing and if you don't get them right, you're going to be fighting the drawing the whole way through.
I did quite a few layouts for this piece, before I found one I was happy with. Sometimes it just takes time, and a lot of drawing.
👍: 0 ⏩: 0

Damn, you make it look so easy.
Your spidey reminds me of Luke Ross' spiderman.
👍: 0 ⏩: 1

Ain't no one said it was easy. I'm not that fast with the colouring especially.
Is Luke Ross the dude that drew that Samurai Heaven and Earth (or whatever it was called) at Dark Horse? I like his stuff, but I don't think I've seen his take on Spidey yet. What stuff has he done of Spider-Man?
👍: 0 ⏩: 1

Yeah that's him. His style's changed since the late 90s when he was doin spiderman.
Just looked it up, he did spectacular spider-man #239 to #263- 1996-98
👍: 0 ⏩: 1

Wow, looks like he made a quantam leap artistically... I didn't realise he had been in the biz that long.
👍: 0 ⏩: 0

damn this is so helpful in so many ways..... this is probably the best spider-man piece i've seen in a LONG time, and i am a true fan of this character..... one question.... what decisions do you make when you go from Rapidographs to brushes? are the details done with rap's and the brush work for the larger area's? thanks so much for posting this David!
👍: 0 ⏩: 1

Yeah with the webbing and stuff it is all rapidographs because I wanted a consistent deadweight line for all of that. Some of the feathering is brush, some rapidograph, and the large masses are obviously all black, as are I think all the backgrounds.
With any piece the choice of ink tools is always, "What line am I going to get out of this?" I also use crowquills, fingers, sponges, frayed dry brush, and whatever else I can to get the textures and lines I want. It just depends on the piece, what size it is, and what's in it.
👍: 0 ⏩: 1

cool, thanks for taking the time to reply=] can't wait for the next piece=]
👍: 0 ⏩: 0

sweet thanks for the step by step David! I've been wanting to give sketch up a try but I'm such a snail when it comes to latching onto new programs. Love your colours as well!! you're like a triple threat!
👍: 0 ⏩: 1

Thanks Francis. I'm still working on tightening up my colouring, and understanding of colour theory a bit more though. I haven't done that much colouring to be honest (nothing pro yet) because I'm always so busy pencilling or inking, but maybe I'll get to colour one of the covers I have coming up.
Sketchup is a cool program, and pretty easy to pick up on (especially with all the video tutorials on their website). It's good to use if you have to draw a certain setting multiple times. Definitely check it out: [link]
👍: 0 ⏩: 1

video tutorials?! I'm there! thanks for the link David!
and yeah coloring is hard! I've tried my hand at it a few times and find it fun and frustrating at the same time! I started growing real appreciation not just about the color rendering but the theory of color pallette! I realized that even if it's colored flat if you choose the right colors it'd look great! anyways looking forward to more color pieces from you!
👍: 0 ⏩: 1

Yeah it's interesting how things just work with the right colour combinations. I honestly couldn't make heads or tails of colour theory for ages, it's only recently that it's started to click for me. I just wish I had more time to devote to it.
👍: 0 ⏩: 0
