HOME | DD
 EEEnt-OFFICIAL — Pixel Penguin Sprite Animation
#2d #3d #animation #bird #blender #cute #desu #kawaii #penguin #pixelart #small #aseprite
Published: 2017-03-18 10:30:59 +0000 UTC; Views: 1429; Favourites: 28; Downloads: 0
Redirect to original
Description
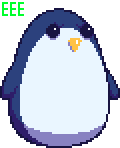
Just like my Undertale Frisk sprite I placed down some primitive shapes inside of Blender and rendered them very small (64px X 64px) and created this penguin. I actually created multiple images, each one featuring a component of the full model; one for the body, one for the beak and one for the body. That way I could edit and animate each one independently inside of Aseprite.")
Related content


Comments: 14

No problem! BTW may I know Wat software do u use?
👍: 0 ⏩: 1

I used Blender and Aseprite, as said in the description. Blender is free to download but Aseprite is a paid software.
If you don't have the money for Aseprite you can always try Piskel: www.piskelapp.com/
👍: 0 ⏩: 1
Ahh niceee, I didn't know blender can be used for pixel animation
👍: 0 ⏩: 1
Blender is primarily for 3D though you can use some special material settings to make the colours cartoony and render the image small to fake a pixel art effect. Then you can edit the picture in pixel art software.
👍: 0 ⏩: 1
Oohhh,,,,,, confusing @@ but thanks for d info!!
👍: 0 ⏩: 1
It's quite simple really:
1) Make a model.
2) Change how lighting affects the materials (colours).
3) Change material colours.
4) Position the camera.
5) Change the dimensions of the camera (try 256px long and high)
6) Hit render.
👍: 0 ⏩: 1
@@ o wowow, I haven't even downloaded blender
YET
but I hv to little time nowadays :,) but thanks so much for this I'll try when I hv a long break!! :S
👍: 0 ⏩: 1
Take small steps. That's what I did. It looks daunting at first but there are many free tutorials on YouTube which simplify the process and make it much easier to learn.
👍: 0 ⏩: 1
Ahh, small steps :,0 barely have time
But thanks for d advice  (Smile)")
👍: 0 ⏩: 0

Aw thank you! I appreciate the kind words.
👍: 0 ⏩: 0