HOME | DD
 elenyan — Quick portrait steps

#portrait #portraitgirl #rough #stepbystep #painttoolsai
Published: 2015-04-08 11:29:13 +0000 UTC; Views: 2038; Favourites: 59; Downloads: 0
Redirect to original
Description
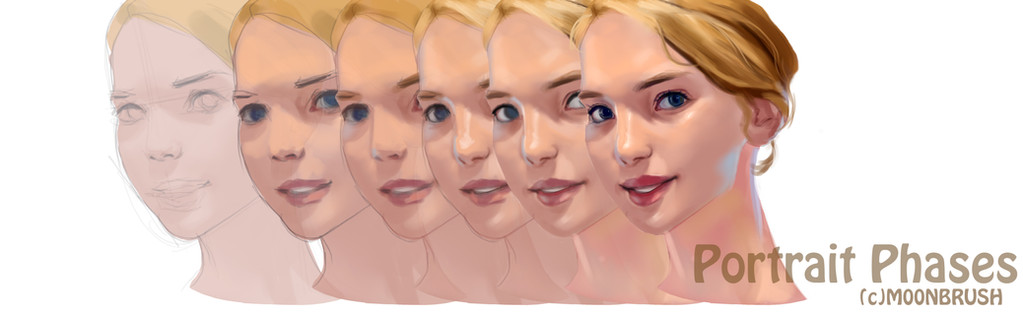
Hello! This is another step by step thingy for this piece: fav.me/d8nz0q3Let me quickly explain what's happening in each frame ^^
1> Very very messy sketch to get down the character overall look, pose and hair. Reference for head and light used: fav.me/d8ki5zs
2> On a seperate latyer Uunder the sketch i lay down the skin and hair colors. I really liked her face shape here but i wanted to keep her characteristics as close to my cousin's as possible so i had to change it later on
 (Smile)")
3> The two layers are now merged and i start reshaping her face and painting on top of the lines
4> Still on the same layer, i polish the skin and hair a bit. I keep it rather rough in quick portaits like this. I like the effect more overall but that's just personal preference.
5> Here experimenting with butterfly placement and compotition a little bit. Now that i'm looking at it next to the finished version i kinda like it more lol. So here's something i also learned from my "step by step" xP. Butterflies were drawn on a seperate layer
6>Time for the glowy part. I used Luminosity layer and painted on top of the butterflies and hair bits. I messed up with this step a lot but mostly because i was not that confident with "glowing" effects on sai but i think it's okayish
Addition notes: I forgot to mention that the blue bg was on it's own layer from start to finish.
Also i did this in sai so sorry if it's the photoshop category. For some unknown reason i don't see a sai category. What's up with that?
Related content


Comments: 2


Oh thank you! If you got any questions whatsoever feel free to shoot ^^
👍: 0 ⏩: 0