HOME | DD
 Ericanii — Pkm Series Step by Step
Published: 2010-06-28 18:19:03 +0000 UTC; Views: 6251; Favourites: 117; Downloads: 72
Redirect to original
Description
I don't know it anyone cares or wants to know; but in case someone does want to know... Awesome! You need to have, like basic understanding of photoshop and lighting to do what I do for the pkm series. And, you guys get a sneak peek of what you won't get to see for a few weeks cause I'm going away XDAgain, did all the wonderful drawings, I just colored them and made them extra special (cause they're pretty awesome as it is

WARNING: LONG ARTIST NOTES.
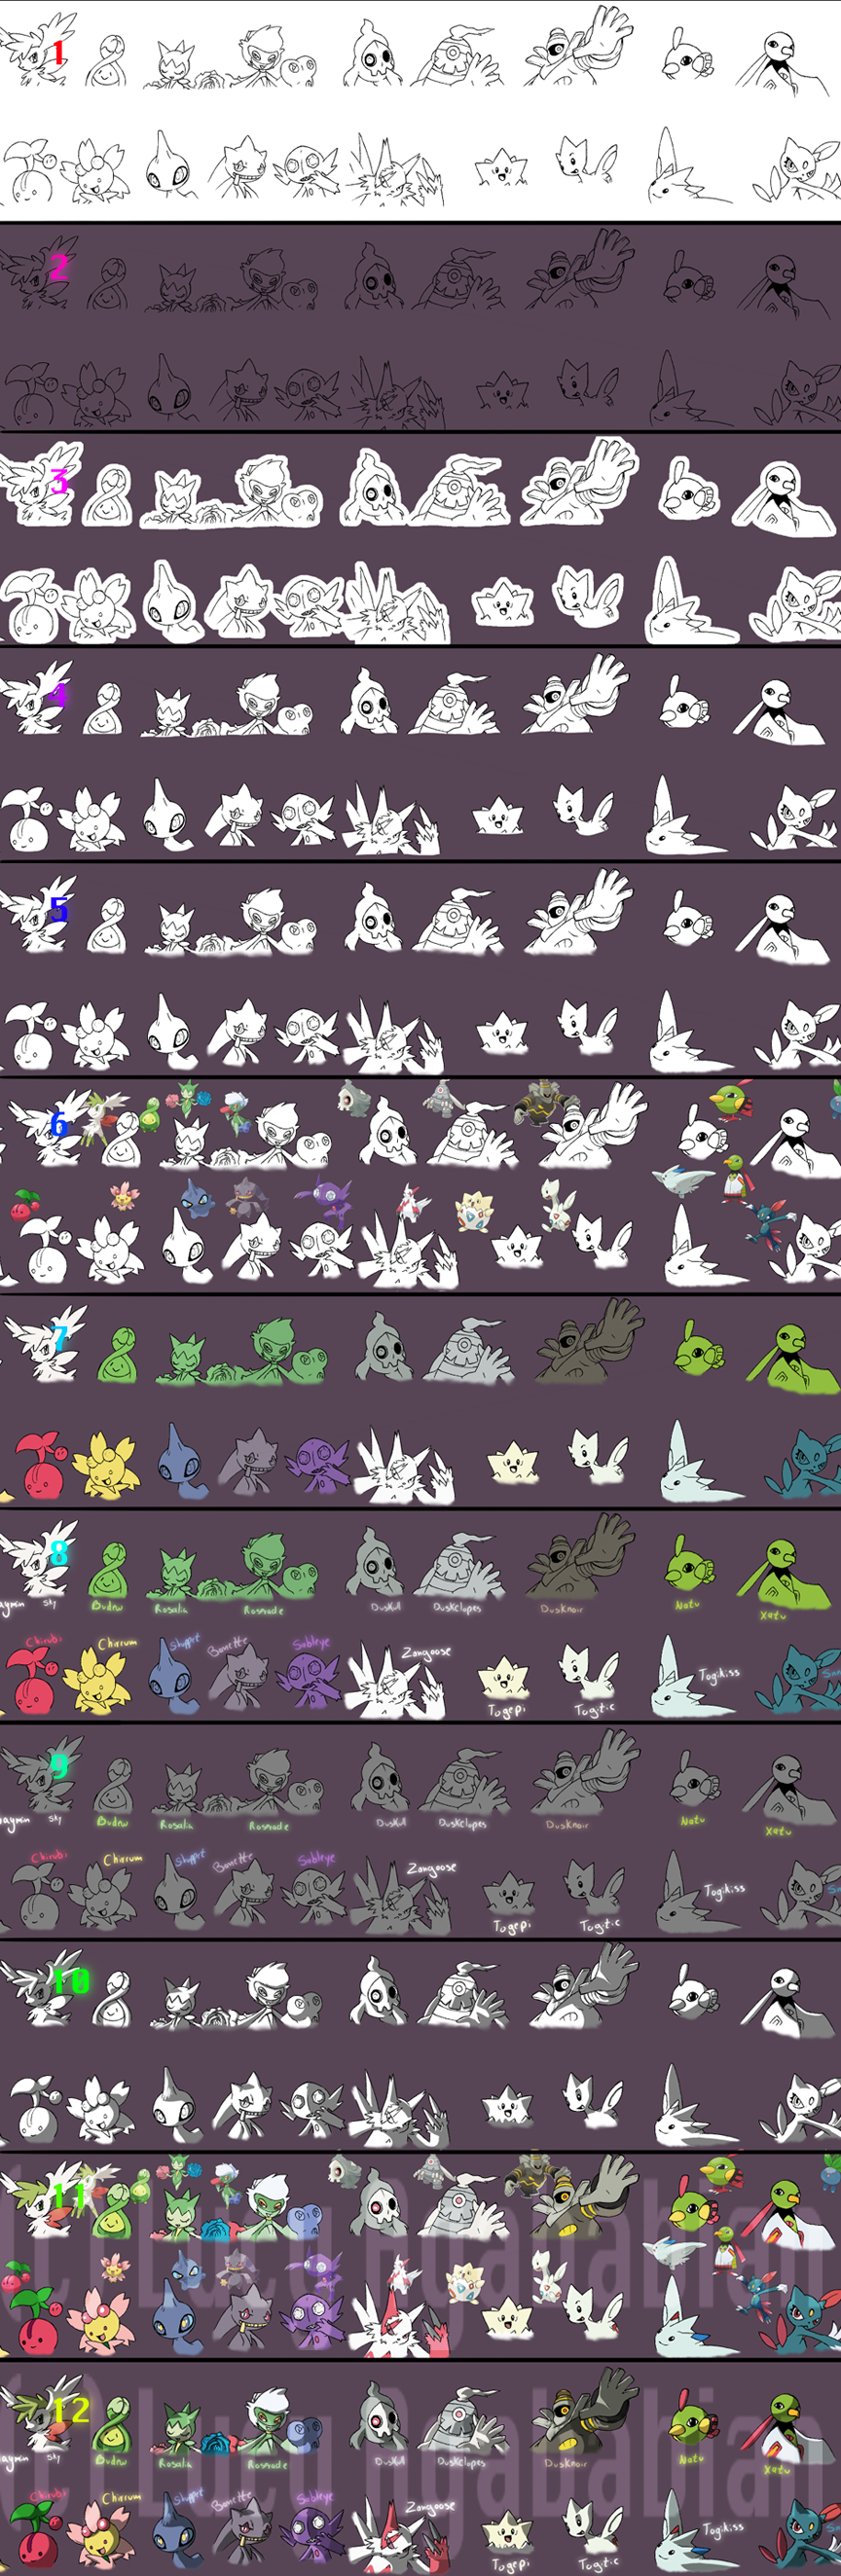
Step 1; I took some of ~Hu-Gon-By 's line work, put it all on one doc and on one layer (background), and clean it. I usually do this by going to Contrast/Brightness, playing with the settings till I have a nice dark line and white bg, then sharpen it. Once that's done I go in an fill in any black that needs filling or erase and in general clean it.
Step 2; Duplicate the layer (so now you have 2 layers), fill the background layer with the color of your choice (I did the pkm series purple) and set the top layer to Multiply, I call it Lines. Its a good idea to name your layers when working so you know what's what.
Step 3; Create another layer, between the Background and the Lines layer and block in your lines with white... though I guess you could use any color, I used white cause I can see its clearly against the purple. This is the Fill layer (three layers now)
Step 4; Probably the longest step x.x On previous pkm series pictures its easier cause I can magic wand the space outside of the pokemon, but because these have big open sections I had to manually go through and erase the excess white around each pokemon.
Step 5; Again, not a standard thing I do for the pkm series, but cause of the nature of the piece I did. I used the smudge tool and kinda smudged out the ends of the open spaces so they kinda fade into the purple better.
Step 6; Went to Bulbapedia before hand knowing what pkm I needed, and got all the official art for each pokemon, copy and pasted them onto the image them moved the refs next to their appropriate image. Merged all the ref images onto one layer called Refs (now I have 4 layers)
Step 7; Locked the transparency on my Fill layer and took the most abundant color of each pokemon and filled in their picture. You don't have to do this, I just found it easier in the long run.
Step 8; Wrote all the names of the pokemon in the same color as their flat color called Names, duplicated that layer and ran it through a Gaussian blur. Set the duplicated layer to Color Dodge and saw which colors needed to be brightened. Like Dusknoir's name isn't the same color as him, his was to dark and looked icky. (There are now 5 layers)
Step 9; Took the Fill layer, duplicated it, transparency is still locked went to Edit -> Fill Selection and filled it with 50% gray. Step 9 and Step 7 are basically interchangeable with each other. This layer NEEDS to be on top of the regular Fill layer. (6 Layers)
Step 10; My favorite part! Layer is still locked and using ONLY 50% gray and white I went through all of the images and basically found where the light would fall on them and added the shadows where appropriate. I'm not going to go into how I determine what needs lighting and what doesn't, there are plenty of good tutorials that tell you how to light things.
Step 11; Other then erasing all the white, this this takes the longest, doing the shading takes a long time too, but I really likes doing that so it goes by quick. Brought the Ref layer back up and eye-dropped the colors from the official arm and colored them into where they would go on the image. This part is really boring and I hate it >_< The only part I like is that its like a giant coloring book and I can never go outside the lines cause of the transparency lock 8D
Step 12; Set your duplicated Fill layer (from step 10) to Multiply, hide or get rid of the Ref layer, bring up the two Name layers, and make sure everything looks alight. At this point I have 6 layers. What I don't picture it one more layer for effects (cause it was 5 in my morning when I finished this >_<) which is basically going to be glows to the ghost pokemon. Which I do by taking whatever color I want to make all glowy, gaussian blur it, set it to Overlay or Color Dodge and play around with the opacity. LAST LAST step is to write my name across it, set it to Overlay and play with the opacity. In the end I think this thing has about 8 layers total. WOO!!!
Related content


Comments: 25


Cool Tutorial. Maybe I will try on Gimp since Gimp and Phototshop are similar with the fact that Photoshop is better.
👍: 0 ⏩: 1

I tried using Gimp... not so fun on a Mac cause you have to manually activate each window to use is x.x
👍: 0 ⏩: 1
Well I have Windows XP not Mac. Is manually activating windows a pain?
👍: 0 ⏩: 1
Its just a double click. But when you need to double click back and forth a bazillion times to change colors it gets annoying >_<
👍: 0 ⏩: 1
Would I be able to do this on scanned on to computer artwork?
👍: 0 ⏩: 1
*face palm*
Come back and ask questions when you have a knowledge of GIMP/Photoshop.
Cause it's a stupid question.
👍: 0 ⏩: 1
Well ,sorry! I have some knowledge of GIMP and photoshop. I know I can put scanned photos on those software programs. I just thought it might not work with your tutorial.
👍: 0 ⏩: 1
sorry. I didn't mean to ask a stupid question and get mad but I was wondering. there is no fill selection on GIMP so what do I substitute it with?
👍: 0 ⏩: 0


Ah~! So that's how you do it!
Great tutorial! GJ! ;D
👍: 0 ⏩: 1


THANK YOU VERY MUCH, I REALLY WANT TO LEAR HOW TO USE PHOTOSHOP AND ALL THAT JAZZ.THIS ONE SMALL STEP 4 ME!
👍: 0 ⏩: 1
Well you're welcome  (Smile)")
👍: 0 ⏩: 0

I gotta save this for later. This looks very useful.
👍: 0 ⏩: 1

Nice tutorial, learned some stuff I wouldn't have thought of.
👍: 0 ⏩: 1
For something I did I trhouyght no one would look at I'm glad to see I was wrong; cause it just blew up XD I'm glad it's useful to people
👍: 0 ⏩: 0

Oh, that's interesting. Thanks for that. Your coloring is very pro, love it!
👍: 0 ⏩: 1
You're welcome, and thanks as well XD
👍: 0 ⏩: 1
 (Wink)")