HOME | DD

Eternityspool — Eye Tutorial

#cervine #deer #equine #eye #horse #tutorial #fawnling #fawnlings
Published: 2016-03-14 02:40:41 +0000 UTC; Views: 10483; Favourites: 297; Downloads: 60
Redirect to original
Description 
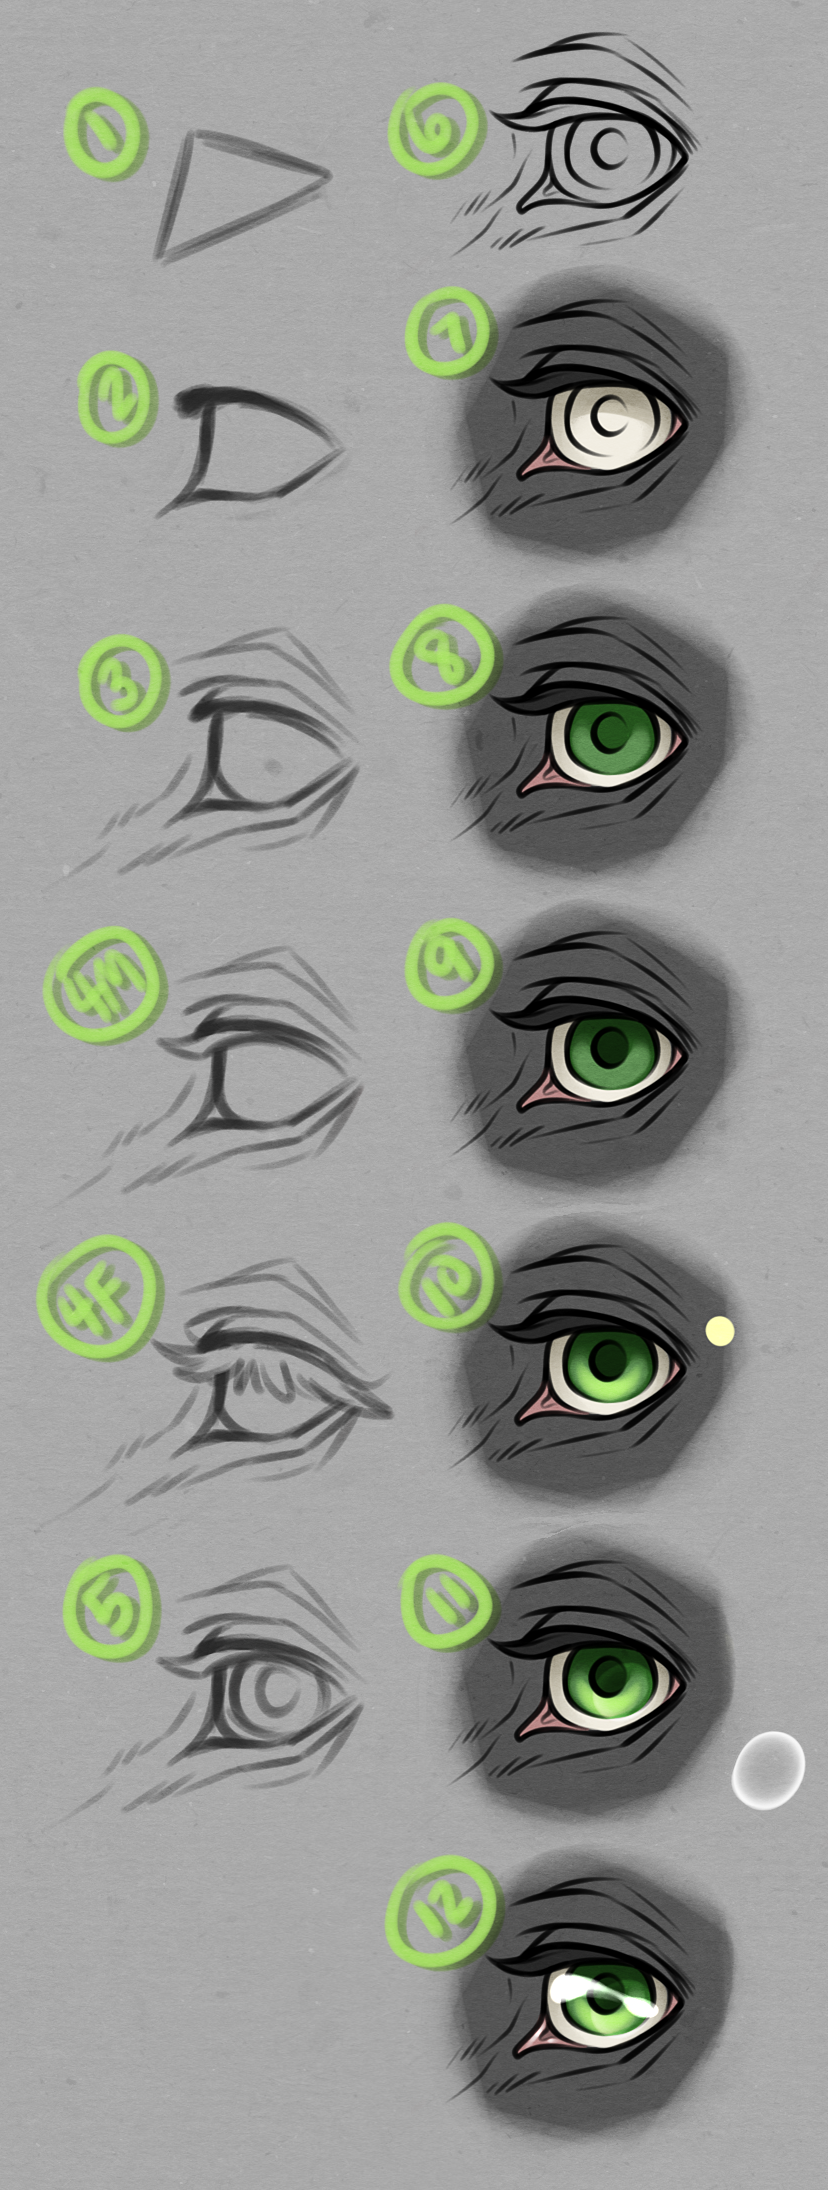
Because a lovely person requested it~ This is the process I usually go through for equine/cervine eyes c:
I use SAI, but the same results can be gotten with Photoshop.
Row One
  • Start with this weird triangle shape.
  • Flesh that out; look at horse eyes for reference. Make sure the upper portion is thicker, especially at the inner portion of the eye (the part closer to the nose).
  • Add upper and lower eyelids/surrounding skin. Also add that little corner of mucus membrane in either corner of the eye. It'll be pink later.
  • Add eyelashes. The first one is what I normally do for males, the second one is what I do for females/babies.
  • Add the iris/pupil.

  • Row Two
  • Lineart!
  • Flat colors. Paint the sclera white; don't everrrr use pure white for this. I usually put my color picker on a yellowish red and pick the white from that range, so it has that brownish tint. Add some shading. Color the mucus membranes a reddish pink, or whatever color you're using.
  • Color in your iris, I usually use a light version of whatever my eye color is going to be (light green here). Clip a new layer above that, put it to multiply, and use that same color to color in the pupil and to do a bit of shading on the top half of the iris and a thin line around the bottom of the iris.
  • Clip a new layer above that, put it to multiply. Desaturate that color you just used and use it to darken the pupil further and add a bit more shading on the top of the iris (I used an airbrush here).
  • Make a new layer, set it to "overlay". I usually use a light yellow for this, but any light color will work as long as it's not white (unless your eye is silver). Use a fuzzy brush to highlight the bottom half of the iris.
  • Make a new layer, set it to "overlay". Make a big circle over about 3/4th of the eye with a hard brush and erase the center with a fuzzy eraser. Any color can be used for this. You'll probably need to way lower the opacity of this layer so it doesn't overpower the eye.
  • Add shading to the mucus membrane with a dark pink, and highlights to it (it's wet!) Add your eye's highlights, I usually do this with white on a "luminosity" layer.
  • Optionally now you can color your lineart; I didn't include this step because I was a dummy and merged things way earlier. Oops!
  • Related content
    Comments: 12

    BlueHorizon-EQ [2017-05-04 21:06:06 +0000 UTC]

    :0   This is amazing, thanks for making it as it'll be an extremely useful reference!  I'll be sure to go practice making some proper eyes now

    👍: 0 ⏩: 1

    Eternityspool In reply to BlueHorizon-EQ [2017-05-04 21:19:07 +0000 UTC]

    Ahh I'm glad it's useful!

    👍: 0 ⏩: 0

    KatPerson098 [2016-03-17 18:44:23 +0000 UTC]

    you, my friend, are my hero

    👍: 0 ⏩: 1

    Eternityspool In reply to KatPerson098 [2016-03-17 19:24:33 +0000 UTC]

    Ffff <3

    👍: 0 ⏩: 0

    salemtide [2016-03-14 16:50:54 +0000 UTC]

    This is really helpful, I always struggle with making a good bright eye color. Thanks for doing this!

    👍: 0 ⏩: 1

    Eternityspool In reply to salemtide [2016-03-14 18:34:21 +0000 UTC]

    You're welcome!

    👍: 0 ⏩: 0

    LaughingHeron [2016-03-14 12:01:00 +0000 UTC]

    Thank you so much, I have an obsession with eyes and this will help me so much with mine!

    👍: 0 ⏩: 1

    Eternityspool In reply to LaughingHeron [2016-03-14 18:34:03 +0000 UTC]

    Hopefully it will be of use!

    👍: 0 ⏩: 0

    orazai [2016-03-14 09:52:47 +0000 UTC]

    Awesome tutorial! <3 Much needed, too! c: Great job.

    👍: 0 ⏩: 1

    Eternityspool In reply to orazai [2016-03-14 18:33:43 +0000 UTC]

    Thank you!

    👍: 0 ⏩: 0

    EspressoShots [2016-03-14 02:56:48 +0000 UTC]

    beautiful tutorial

    👍: 0 ⏩: 1

    Eternityspool In reply to EspressoShots [2016-03-14 02:57:29 +0000 UTC]

    Thanks <3

    👍: 0 ⏩: 0