HOME | DD
 gerimib — Steampunk-Neda step-by-step

Published: 2013-12-30 19:00:30 +0000 UTC; Views: 133; Favourites: 4; Downloads: 3
Redirect to original
Description
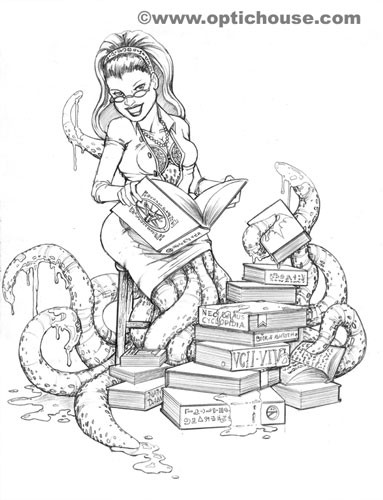
My girlfriend recently became interested in steampunk fashion and asked me to create an illustration of her as a steampunk girl. Here's the result. Fairly pleased with how it came out. I've been trying to step up my color game.
While I'm at it, here's some behind the scenes process.
The initial sketch, trying to find a pose I like. I took some photo reference before doing this sketch. I should probably show you the sheet of horrible thumbnails I drew before it. Those thumbnails are what made me realize I needed photo ref.
Once I had a sketch I liked, I scanned it in, flipped it horizontally (So I'm looking at a mirror reflection of it.) Looking at the mirror image of artwork often reveals draftsmanship flaws that the artist might miss, due to inherent perceptual biases. I enlarge the sketch to 8.5 x 11 inches, lower the opacity to 20% so it's faded out, and print it out on plain copy paper.
I drew a cleaned up version of the sketch on top of the red line artwork, scanned it, and flipped it back to the horizontal orientation I originally intended.
I converted the cleaned up sketch to a light blue color Photoshop, similar to a non-photo blue, and printed that to 8.5 x 11 inch card stock for the final pencils. I actually printed out 2 blue line sketches. I wanted to ink one as well, to compare how my inking was coming along in contrast to my pencils. I forgot to scan the inks, so I'll add them later.
It wasn't bad, but my girlfriend and I both agreed that the pencil version was better, so that's what I chose to color over for the final piece. Actually, she couldn't decide. I told her she could keep one and I was going to sell the other. She chose the pencil drawing. I knew which one I thought was better, but I was curious which one she would chose when forced.
The last step before coloring in Photoshop was creating the gears in Adobe Illustrator. I dragged some simple shapes into the brush palette (one-by-one), to make strokes that could be applied to the circles and turn them into gears. Once the gears were created, I used the 3D effect in the Effects pallet to give them dimension, then added them to the pencil drawing in Photoshop.