HOME | DD
 hjhornbeck — HDR the lazy way tutorial
Published: 2006-07-02 23:45:40 +0000 UTC; Views: 4520; Favourites: 24; Downloads: 166
Redirect to original
Description
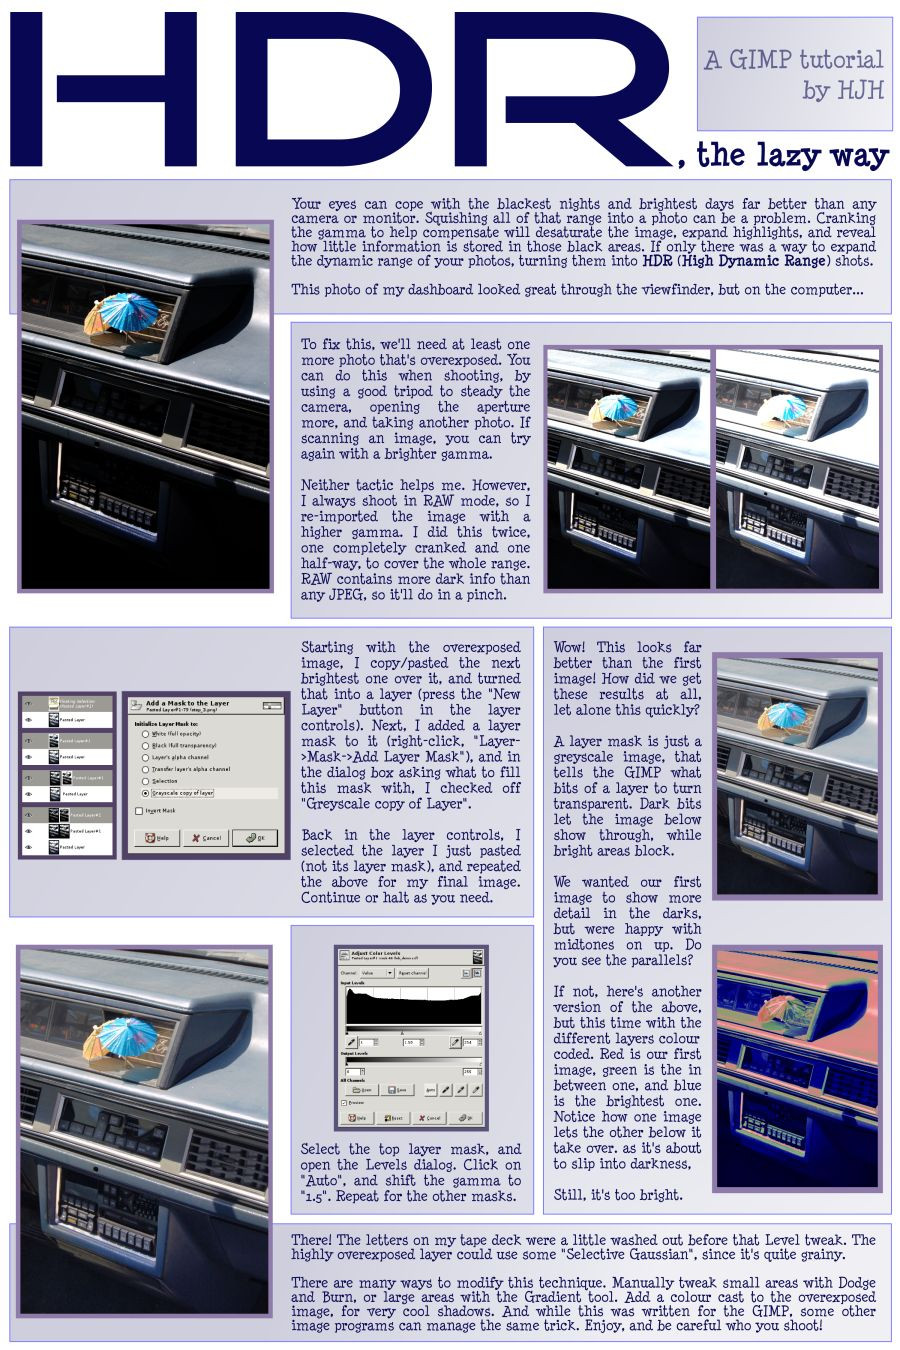
I miss writing tutorials. This time, I'll cover how to drain every last bit of light out of your photo. The full text:Your eyes can cope with the blackest nights and brightest days far better than any camera or monitor. Squishing all of that range into a photo can be a problem. Cranking the gamma to help compensate will desaturate the image, expand highlights, and reveal how little information is stored in those black areas. If only there was a way to expand the dynamic range of your photos, turning them into HDR (High Dynamic Range) shots.
This photo of my dashboard looked great through the viewfinder, but on the computer...
To fix this, we'll need at least one more photo that's overexposed. You can do this when shooting, by using a good tripod to steady the camera, opening the aperture more, and taking another photo. If scanning an image, you can try again with a brighter gamma.
Neither tactic helps me. However, I always shoot in RAW mode, so I re-imported the image with a higher gamma. I did this twice, one completely cranked and one half-way, to cover the whole range. RAW contains more dark info than any JPEG, so it'll do in a pinch.
Starting with the overexposed image, I copy/pasted the next brightest one over it, and turned that into a layer (press the "New Layer" button in the layer controls). Next, I added a layer mask to it (right-click, "Layer->Mask->Add Layer Mask"), and in the dialog box asking what to fill this mask with, I checked off "Greyscale copy of Layer".
Back in the layer controls, I selected the layer I just pasted (not its layer mask), and repeated the above for my final image. Continue or halt as you need.
Wow! This looks far better than the first image! How did we get these results at all, let alone this quickly?
A layer mask is just a greyscale image, that tells the GIMP what bits of a layer to turn transparent. Dark bits let the image below show through, while bright areas block.
We wanted our first image to show more detail in the darks, but were happy with midtones on up. Do you see the parallels?
If not, here's another version of the above, but this time with the different layers colour
coded. Red is our first image, green is the in between one, and blue is the brightest one. Notice how one image lets the other below it take over. as it's about to slip into darkness,
Still, it's too bright.
Select the top layer mask, and open the Levels dialog. Click on "Auto", and shift the gamma to "1.5". Repeat for the other masks.
There! The letters on my tape deck were a little washed out before that Level tweak. The highly overexposed layer could use some "Selective Gaussian", since it's quite grainy.
There are many ways to modify this technique. Manually tweak small areas with Dodge and Burn, or large areas with the Gradient tool. Add a colour cast to the overexposed image, for very cool shadows. And while this was written for the GIMP, some other image programs can manage the same trick. Enjoy, and be careful who you shoot!
Related content


Comments: 7

")

Nice tut! I put your tutorial in my Journal!
Thank you
 (Wink)")
👍: 0 ⏩: 1

No prob, always happy to help out!
HJ Hornbeck
👍: 0 ⏩: 0

No problem-o! Getting that camera took away one big obsticle to these tutorials.
HJ Hornbeck
👍: 0 ⏩: 0

"Exposure bracketing"
The D50 actually does it natively.
👍: 0 ⏩: 1
It's bizzare, I usually love reading manuals....
HJ Hornbeck
")
👍: 0 ⏩: 0