HOME | DD
 Ivelieu — Labelled Portfolio Montage

#abstract #abstractdigital #desktopbackground #fractal #fractalabstract #fractalart #fractalartwork #uhd #paintdotnet #jwildfire #uhdwallpaper #jwildfirefractalart #jwildfireabstract
Published: 2023-08-21 07:50:27 +0000 UTC; Views: 771; Favourites: 1; Downloads: 0
Redirect to original
Description
It is a little over 4k resolution. Made with imagemagick. Along with the center image which I also used paint.net and G'MIC. Imagemagick is great for batch scripting, but windows is not, and I wanted to do something apparently unconventional with it, so it took a stupid amount of effort.
I got 80 images, some were 2k and some were 4k, and I wrote a lot of imagemagick code to generate and place text labels with gradient colours on the images. I'm not joking - it took the better half of two days. It was maybe a misguided idea to try and do the scripting with windows. I also made the central image with some short information about the montage.
To generate the labels and attach to the images, I used this script. Windows uses ^ for newlines, and it apparently complained if I put them in the 'wrong' position which it determined randomly. So I am pasting verbatim so it works if anyone else wishes to use it. (Yeah. Windows scripting sucks.)
FOR /F "eol=; tokens=1,2* delims=@" %i in (file_titles.txt) do magick -gravity center -pointsize 280 -fill black -background none -font file/path/to/UbuntuMono-Regular.ttf -size "x340>" ( label:"%j" ( +clone -background DeepPink -shadow 300x13+0+0 -size "3840x340^" -write MPR:alpha +delete ) ^
( +clone -size "%Hx%W^" +delete gradient")
( MPR:gradient MPR:alpha -compose copyalpha -gravity center -composite -size "3840x340>" ) ) +swap -compose Over -composite -size "3840x340>" -geometry "3840x340>" ^
"%j_label.png" & magick "%i" "%j_label.png" -geometry +0+100 -gravity south -composite "combined_%i"
The first part of line 1, up to "magick", is the loop which is reading from a file, which is of the format
image.pngimage Title
This is where I put my labels. The second part of the first line sets the font, Ubuntu Mono, and the label for the text from the file input. Then, the 300x13+0+0 shadow is written to the magick persistent register (MPR) "MPR:alpha". The second MPR on line 2 is the gradient, which spans the entire size of the text and then a little extra, so the blur does not get clipped. On line three, these two MPRs are composed with the 'copyalpha' method, which means the alpha of the background is overlaid onto the image of the foreground. The order of the composing is very fickle. After composing, the layers are like so:
top layer: blurred gradient background of black text
bottom layer: black text
So the next command, +swap, swaps this order. Then there is a second compose, which is 'over' type. This does no fancy alpha channel mixing; it just places one on top of the other. Once this compose is done, the text is finished, and it is saved to "%j_label.png". Then, it is rendered ontop of the image, with "-geometry +0+100 -gravity south" which positions the label just above the bottom row. One final compose and the labelled image is done. In the script I do not delete the leftover label images as I was using them for debugging, but I could have.
It genuinely took a day to get the layer swaps and composes to correctly produce the text style I wanted. imagemagick is sooooo fickle on command line... *especially* for windows when I cannot easily use even very basic scripting techniques like variables and loops.
As the blur was based on raster pixel size, for the 2k images I had to modify it and run it separately, along with changing the font size. This is the corresponding modification:
FOR /F "eol=; tokens=1,2* delims=@" %i in (file_titles.txt) do magick -gravity center -pointsize 140 -fill black -background none -font C:/Users/Darcy/Documents/Ubuntu_Mono/UbuntuMono-Regular.ttf -size "x170>" ( label:"%j" ( +clone -background DeepPink -shadow 300x6+0+0 -size "1920x170^" -write MPR:alpha +delete ) ^
( +clone -size "%Hx%W^" +delete gradient
( MPR:gradient MPR:alpha -compose copyalpha -gravity center -composite -size "1920x170>" ) ) +swap -compose Over -composite -size "1920x170>" -geometry "1920x170>" ^
"%j_label.png" & magick "%i" "%j_label.png" -geometry +0+50 -gravity south -composite "combined_%i"
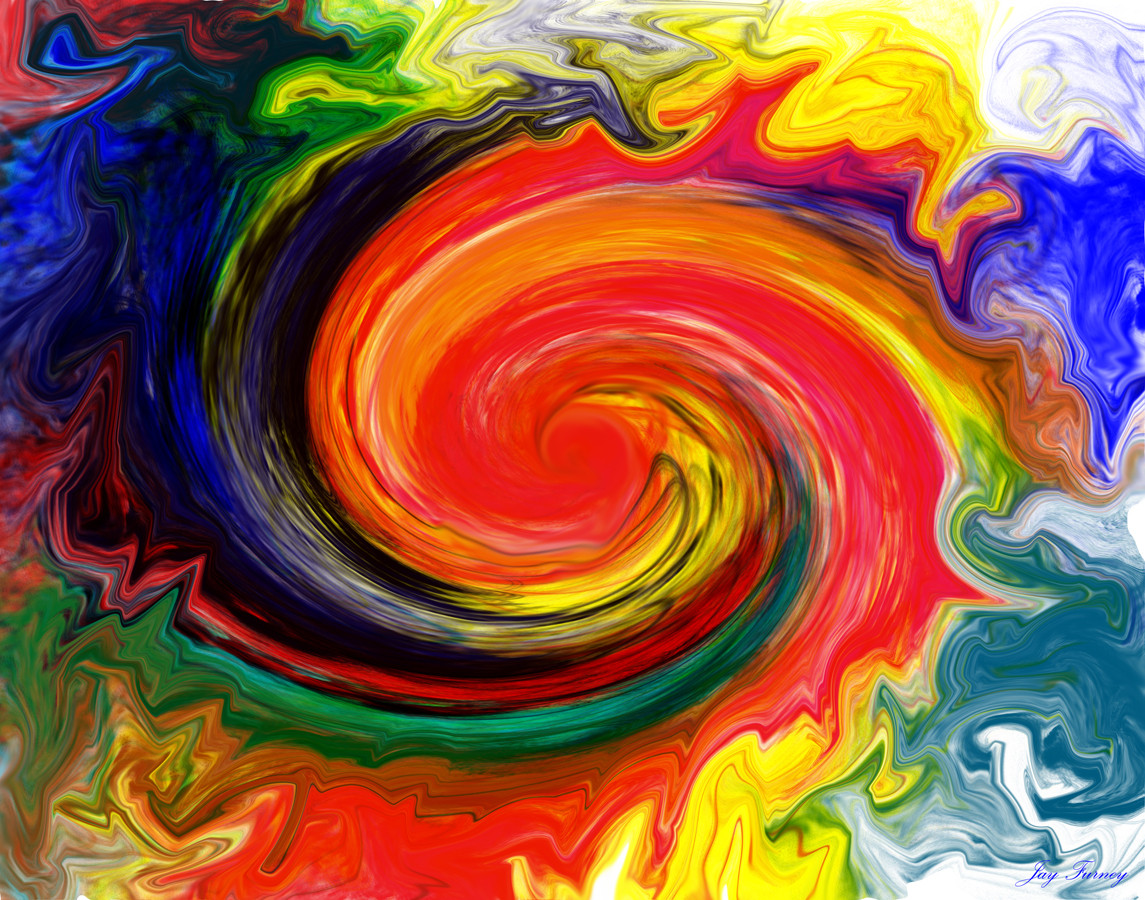
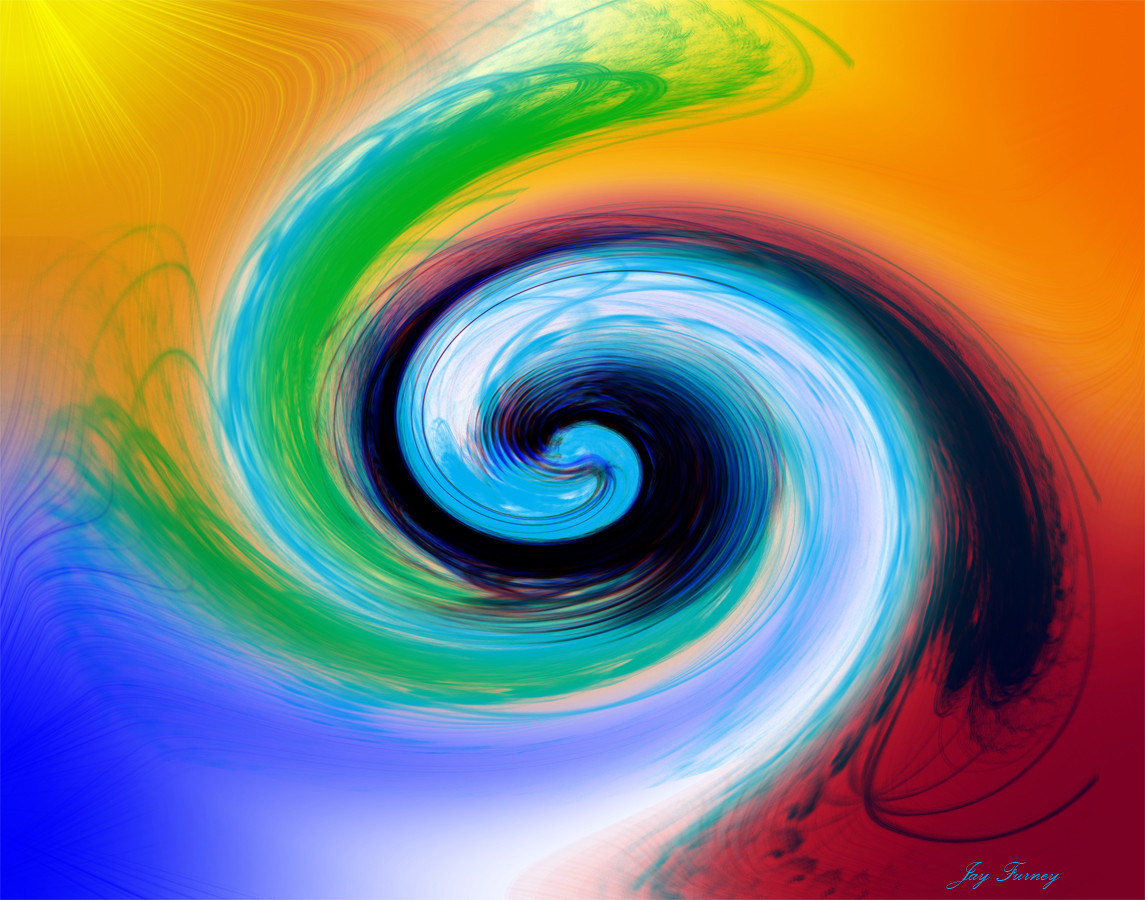
For the central image, I used the paint.net "crystallise" filter on a red-black swirl, then added a whole bunch of HSV modified channels. I then used a few glitch and dithering filters from G'MIC. For the text, I did not use a gradient generated by imagemagick, instead feeding in a gradient file I edited slightly with some colour blotches. There is a second blur gradient, kind of subtle, which is the crystallised red-black swirl before the HSV curve balancing. This is the command I used to generate the text, where gradient2 is the slightly blotched pink-cyan gradient, and gradient2b was the red-black swirl:
magick -gravity center -pointsize 140 -fill black -background none -font C:/Users/Darcy/Documents/Ubuntu_Mono/UbuntuMono-Regular.ttf ( label:"Ivelieu\nMade with JWildfire, Paint.NET and G'MIC-Qt\nAll art is CC-BY-SA 4.0 and free to download\nI also make animated fractals\nMore information and 4K downloads on DeviantArt\nwww.deviantart.com/ivelieu/gal… \n" -gravity south -geometry 1920x1080 ( +clone -background DeepPink -shadow 300x6+0+0 -size "1920x" -write MPR:alpha +delete ) ^
( gradient2.png -write MPR:gradient +delete ) ^
( MPR:gradient MPR:alpha -compose copyalpha -gravity center -composite -size "1920x" -write MPR:combined1 +delete ) ) ^
( gradient2b.png -write MPR:gradient2 +delete ) ^
( +clone -background blue -shadow 330x26 -size "1920x^" -geometry +0-3 -write MPR:alpha2 +delete ) ^
( MPR:gradient2 MPR:alpha2 -compose copyalpha -gravity center -composite -size "1920x<" -write MPR:combined2 +delete ) ^
( MPR:combined2 MPR:combined1 -compose Over -gravity center -composite ) ^
+swap -compose Over -composite -size "1920x170>" -geometry "1920x" ^
"title_text7.png"
The final montage command was very simple:
magick montage -tile 9x9 -geometry 960x540+0+0 [input images in randomized order] montage.png
Although I later had to resize it down to 4K, because for whatever reason, even though it is within file size limits for images, the 4k version on upload to stash was responding with "internal server error". Whatever. It still looks pretty good, I tried a few and decided on Fant resampling for the shrunk image. Although it does not fit at 4k resolution exactly, it does fit the typical aspect ratio. I found resizing to the typical 3840x2160 was producing some resampling artifacts, so I think this looks modestly better. If I actually render the image such that each montage is 1920x1080, the output resolution would be 17280*9720. But the point of it is to be a montage, an introduction, so I do not think the high resolution is strictly necessary. Overall, I am happy I put in this effort, and it will save a lot of time in future now that I know the arcane machinations of imagemagick.