HOME | DD
 jatek — Making of the Transistor / Tutorial
#prop #props #red #sword #transistor #tutorial #swordtutorial #supergiantgames #redtransistor #transistorcosplay #transistortutorial #cosplay #leds #redcosplay #redtransistorcosplay
Published: 2015-11-22 20:15:38 +0000 UTC; Views: 2188; Favourites: 20; Downloads: 10
Redirect to original
Description
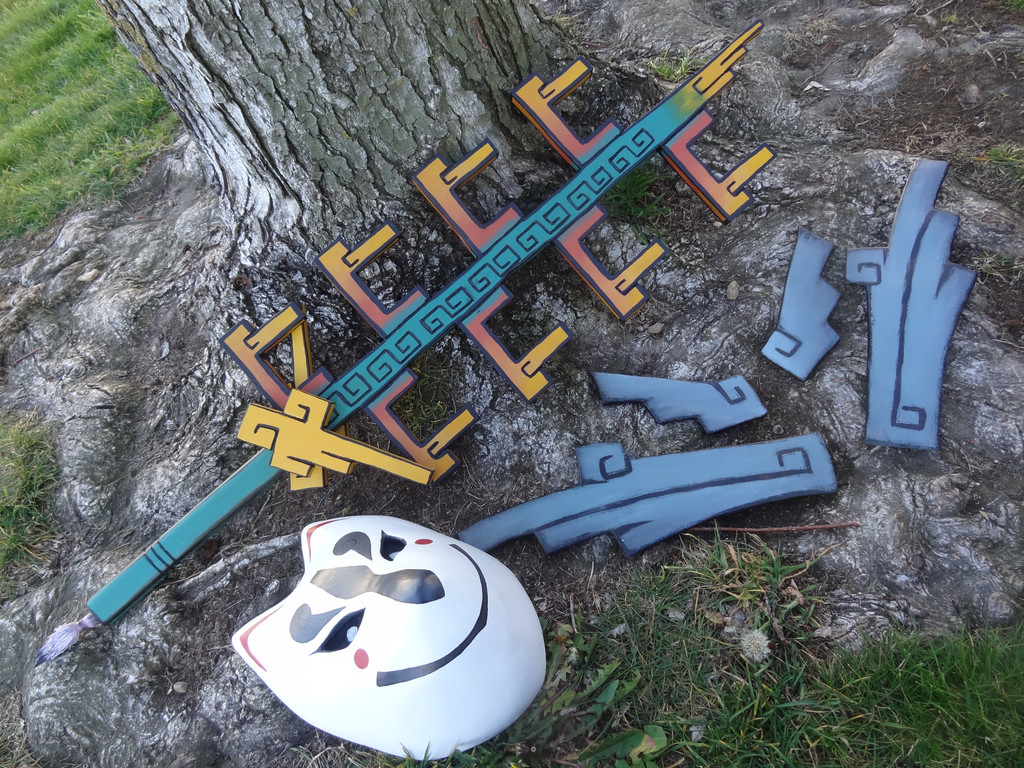
So, I finished this sword a couple of days ago and even had a photoshoot with it yesterday. I'll upload pics as soon as I'll get them! And yes, I know the yellow floating side things are not attached in this picture.
 (Smile)")
Here comes a long explanation about me making the Transistor. This is my first time writing something like this! And a little note that I work on a small family company which is all about plastics, so I got the materials pretty easily. I also have access to a laser cutter and many tools designed for plastic
.
First I drew a life size pattern of it with the help of reference pictures and after visualising it I drew it again with Corel Draw. Now I had the right size patterns for every piece on my computer.
I used our laser cutter to cut the parts. For the blue part I used 8mm acrylic glass, which is a transparent plastic. It had a protective sheet which had just the right color, so I didn’t remove it expect from the spots I used silicon on. The laser cutter sealed the edges, so I didn’t have to worry about it coming off. I also cut the lighter blue parts and the red circle, but for them I used Softis, a thin craft foam. The round part under the red circle and the yellow details were cut from laserable 3mm plastic. The triangle near the handle was cut from a 3mm and 10mm plywood.
The patterns had been designed so they could fit into our small model. Which made things more difficult, because the sword would have been a lot more sturdy, if it was made from bigger pieces. I won’t go into details with my parts, because the structure is very complex and I can’t explain it with just words. I didn’t take that many progress pictures, because when I’m doing something, I want my 100% focus to be on it, not on taking pics every other second.
After cutting, I cleaned the pieces and started attaching the acrylic layers together with silicon. I had four layers on the edges and in the middle, but the rest of the sword was going to be hallow inside with just the two surface layers, so there would be space for the handle and the leds. It also made the sword lighter, because it was already quite heavy! At this point I didn’t add the final surface layer, because I had to attach the handle and the leds before that.
For the handle I used a broomstick handle, but I had to sculpt the part that was going inside the sword to be 16mm wide, because otherwise it wouldn’t have fitted there. I attached it with silicon and screws, and made it go as far into the sword as I could to make it durable. On it’s both sides there were two acrylic glass layers giving it support and firming the swords frame. It also attached all the pieces together. Like you guessed, there were a lot of screws and silicon here too. Everytime I screwed something on the acrylic glass I had to drill the right size holes for them beforehand. Otherwise the screws or the acrylic glass would break. I practised this on extra pieces before doing it for real.
I added the leds across the handle and the acrylic glass support frames. Altogether I used 8 blue leds (not white because they were not bright enough). It was my first time using leds, but with a little help I managed to solder the leds to a cable and make a working circuit with a switch. Now I could seal the final layer and put some more silicon and screws everywhere. I put a lot of weight on the sword and let it dry for a day. After that it was super sturdy!
Now I painted the blue parts and the cicrcles. Just normal painting with acrylic colors so nothing exciting here, exept after painting the blue parts I added glow-in-the-dark varnish on them! The varnish was extremely thin so I needed like 15 layers to make it look even. Also I had to turn the lights off all the time to see how the paint looks. It’s a cool add-on, but I guess no one gets to see it, because why would there be dark in a convention? Hymiö smile
I glued the circles and the blue parts on the surface of the sword. I used just some general glue I happend to have. At the same time I sanded and painted the grey triangle thingies, and made a hole for the handle on one of them. I glued them on to each other with wood glue and on to the sword with silicon. Silicon is literally my new favorite thing, it makes everything stick together really well! At this point I also glued the other painted parts on. They hided the handle stick, silicon, screws, wires and everything that wasn’t supposed to show. Suddenly everything looked clean and smooth.
Now it was time to make the yellow details on top of the sword. I had cutted them previously from yellow plastic, which was just the right color. I made the three stripes that go from the one side of the sword to the other from three single pieces, which where bended into a shape with a resistor. I also bended four pieces of a thin arylic glass into L shaped thingies and attached the long yellow side pieces in to them, to make it seem like they are floating in the air. I used really strong two sided tape to do that. It’s designed for this kind of plastic. I also used it to attach them into the sword.
And the last thing I did was finish the handle. I used a right size pipe to hide the wooden handle and the wires. I put silicon there to make it stay. Then I built the different thicker spots with softis and old wonderflex I still had. I surfaced the whole thing with glue and made it smooth. Then I painted the handle grey and gold. I also painted the small half-ball on top the handle, and I made it so you can take it off. There is a small secret locker which helds the light switch and the batteries under it. It’s very convenient!
Overall this was an amazing and fun project! I loved using leds and I’m sure I’ll be using them again on some of my other projects. I also found the wonders of silicon. It takes time to dry, but it is efficient. I’m proud of what I build, and I hope this writing either helps someone with their projects or gives you a nice summary of how I made the sword.
Related content


Comments: 7

The sword looked so cool, then I seen what you had to do to make it - DAAAMN, impressive work, I do love when cosplayers go out of their way and put in so much work in props, this one is really neat and I love the quality, more of this please
")
👍: 0 ⏩: 1

Thank you so much! I loved making the sword, it was so much fun! I'm glad you read my text, I think many ppl ignore this kind of long explanations. In the future I have to choose costumes with props, because it's so much more fun to make a prop than sew something.
👍: 0 ⏩: 1
Depends on the artist/creator. If they are boring simpletons, have nothing behind their expression. A genuine comment, scares them. Then there is real artists, glad your little gang, has it all. That wasnt even long
As of if you have a peanut sized brain. 30 words seem a book
Looking forward to see more of your creative ideas.
")
👍: 0 ⏩: 0