HOME | DD
 Kakarotho — Alyssa Sorto as MK2 Kitana
Published: 2018-04-09 15:23:46 +0000 UTC; Views: 3533; Favourites: 43; Downloads: 28
Redirect to original
Description
An older work, done in MS Paint. I still get a lot of people asking me how to edit like this, so this is a brief description of the process in general, although it's probably all for nothing, as most guys want to get good results with minimal effort, and the following is not easy at all. I've tried to explain this before, but I've never actually seen someone try this.1. Select a photograph, preferably large size (the original I used here is 1080 x 1349) and high quality (HD).
2. Reduce the size of the photo to have the person in it match the size of MK2/MK3 sprites. This will automatically reduce the quality as well, obviously.
3. Cut out the person; seperate them from the surrounding background. You can switch step 2 with 3, so that you cut the person out of the large image, which will be more precise, but that's also a lot more time consuming.
- You can cut out seperate parts of the image, like hair, clothing, or individual limbs, the head, etc.
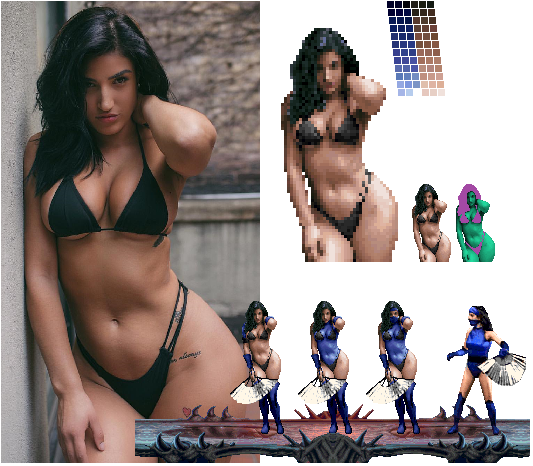
4. Create a palette like the blue and brown palettes you see in the image above, but use a single color with lots of different shades (from dark to bright), like the green color you see on the right there. I always use that.
- You're going to convert the down-sized image's pixels to this green color. This is an essential part of the process, because that down-sized image will have hundreds of different colors. You don't want that.
The reason why you want to reduce color count is because original MK sprites have a limited amount of colors, and you want to match yours with the original sprites, so that the style and overall look becomes similar.
Too many different colors will have your image looking too realistic. It has to be 'pixelized' in order to fit in with the rest of the original sprites. Color count of skin/flesh in original sprites varries, but it's usually around 30 to 40.
The way you convert the colors of the down-sized person is by zooming in, and picking the darkest pixels, changing them individually with the darkest green you have. This is actually the hardest part of the process.
You have to have a keen eye in order to choose the right pixels, and patience. You basically go from darkest to brightest, slowly but surely converting the entire image into a green version, which now has the proper color count.
The more precision you apply, the better the result will be.
5. If done right, you'll end up with the green 'Kitana' you see on the right in the image above. She's now a pixelized version of the down-sized photo. You can now convert all the greens back to browns.
- So you create a palette with a similar amount of browns as the greens you used. You can take the browns from the original photograph or simply pick a palette by yourself.
You could use a darker palette for her skin though, if you want to make Jade for example, and you can use different palettes to create clothing, such as the blue torso in the image at the bottom.
There are lots of other techniques and steps that I haven't mentioned here, but the above is just a brief description of what I did to go from Alyssa's HD photograph to the 'new' MK2 Kitana sprite.


")
 (Smile)")
