HOME | DD
 KaynessArt — Vampness - photomanip tutorial
Published: 2007-08-21 16:27:17 +0000 UTC; Views: 41903; Favourites: 528; Downloads: 2806
Redirect to original
Description
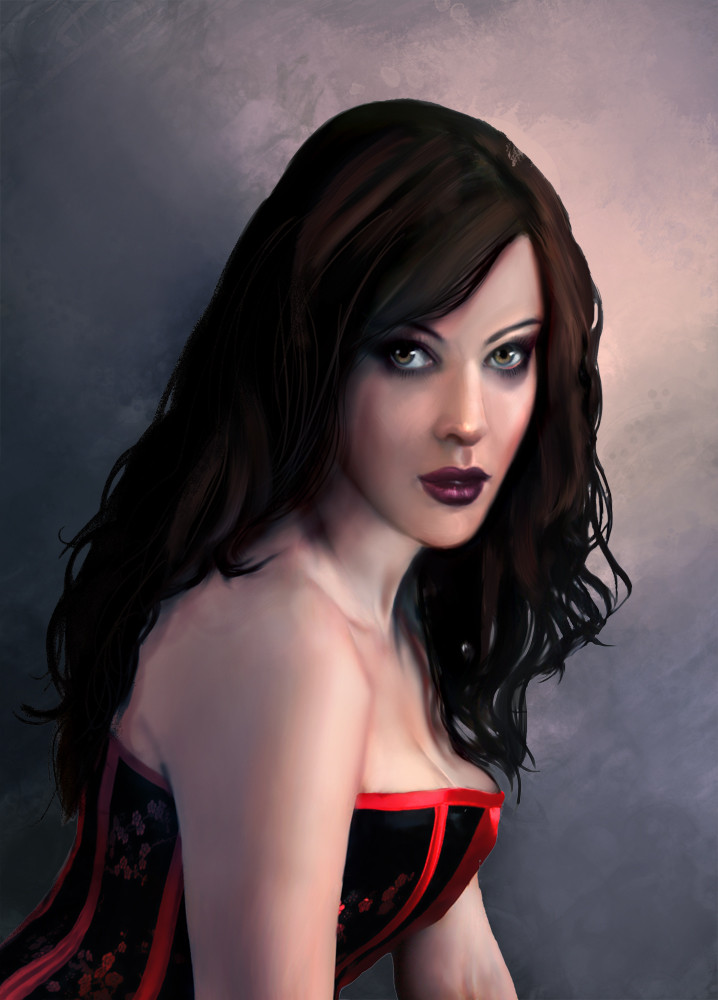
CLICK HERE FOR THE VIDEO TUTORIAL!basically it's more like a demonstration of how a photo can be painted over and manipulated to make it look like a ' painting'. Nothing much here just fooling around
") . Took only a few hours. All the steps are explained in the subtitles in the video. Done with Photoshop CS3
. Took only a few hours. All the steps are explained in the subtitles in the video. Done with Photoshop CS3original image
[link]
text, for those who cannot read fast enough:
- smudged the skin using round brushes at 20% strength and hair with spackled brush at around 69% strength
-filled the background with a neutral grey colour
-made a new layer, set the layer blending mode to Soft Light and brushed some light blue over the skin and some reddish brown along the hairline and the hair at the back
-painted over the face and neck, removed dark circles and blemishes, and generally smoothed out the skin
-used the Liquify tool to nudge and slim down the face shape, jawline, raise cheekbones, enlarge the eyes and raised the eyebrows.Dodged in and painted over the irises.
-painted over the face and hair. Changed the head shape and used even more of the Liquify tool to slim down the torso area.
- made another layer, fill it with a neutral grey colour and set that layer to Overlay. Used layer mask to erase out the area on the skin and hair
- made another layer and set that layer's blending mode to Colour. Used a medium soft round brush in blue to tone down the orange. Set the layer opacity to about 60%
- made another layer and this time the blending mode is set to Normal. Painted over the shoulder and arms to smooth them out.
- painted in eyelashes, highlighted the nose, lips and face using round brushes set to Normal and Colour Dodge modes
- fill in the background, Done.
Related content


Comments: 71


2-3 hours? surprisingly short
")
👍: 0 ⏩: 0

Lovely! I especially liked the tango! 
 (Wink)")
👍: 0 ⏩: 1
yeah I loved that bit too. It's from the Essential Yo-Yo Ma CD disc 2...I don't know who it is by though, because i only have it on my WMP not on cd, and the track on WMP says 'Schafe können sicher weiden', but I am certain it is wrong because the lists on WMP and on the cd case doesn't match, and, I would love to ")
👍: 0 ⏩: 0

Wow, you made it easier to me, but I'm not gonna give it a try. Nice done!
👍: 0 ⏩: 0

hehehe! good one kay! gotta love this
we need more paintovers!
 (Smile)")
👍: 0 ⏩: 1

Haha, sweet. I never really tried the realistic/overpaint style, now I have an excuse to try it out. Awesome tutorial, Kay
👍: 0 ⏩: 0

Oooh, the subtitles disappear very fast that I can hardly read'em fully... Elandria would love this tut 
👍: 0 ⏩: 1
thank you! who's Elandria though(sounds familiar)..oh, and I typed in the text
text, for those who cannot read fast enough:
- smudged the skin using round brushes at 20% strength and hair with spackled brush at around 69% strength
-filled the background with a neutral grey colour
-made a new layer, set the layer blending mode to Soft Light and brushed some light blue over the skin and some reddish brown along the hairline and the hair at the back
-painted over the face and neck, removed dark circles and blemishes, and generally smoothed out the skin
-used the Liquify tool to nudge and slim down the face shape, jawline, raise cheekbones, enlarge the eyes and raised the eyebrows.Dodged in and painted over the irises.
-painted over the face and hair. Changed the head shape and used even more of the Liquify tool to slim down the torso area.
- made another layer, fill it with a neutral grey colour and set that layer to Overlay. Used layer mask to erase out the area on the skin and hair
- made another layer and set that layer's blending mode to Colour. Used a medium soft round brush in blue to tone down the orange. Set the layer opacity to about 60%
- made another layer and this time the blending mode is set to Normal. Painted over the shoulder and arms to smooth them out.
- painted in eyelashes, highlighted the nose, lips and face using round brushes set to Normal and Colour Dodge modes
- fill in the background, Done.
👍: 0 ⏩: 2
Oh fuck, I meant *enayla ! Of gosh, sorry for the mistake 
👍: 0 ⏩: 1
she hasn't been online for over a year now ya know
👍: 0 ⏩: 1
Yeh I know, just trying to make some fun out of this

👍: 0 ⏩: 1
Oh great, thanks for pasting it here
Elandria is probably the most famous contemporany digital painter (also on dA: =Elandria ) who is well know also because most of her paintings are really paint-overs, though she stated they're not there are a lot of proofs that says the opposite... that's why I said that
👍: 0 ⏩: 0

I left you a comment on youtube. ^^
I like the drawing itself, but I just couldn't read that fast..
👍: 0 ⏩: 1
ok I wrote down the text:
text, for those who cannot read fast enough:
- smudged the skin using round brushes at 20% strength and hair with spackled brush at around 69% strength
-filled the background with a neutral grey colour
-made a new layer, set the layer blending mode to Soft Light and brushed some light blue over the skin and some reddish brown along the hairline and the hair at the back
-painted over the face and neck, removed dark circles and blemishes, and generally smoothed out the skin
-used the Liquify tool to nudge and slim down the face shape, jawline, raise cheekbones, enlarge the eyes and raised the eyebrows.Dodged in and painted over the irises.
-painted over the face and hair. Changed the head shape and used even more of the Liquify tool to slim down the torso area.
- made another layer, fill it with a neutral grey colour and set that layer to Overlay. Used layer mask to erase out the area on the skin and hair
- made another layer and set that layer's blending mode to Colour. Used a medium soft round brush in blue to tone down the orange. Set the layer opacity to about 60%
- made another layer and this time the blending mode is set to Normal. Painted over the shoulder and arms to smooth them out.
- painted in eyelashes, highlighted the nose, lips and face using round brushes set to Normal and Colour Dodge modes
- fill in the background, Done.
👍: 0 ⏩: 1
thanks.. it's not my first language so I have probs with reading

👍: 0 ⏩: 0

<= Prev |