HOME | DD
 Kevin-Allen — Little Oak Character Design Process
Published: 2013-04-12 01:05:49 +0000 UTC; Views: 1913; Favourites: 33; Downloads: 23
Redirect to original
Description
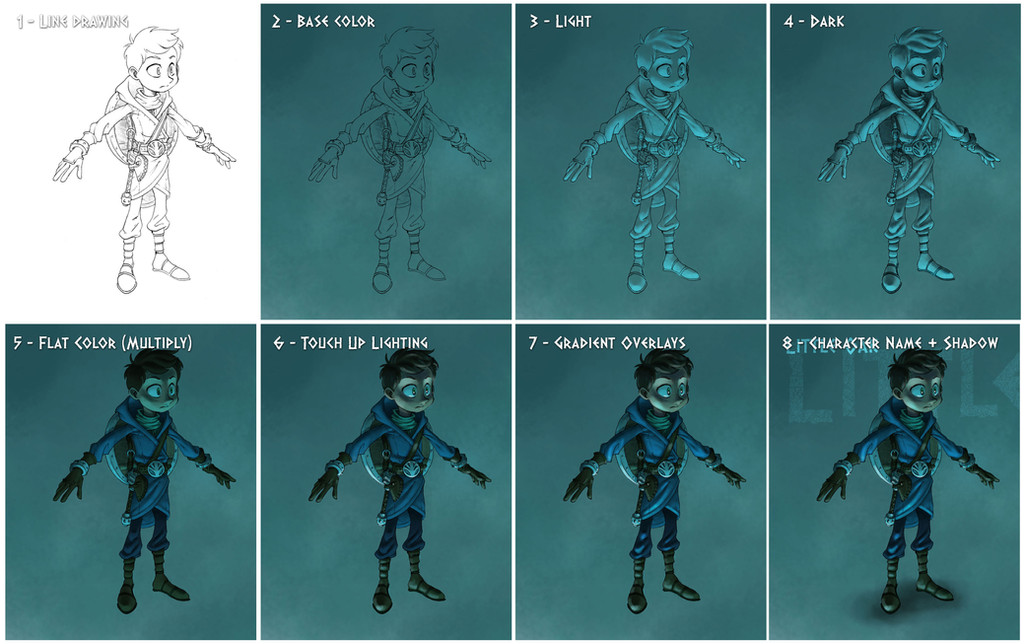
1 - Draw your character. Take a decent amount of time on this. A strong drawing equals a strong foundation to build upon.2 - Make your base color and background and use multiply as your layer style so that your line drawing appears through it. I use a spongy textured brush for this part with a bit of transfer active to really capture varying pressure and variety. You can also declare the light source here by choosing to go brighter from one area and darker to another.
3 - Add your lighting. I grab the background color with the eyedropper tool, then brighten that color near the top of the value scale. Use overlay under your layer blending drop down so that your line drawing isn't lost.
4 - Add your shadows. Repeat step 3 only use the darker value of your background color and oppose the lighting.
5 - Apply flat color. Blend your layer to multiply and paint on flat colors. Be sure your are using a brush with 0% transfer active so that the color spreads evenly. Your values beneath should translate if you have your layer blended with multiply. Don't worry if it seems a little dark.
6 - Touch Up and Shimmer - Create a new layer. With a charcoal brush, transfer active, and opacity down just a bit, lightly apply all of your shiny spots (metals, rim lighting, hair, edges, etc.) You can also use the eyedropper tool and use local colors to touch up any areas that are still sticking out at you.
7 - Gradient overlays. Using the drawing lasso tool, select areas where intense lighting would be on your character. To draw multiple, complete your first lasso, hold shift, then draw your next. Don't release shift until you've completed all of your lasso selections. Now, go into select at the top of Photoshop, in the drop down click on refine edges, then turn the feather up 1/3 of the way to soften the selected edges. Now select your gradient drag tool and specify your gradient to go from a bright color to clear. Drag from the bottom to the top. This should only light up your selected areas.
8 - Name + Shadow. You're there! Name your character and make sure it looks like he/she is standing on something. Add a shadow beneath them. And that's it!
Done in Photoshop CS6 in about 4 hours.
Related content


Comments: 9

Thanks to your Secret technique. .... Now I shall rule the WORLDDD!!! BWAHAHAHAHHAHHAHA!!
SORRY. But Punch me. This was Amazing.  (Smile)")
👍: 0 ⏩: 1

Awesome! I'm happy to hear that it has helped out someone ")
👍: 0 ⏩: 1
I see. thx.
👍: 0 ⏩: 1

So is this really the final character design?
👍: 0 ⏩: 1
Totally is. It finally feels right. Now I just have to design all the others based on his frame
👍: 0 ⏩: 0
