HOME | DD
 kitty-pet — Umbreon Plushie Pattern

Published: 2010-11-08 23:37:12 +0000 UTC; Views: 14495; Favourites: 95; Downloads: 1630
Redirect to original
Description
**there are supposed to be two of piece n**oh my gosh guys... 1,500 views? xD I really wasn't expecting this to be my most popular deviation. Thank you everyone <3
note: If you want a life-sized plushie, you have to blow up the pattern.
As soon as I can, I'll have a photo-tutorial up, but this is how you do it~
Things you'll need:
The pattern (download and print it out)
White or light-colored tissue paper (to blow up the pattern; if you can do this on your computer, you don't need any.)
Scissors (for cutting fabric, so make sure they are sharp)
Sewing machine (you may hand-sew if you'd like)
Stuffing (or lots of cotton balls!)
Black fleece or other fabric (the main body)
Yellow felt or fabric (the rings) [Blue if shiny]
Red felt or other fabric (the eyes) [Yellow if shiny]
Black felt or other thin fabric (pupil)
White felt or other thin fabric (eye highlight)
*it's important that the eye details are very thin. While it isn't required, it's highly recommended that felt is used for all the details (the yellow rings can be virtually any fabric though)
** if you'd like to paint on the details (glow-in-the-dark paint is fabulous for this, though regular fabric paint works best) you don't need any felt.
I. The pattern
If you'd prefer to make the pattern traditionally, skip down to the next step.
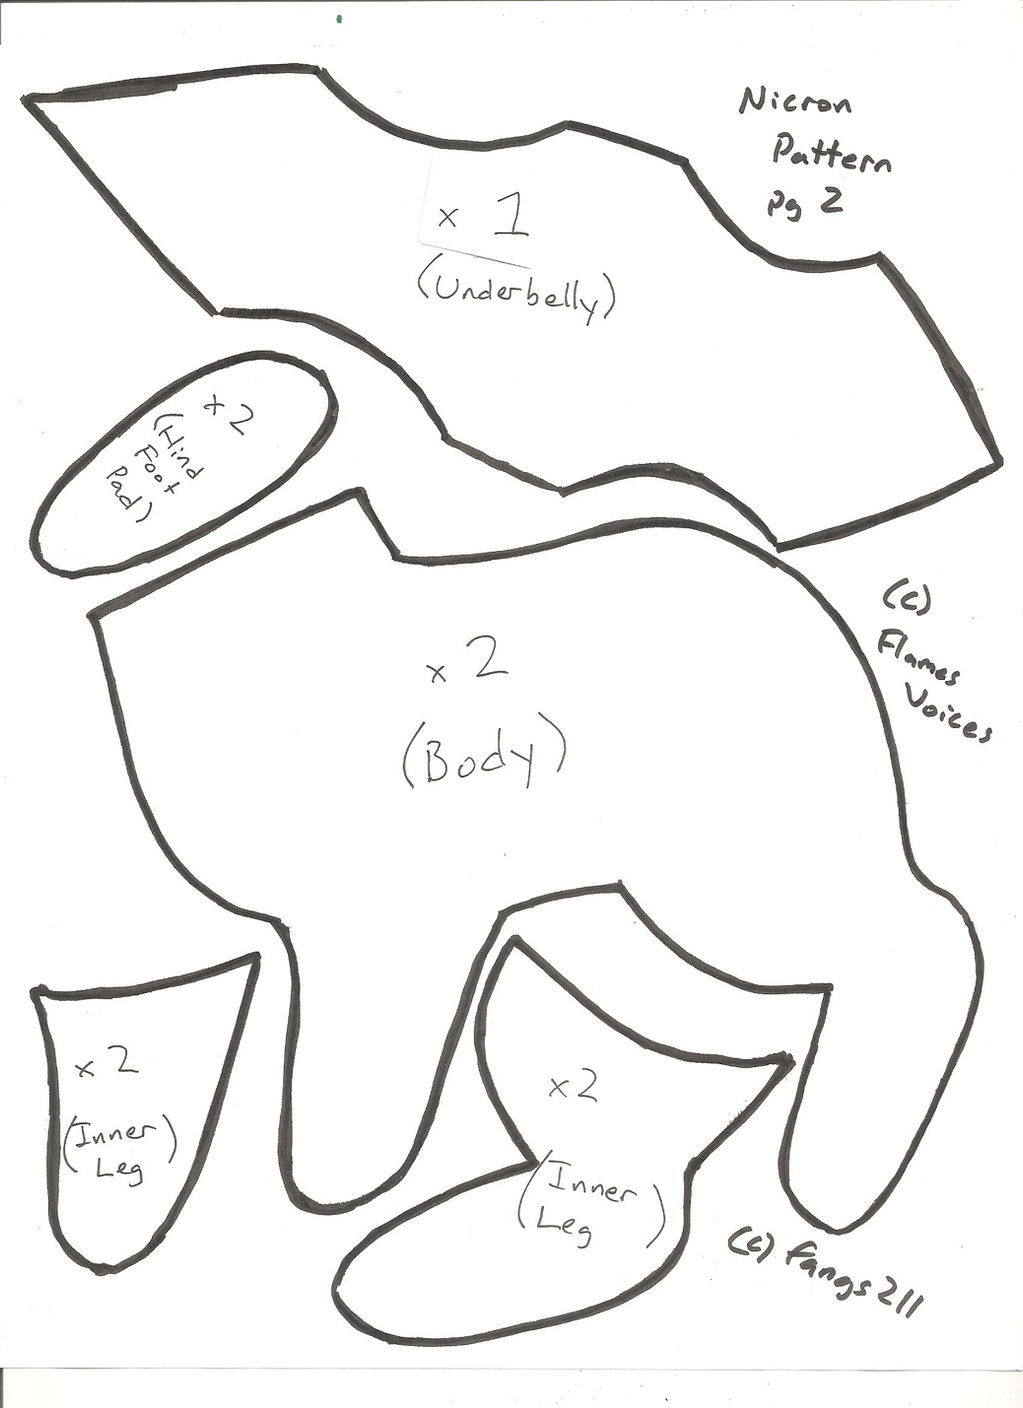
 First, print out the provided pattern. Using Photoshop or another graphics editing program, resize the image using inches. Now Umbreon is approximately 3 feet tall, 2 feet without the ears; this pattern is 2 inches tall and the main body (without ears) is about 1 inch tall. So you need to make it 24 times as big (woah!). Yes, make it 48 inches tall. You should now be able to print it and have it be tiled on separate pieces of paper; if this doesn't work, have fun cropping and printing out many different pieces.
If you did the above, skip this step. This is for tracing the pattern on tissue paper.
Print out the pattern, you can "tile large pages" and have it print out larger on four sheets if it makes it easier for you. Now you want to cut out the pattern from the paper and pin/tape it to the tissue paper. With a pencil, you want to draw each piece larger on the tissue paper. Nothing really has to be exact... If you'd prefer to freehand the pattern without printing it, that works as well. Now using chalk or white pencil, trace your pattern on to the fabric and cut out all the pieces. Since you have to do two of almost every piece, you can fold it in half and cut both at the same time. If you have a specific side you want facing out for the body, make sure that the right sides are facing each other, and start pinning together pieces c, d, e and f. E and f are the bottoms of the feet, d is the main body, and c in the inside part of the legs and belly (to make it 3D). Sew them together, then do the same again for the other side. Now, with the wrong side still out, sew all of that together only on the bottom. Put that aside. Sew two of piece b together (and repeat for the remaining two) but leave the bottom open. Turn the pieces right side out so you have two sort of "sleeve" pieces. Do the same thing for the two a pieces. Stuff the ears and tail, and sew the bottom closed (it should just be a straight line). Okay so take the body piece and it should be like a shell right now, right? With no top? Sew the ear pieces where you want them making sure the bottom of the ear is sticking out on the outside so that when you turn it right side out again, you won't see the ugly part. Sew piece g from the chin to the butt, along the back and head, connecting the two sides together. Leave a gap in the butt and where the ears are then turn it all right side out and push the ears through the holes. Sew the ear holes closed the rest of the way. Stuff the whole thing and use a pencil or stick to push the stuffing in to the legs; and stuff generously, because if you don't, it will look deflated and won't stand up. If you pack it supertight it won't be as squishy and cuddly but will stand up by itself. Using a needle and black thread, handsew the tail in to place and sew up the butt. And your body is finished! Paint or appliqué the eyes and yellow rings on. Voila! Your Umbroen is finished!If you make it, I'd love to see any pictures!
 Also, please link to the pattern.
Have fun with it dearies~
Related content


Comments: 18

Going to use this pattern to try to make an albino Umbreon! (I only have white, pink, red, and black on me at the moment... haha!)
👍: 0 ⏩: 0


My Umbreon turned out EPIC! It even as a collar with ID tag in case it gets lost! THANK YOU SOOOOOOOOOOOOOOOOOOOOOOOOOOOOOOOOOOOOOOOOOOOO MUCH FOR PATTERN!!!!!!!!!!!
👍: 0 ⏩: 1

I'm glad you could make use of it! (:
👍: 0 ⏩: 1
I take it almost everywhere I go. Its very comfy so I take it mostly on planes
👍: 0 ⏩: 0

Thanx for letting people use this pattern! My Umbreon turned out great!
👍: 0 ⏩: 1
No, thank you for using it (:
👍: 0 ⏩: 0

Making this once I get some yellow fabric and stuffing. XD
Thank you for making this, I've always wanted a Umbreon plushie.~
👍: 0 ⏩: 1
nice, i can't wait to see (:
👍: 0 ⏩: 0

When I get some fabric, I am so making this ^^
👍: 0 ⏩: 0

....Dude, you don't know how long I've been looking for like, a free dog pattern and trying to see if I could alter it for Umbreon... I guess I should have searched for an Umbreon pattern first, huh? orz Anyway... I will definitely be trying this as soon as I can get some fabric. Thank you so much for posting this. <3
👍: 0 ⏩: 1
")
Hmm.... I'm a bit confused. Where do pieces m, n, and g go? I'm thinking that g goes on the bottom, in-between the two c pieces? ...I have no clue where m and n are supposed to go. xD
👍: 0 ⏩: 1
g goes between the c pieces, yes. there's actually supposed to be two n pieces (my mistake) and they are the golden rings for the ears, m is the ring for the tail.
👍: 0 ⏩: 1
Ahhh, that's kind of what I thought m and n were for, but I was confused because it only said one. xD Thank you for clearing that up. c:
👍: 0 ⏩: 1

With this pattern woulden't it be more of an umbrion pillow then a plushy?
👍: 0 ⏩: 1
No, if it was a pillow it wouldn't have pieces c, e, f or g. They are there to make it three dimensional.
👍: 0 ⏩: 0