HOME | DD
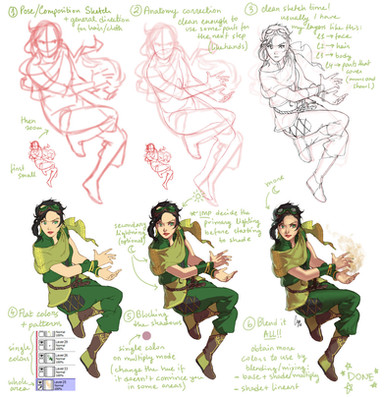
 LPDisney — Drawing and Coloring Tutorial

#blood #character #color #commission #commissionedart #digitalart #digitalpainting #fighter #girl #howto #howtocolor #illustration #originalcharacter #painting #photoshop #sketch #sword #tutorial #woman #effects #howtodraw #learning #learntodraw #photoshopcoloring #stepbystep #tutorialphotoshop #stepbysteptutorial #tutorialdrawing #tutorialhowto #stepbystepart
Published: 2011-02-23 21:20:51 +0000 UTC; Views: 21879; Favourites: 411; Downloads: 1174
Redirect to original
Description
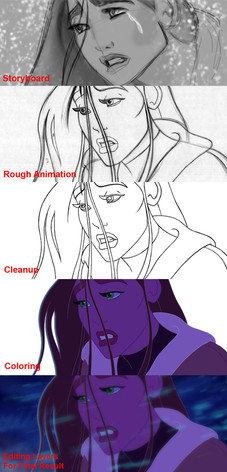
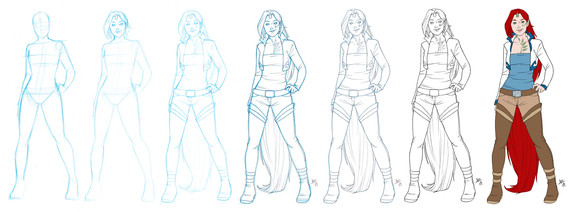
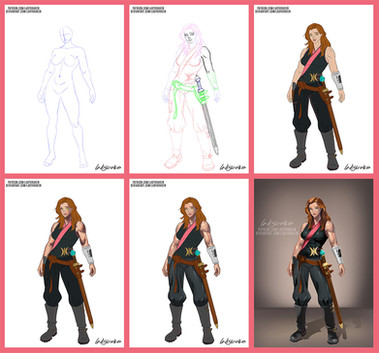
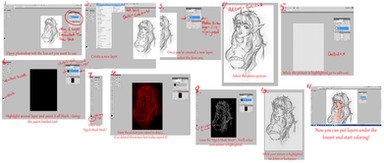
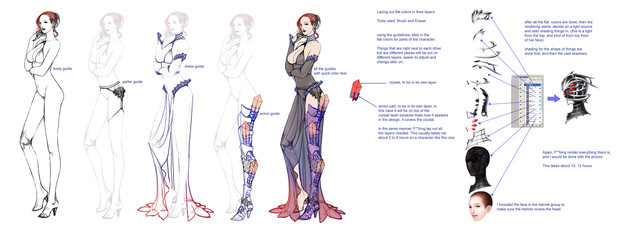
++ DOWNLOAD image for better view ++*EDIT* Please see Panel 4 about Cleanup. A couple of weeks ago, while working on a commission, I noticed that I forgot to mention that I duplicate the "Lines" layer to make the lines a bit thicker. Yes, this can work without duplicating, but I found that the illustration looks a bit better this way. Sorry it took me a while to fix this in the tutorial, life has been crazy... @_@
--------------------
Yes... And that's why it takes me quite a while to create my art (and why I don't like coloring cause it's so much work...).
So.... I hope that answers most of your questions on how I work and such.
Please note that this is my latest work up to when I posted this tutorial, so this should reflect how I currently work. But I always find new tricks and improve my technique and style. What I'm trying to say is - EXPERIMENT! As Dee-Dee used to say "Oooo... What this button do?" always try to find new cool tricks to create effects and bring your artwork to the next level!
Also note that, although the general process is the same, the fine details do change from drawing to drawing. I sometimes use several Adjustment Layers, different brushes for effects, my lovely "Sun Flare", different Layer styles and on rare occasions even import it into After Effects for extra processing, etc.
But as I mentioned before - this IS the general way I work on my art, so feel free to take some ideas from this tutorial.
--------------------
Special Thanks to for allowing me to use her commissioned OC Marron as a Tutorial sample.
Marle, you're the best!
FINAL ARTWORK: www.deviantart.com/lpdisney/ar…
Thank you for watching.
Your humble servant,
Liron.
-------
Photoshop
VISIT HERE to Follow My Work
Related content
Comments: 25

Hiring Liron as an artist is one of the best investments you can do! She's professional, keeps you updated step-by-step, and delivers an amazing product. I will be hiring her again soon
Much love, Liron! Use my commissions any time for what you need
👍: 0 ⏩: 1

Thank you very very very much!!!
👍: 0 ⏩: 1

does it ruin your eyesight if you colour your drawing in the cpu every time? x-x
👍: 0 ⏩: 0

This was a very informative tutorial. It made sense in a way that many other tutorials have not.
👍: 0 ⏩: 0

You forgot the part where the commissioner bitches you out because you didn't draw the character in the proper style.
👍: 0 ⏩: 1

This is going to help me A LOT!!! I am not very good with photoshop yet (*that might have something to do with the fact that I do not own a tablet yet and that I do everything with the mouse, but I'm saving up for one). This is my photoshop Bible until I understand it for myself. ThANK YOU!!
👍: 0 ⏩: 0

very nice and clear tutorial, Makes me feel like I got to do some artsies just for the fun of it ^.^
I work in a quite similar way and couldn't have explained it better <3
👍: 0 ⏩: 0

i love this tutorial X3 i'm still not very good at digital art in general, but this really helps 
👍: 0 ⏩: 1

You're welcome and good luck.
👍: 0 ⏩: 0

Just wanted to say: thank you for the tip on the Paint Bucket Tool! Saves me SO much time now to lay down my base colors.
👍: 0 ⏩: 1

Ya, I noticed that a lot of professional artist still just paint under and the go over with the eraser, when it's so much work.
You're welcome
👍: 0 ⏩: 0

Very well done- To use the blurr effect for the shadow layer to smooth the shadow...I didn't had that idea yet! I have to try that!!!!
👍: 0 ⏩: 0

